What's new
Photoshop Gurus Forum

Welcome to Photoshop Gurus forum. Register a free account today to become a member! It's completely free. Once signed in, you'll enjoy an ad-free experience and be able to participate on this site by adding your own topics and posts, as well as connect with other members through your own private inbox!

Converting images to outlines


Metalhead5

Member
Messages
5
Likes
0
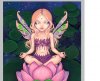
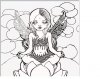
Hi, I have some very basic photoshop experience. I have been trying to convert some scanned images of paintings into colouring pages. I wanted thick, well defined outline and the rest blank. I have managed to do this using a very long winded method that requires me to go back over all the outlines and use a white paint brush to get rid of varies shades of light grey where the image was coloured. Does anyone know of a way to achieve this effect more easily? I hope that all makes sense, if not please let me know.

many thanks in advance


James
 
Hi James and welcome to PSG.

It would really help if you could post one of the scanned images for us to use when helping you out.
 
Hi Sam

Thank you for the welcome, I hope to learn a lot. I was wrong I have CS5.1, I have posted two pics,one of the type of image I am working with and the other one is one I have manually done, took hours, you can see the differences between the wings which have not finished. I appreciate any help
 

Attachments

  • lotus.jpg
    lotus.jpg
    173.9 KB · Views: 4
Sorry James, got busy there for a while.

Thanks for the image, this will help other members in knowing what it is your needing so they can offer their advice. I don't have much to offer at the moment but I'm hoping someone will come along who can help. Good luck!
 
Perhaps your best bet would be to use the pen tool and follow the outlines you want. That is a bit painstaking, but if you're good with the pen, it will give the most accurate results. However, I don't know if it would be any less time consuming than the process you have already used.

I came up with this, not using the pen tool. Selection of the leaves, desaturations, etc., but it would take some manual erasing if you want just B&W. If this comes anywhere near what you want, let me know and I'll explain the steps I used. This is the fastest way to get to this point after which you would need to do further selections. So you may want to stay with the method you have already used.

coloring.jpg
 
Hi Clare

thank you for your reply, it does get it to a very similar stage as what I gave but does look a bit crisper. It's the mid tones that are the problem I think, using language I am not totally comfortable with, do you mind sharing how you did this so I can compare to my methods? Thank you so much James
 
Hi Metal, if you are OK waiting till tomorrow, I will open PS again and see if I can replicate it. LOL, I trashed the psd.

Basically I used levels to brighten and darken the image. Then I selected the lotus leaves and copied them onto a new layer. I used levels on this and brightened it yet again. Then I desaturated it (and the base layer), used select>color range to remove a certain number of mid tones, then used a levels adjustment again to darken the blacks and brighten the highlights.

I'm pretty sure that's how I went about it.

If you want more areas of white space, I would go in and either use the pen tool to outline them, delete them, and use the path for the outline. For some areas, I would use another selection tool to mask or delete those areas of grey.

That's about all I can think of at this time, especially without PS open.
 
Last edited:

Back
Top