What's new
Photoshop Gurus Forum

Welcome to Photoshop Gurus forum. Register a free account today to become a member! It's completely free. Once signed in, you'll enjoy an ad-free experience and be able to participate on this site by adding your own topics and posts, as well as connect with other members through your own private inbox!

Been studying technique and color..testing progress.


ALB68

Dear Departed Guru and PSG Staff Member
Messages
3,020
Likes
1,332
Here is a photo I downloaded from Morquefile. It was not a good photo in my opinion and was quite noisy. Who ever shot it must have used a high ISO. Anyway, I have decided to submit this to the graphic police and check my progress. This was originally opened in ACR, and I normally set the White Balance there. I did not make further adjustments in ACR as this was a PS exercise. I did use the Topaz DeNoise filter to remove the noise. I used a technique I found to remove the redness around her nose etc by using the Brush tool. I chose a color from her face, set my brush to Color blend mode, 30% opacity, and 50% flow. Then painted the areas I wanted to tone down from the sunburn on nose etc. Let me know what you think (Tom). :)
After:
 

Attachments

  • File 0005 Repaired.png
    File 0005 Repaired.png
    3 MB · Views: 3
  • file00050580446.jpg
    file00050580446.jpg
    338.3 KB · Views: 5
Last edited:
I think there is always room for improvement, subjectivity always a factor when trying to critique. All I'll say is you're doing a fine job keep it up it looks good
 
Heya! :D

For sure the photo is a bit gnarly and grainy lol! and you're doing a nice job of using the paint tool to blend colors from the skin in! It's really taking on a painted feeling.. like acrylics, which is awesome! So the idea of using pigments from the skin is right on!

There are a couple of different ways you can go about this, depending on what your goal is, you can keep her as she currently is with that more painted affect rather than photorealistic and run with that (which would be super fun!) or if your goal is to keep her as photorealistic as possible, then that's another option (fun and challenging! yay!)

If you are going to go with the painted feel, all you need to do with what you currently have is either enhance it one way or another. In other words, if you want to go warmer, go warm, if you want to stay in your cool blue skin hues, then go all out and go dramatic blue!
For a warmer skin tone to bring it back to the same colors it was originally shot in, all you have to use is the adjustment tool called "photo filter" View attachment 30755 located over in the right hand corner above your layers! You can probably use the "warming filter 85" at a density level of 30 or 35 and it'll bring your colors right back up. She should look something like this:
View attachment 30757
if you want to soften her features too, you can just add an exposure adjustment (also located in right corner) Screen shot 2013-04-05 at 5.07.57 PM.png and play with it to see if you want to lessen her shadows a bit by lowering the gamma correction and VERY slightly raising the Offset. and she'd look something like this:
Screen shot 2013-04-05 at 5.09.40 PM.png
 
if you wanted to do a cooler feeling photo, you can apply the same "warm filter (85)" with a density of 35 and add on top of that a "Color Balance" adjustment Screen shot 2013-04-05 at 4.34.58 PM.png (also located in the right corner above your layers bar) and play with the settings to tone down the reds. This is just an example of what settings i used ^_^
Screen shot 2013-04-05 at 5.01.30 PM.png
and she should come out looking something like this:
Screen shot 2013-04-05 at 5.16.27 PM.png
personally, i think she's a little too dark, so you can then add an exposure adjustment and again, play with the settings to maybe lighten all those shadows a bit, this is what i used for mine (just a suggestion):
Screen shot 2013-04-05 at 5.17.40 PM.png
and she should come out looking something like this:
Screen shot 2013-04-05 at 5.18.38 PM.png
 
Very nice CK58. That's very helpful advice. I'll try it out in the future.
 
OKIES!!! now... if you're going for more photorealistic, your ultimate goal should be to make the photo look as little worked on as possible. Meaning, you need those pesky skin textures lol! Two AWESOME tools that are immediate go-to faves of mine for skin touchups are these bad boys right here:
the spot healing brush tool Screen shot 2013-04-05 at 5.24.05 PM.png
and the clone stamp tool Screen shot 2013-04-05 at 5.23.56 PM.png

These tools make life oh so much easier. oh so much. BUT FIRST (i digress), lets go through this step by step :D
BTW, i hope i don't sound rude or intrusive... i'm just offering my opinion, by no means do you have to do it this way, it's just another option you can consider and play with :)
anyways...

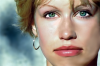
when first putting the photo into photoshop, this little screen came up:

Screen shot 2013-04-05 at 5.29.07 PM.png

ultimately, we are trying to cool her face down since it indeed has suffered some sun trauma, lower the clarity since the quality of the piece is a bit rough anyways, and slightly adjust some of the contrasts and highlights. The skin more than likely will not be completely fixed at this point, but we can at least get it to a manageable state lol! this is what i adjusted:

Screen shot 2013-04-05 at 4.47.08 PM.png

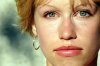
which you can see, already helps her quite a good deal lol (yay!)

Screen shot 2013-04-05 at 5.34.37 PM.png

but as you can see, she's quite pale now, but that's ok because we can always add or enhance color later ^_^

okies, now that you've got the skin in a better place, we can start removing blemishes with the "spot healing brush tool" any blotches you see that are red, or any random skin mark (like the one on her lip) can be removed with this tool. so fabulous! make (2) duplicates of that layer. With the duplicate on the top, take your dodge tool and slightly go over the red areas on the face (including the nose) and you can see the red becoming less and less. Don't do too much otherwise the nose will appear flat.

Screen shot 2013-04-05 at 5.42.01 PM.png

it is really subtle, but that's all you're going for.
Next we are going to add a Color Balance adjustment layer and bring some yellow back into the skin (to give it that under glow) this is the setting i used mine at, but you can adjust it however you'd like:

Screen shot 2013-04-05 at 5.46.02 PM.png

and she should look something like this:

Screen shot 2013-04-05 at 5.46.43 PM.png

now, take that other duplicate you made and bring it above the Color Balance Adjustment layer. This layer you are going to use your clone stamp tool and take areas from around the skin and even out the red on the nose by cloning the skin that looks healthy and placing it on top of the red areas of the nose. keep in mind you can use shadow areas of the face to help with the shadow areas on the nose.
Once you are satisfied with how it looks, you can then go up to the "Filter" menu at the top and scroll down to the "Blur" area, and click on "Surface Blur". The radius should be set around 5 and the Threshold should be set around 15. What this does is help even out the skin, and at first it looks too dramatic, but on this layer we are going to set the opacity to around 43%. This should help even out the skin as well as introduce back some cooler tones so the yellow we added isn't so like.. BAM! in your face lol! It'll also add back the natural shadows her face had before we used the dodged tool, but in a much more subtle way. She should look something like this:

Screen shot 2013-04-05 at 5.52.49 PM.png

okies, NOW we are going to make her eyes pop a little more :D Duplicate the layer you just brought above the Color Balance Adjustment layer, and set this layers blending mode to "Color Dodge" with an opacity of 15%. Then add a "Layer Mask" to it (located on the bottom right side, it looks like this: Screen shot 2013-04-05 at 5.54.45 PM.png) you'll see a white box appear to the right of your image on your layers Screen shot 2013-04-05 at 5.56.54 PM.png make sure that the white box is highlighted with the white border and not your image. Click and hold "Command" & "I" together. The Layer Mask should turn black. Go to your brush tool, and select a brush that is round and has a hard edge to it, and keep the opacity of it at 100 and go over ONLY the eyes.

Duplicate this layer and set the blending mode of this one to "Multiply" with an opacity of 15%.

okies, so now we can look at her and see she's a little too cold looking, so we're going to add some orange back into her face with the adjustment layer "Photo Filter" using the "Warming Filter (85)" with a density of 36% or around that area, and we'll have some nice color come back into her face! She should look something like this:

Screen shot 2013-04-05 at 6.17.35 PM.png

if you want to play with her shadows you can, i made her shadows a little deeper by adding an "Exposure" adjustment layer and raised her gamma correction to about .96, nothing crazy, just adds a little more umph lol

anyways!!! sorry, that was probably too long of an explanation, but there ya have it lol! either way you go, you have a good starting point going for you so, keep up the good work yo! :D

Hope this helps!
 
Thanks iDad. Workin at it.
I think there is always room for improvement, subjectivity always a factor when trying to critique. All I'll say is you're doing a fine job keep it up it looks good
 
oh, so here's the before and after just so you can see ^_^ (sorry, i should have posted on my last reply thing...)

Screen shot 2013-04-05 at 6.29.30 PM.png
 
Yes CK58. I used all of the tools you mentioned at some point except I as said, did most of it in PS. I use ACR a lot and it is quite amazing how that Clairity tool can smooth skin. I am not too new to Photoshop tools but I found when I came to this forum in December that I didn't know much compared to lot's of people here. I am still very amateurish when it comes to color correction and worse at determining what is good and what is bad. I have been accused of having a poor monitor, lack of calibration and poor eyesight, all of which are not true..LOL. I don't know of an easy way to judge what is wrong with an image other than experience (which I am lacking on color). So, thank you for your involved and well explained post. I am sure it is helpful to me and to others.
Thanks again
 
oh yeah, you did mention that you weren't using ACR huh? lol! sorry :redface:

And fair enough, i never like to assume what people do or do not know lol! it's a "just in case" thing lol!
 
OK OK!! I totally got it for you bro!!! and it's WAY easier than what i did before!!! you don't even have to change the colors!!! :D :D and it looks SO much better than the first way i tried!!! i love this! learning through experience hahaha! ok, check this out:

original:

Screen shot 2013-04-05 at 5.34.37 PM.png

Blemishes, BE GONE! (right right? with the spot healing brush tool thing)

Screen shot 2013-04-05 at 7.31.32 PM.png

then using the skin in the green circles to fix the nose skin with that cloning tool and the skin around the lips (orange circle) to fix the random redness around the lips

Screen shot 2013-04-05 at 7.35.49 PM.png

it should fix those areas so it looks like this:

Screen shot 2013-04-05 at 7.37.44 PM.png

ok, so this was the part that was driving me mad! getting the skin softer!! but that filter in blur "surface blur" actually does the trick! just put it on 15 and 25 and then lower that layers opacity to 59% and then put a mask on it and erase a good portion of the parts covering the hair and then just slightly over the rest of the skin like, ... just so you can start seeing some pores here and there, and actually (don't laugh) but if you erase a bit more around the lips, it actually looks more natural. i know. i don't understand it either hahaha!

and then put an adjustment layer "exposure" over it and just bring the Offset up to .0042+ and the gamma correction down to 1.17 and she'll turn out looking like this!

Screen shot 2013-04-05 at 7.44.33 PM.png

DUDE! this is awesome!! you don't even need to color correct!! :D :D :D take THAT acr!!! hahahaha!
wow... i totally just geeked out. :redface:
 
I would do some of the same things Crzy did in her final version, but:

  • As the very 1st step, I would reduce the harshness of the image using the clarity slider, but compensate with a bit of sharpening.
  • Do more spotting of individual blemishes (tedious, but if you want realism, you just can't use a shotgun approach)
  • Do much less overall smoothing of the skin to leave more of the pore structure & less of a plastic look,
  • Reduce the sunburn using the technique I mention below,
  • To look more realistic, I would never attempt to reduce the sunburn all the way to zero,
  • Perform more noise reduction on the background and deep shadow areas
  • Correct the shiny areas (typically with either the patch or spot healing tool),
  • Do a bit of burning and local color saturation of the cheeks to better define them.
  • Correct the remaining cyan-yellow cross processed / curve crossing look (using levels)
  • Do final overall tweaks of saturation, warmth, gamma, etc. (vibrance/sat and curves adj layers)
  • etc.

Note: The technique I used on this image and almost always use to reduce the visual impact of sunburn, rosacea, blemishes, etc. with minimal reduction of skin texture is an old plugin, "Color Mechanic" ( http://dl-c.com/content/view/16/30/ ). I remember writing extensively about this technique, but, unfortunately, at the moment, I can't find the exact post that I'm looking for. The closest I could find is this one that describes more general use of Color Mechanic, not specifically for the above skin problems. Scroll down to my posts in that thread. Basically, you draw little arrows on a color chart to adjust the hue and saturation of the problem areas to match the hue and sat of good nearby skin.


Tom Mfile00050580446-tjm01-acr-ps02a-03b_650px_wide-for_web.jpg
 
Last edited:
PS - I forgot to mention that I really disliked the sickly background in the original, so I moved it a bit towards the blue.

Also, I added a bit more saturation to her lips, but, in retrospect, I don't think I should have done this -- just corrected the little line of discoloration above her upper lip and let it stand at that.

T
 
Thank you Tom and CK58 for your submissions. Here is another one of the same subject. This time I tried to retain more of a natural look. I did use Portrait Professional as a starter. I finished with Photoshop for fine tuning. This is a pleasing result to me, but as iDad said, this is all subjective and I suppose it depends on taste. In this one I actually added back a little noise to give the skin back some texture in lieu of having the wax museum look.
 

Attachments

  • File 0005 with PP and PS.jpg
    File 0005 with PP and PS.jpg
    437.6 KB · Views: 2
It looks like you may have overlapped the texture on skin area into the background and behind the earing the selection process could be a little finer than that, but I see where you are going though.
 
Your right. I did it with a mask and missed excluding that part, but you have to admit, the price is right..LOL.
It looks like you may have overlapped the texture on skin area into the background and behind the earing the selection process could be a little finer than that, but I see where you are going though.
 
Hi ALB - IMHO, the skin colors in your very 1st post in this thread were much better than in your most recent posting, but the reverse is true of the texture and detail. Maybe you can combine them?

Tom
 
Tom,
I think your right. I seem to lose the look from the computer to the browser. Let me see if I can take the first one and then add back that bit of noise and see what we get.
Hi ALB - IMHO, the skin colors in your very 1st post in this thread were much better than in your most recent posting, but the reverse is true of the texture and detail. Maybe you can combine them?

Tom
 
Here is what I came up with with Tom's suggestion.
File 0005 Repaired-textured.png
 

Back
Top