Hi Jocelyn -
WRT the "glossy" look from your previous thread, to be honest, I couldn't figure out what you meant and I got busy and figured we would probably revisit that discussion if it still was of interest to you.
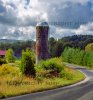
WRT this image, the main problem with this image, as well as lots of other landscape pix, particularly those taken when the sun is high above the horizon, is too much contrast. Believe it or not, the exposure of your original image was very reasonable for the situation. If you attempted to brighten up the image by adjusting the camera, you would have irreversibly blown out the highlights in the clouds. So, we are stuck having to deal with a somewhat dim image in software.
The last thing you want to do with such an image is simply apply an overall brightening to it. That will be little different from brightening it in the camera. Instead, one has to selectively brighten the dark areas without blowing out the highlights.
Another aspect to be very careful about is keeping the contrast under control as you are adjusting the tonal values (ie, brightness) in the image. It's very easy for the contrast to increase dramatically as you make other adjustments. Another thing to watch for is unwanted changes in color saturation when you are adjusting the tonal values (as pointed out earlier in this thread with respect to the greens). All of these phenomena are present in your tweaked versions of this image: The blacks are too black, the bright area of the sky is blown out, and the colors have become too saturated.
A good way to make global changes to an image is to initially process it with Adobe ACR. This part of Adobe Photoshop is usually used to process raw images, but it works almost as well on JPGs such as yours. ACR provides a nice array of tools to deal with all of the above problems. It provides many fewer adjustments than the main part of Photoshop, but 99% of what you see in the attached image was done in ACR and nothing else. The only minor task I didn't use ACR on was the final sharpening step after I down-rez'ed your image to under 700px on a side for high quality in-line display in this forum.
Here are some introductory descriptions of using ACR, but there are many, many more complete tutorials available:
http://www.lonestardigital.com/adobe_camera_raw.htm
http://graphicssoft.about.com/od/pselements/qt/open-jpeg-as-camera-raw.htm
http://blogs.adobe.com/pselements/open-jpeg-files-in-adobe-camera-raw-in-photoshop-elements/
ACR has one VERY nice feature: I can put a summary of all of the adjustments I made in a file and you can then see exactly what I did and experiment with each of the adjustments that I used. That XMP file is attached to this message. Unfortunately, I don't know which version of PS you are using, so if you are using a very old version, it might not be compatible with my xmp file. Here's how you load my xmp into your system:
http://help.adobe.com/en_US/creativ...C.html#WSA743BAAF-3A14-4ecf-8F7E-E2F8CF7CF3DF
Obviously, one has to unzip it to extract the xmp file for use.
Let me know if you have any problems.
Cheers,
Tom M
PS - I know this is a real long shot, but your scene looks just like a a spot in West Virginia that I'm familiar with: the road to Lost River State Park (coming in from the east). I'm probably off by thousands of miles, so may I ask where it was taken?


")