What's new
Photoshop Gurus Forum

Welcome to Photoshop Gurus forum. Register a free account today to become a member! It's completely free. Once signed in, you'll enjoy an ad-free experience and be able to participate on this site by adding your own topics and posts, as well as connect with other members through your own private inbox!

PET Photo - Understand light


rogerpb800

New Member
Messages
4
Likes
2
Hi! I wonder if anyone can help me to understand how much of Photoshop work the pic2 has (if any!). I got it from internet - Zoo Studio Australia (one nice photographer that are using the same kind of light among others).

I admire the kind of light that those pet photographers have been using recently and I´d like to understand the whole process of creation (I connot even define if it has more contrast, sharpness etc...than the pic1)

I am sending the pic1 that I took. I am not sure if I have to adjust my lights in order to reach the kind of work in pic2 or if I have to put my efforts in Photoshop (both?!)

Many thanks for the Gurus!!!! :)
Roger

PS.: fell free to improve my picture and send it here ;-)
PPS.: Pic1 is a RAW file saved in JPG without any adjustment.
 

Attachments

  • Pic1.jpg
    Pic1.jpg
    18.8 KB · Views: 48
  • Pic2.jpg
    Pic2.jpg
    71.6 KB · Views: 55

Tom Mann

Guru
Messages
7,223
Likes
4,343
The crisp definition of the folds and exact shape of the head in Photo #2 is 99% due to good lighting, not Photoshop work. In fact, I would go so far as to say one would be wasting their time if they attempted to recreate lighting this good after the fact in PS.

The principles and techniques used to light an animal portrait well are exactly the same as to light a good, studio quality portrait of a person, and they are not particularly difficult. For example, look at the shape, size, and position of the catchlight in the eye of the dog. It's rectangular shaped and of moderate size. This tells you that the main light source was almost certainly a small-to-medium sized rectangular softbox positioned fairly closely, in the direction that the dog is looking, ie, 90 degrees to the direction the camera is pointed. Light from a softbox, especially, a gridded softbox, is moderately directional, but comes from an extended area, so it wraps nicely around the subject.

The large depth of field and overall sharpness of this image tells one that this was almost certainly lit with a strobe, not a continuous (aka, "hot") light, window light, or anything similar.

The reason your attempt falls short of the example image is because you were lighting your dog frontally, with the light source somewhat above the level of the camera, most likely with a small,fairly non-directional light source like an on-camera strobe. This caused the shadows made by every fold in his skin to be almost completely filled in (except under his chin), so his skin looks relatively flat and featureless.

There are quite a few good books and websites that describe good (human) portrait studio lighting. Later tonight, I'll try to find one for you.

HTH,

Tom M
 

ALB68

Dear Departed Guru and PSG Staff Member
Messages
3,020
Likes
1,332
However, your pooch can be improved some. Take a look at this attempt in ACR.
dog pic.JPG
 

egosbar

Guru
Messages
778
Likes
351
to me of course the lighting is very important but the stand out difference to me is the sharpness of the images, image two is tack sharp yours is not , if you dont get the eyes sharp the image loses impact

raw files do need sharpening if you did shoot in raw, but if you get the sharpness as best you can through good shooting techniques then the image has so much more of a chance to be something that makes you go wow
 

Tom Mann

Guru
Messages
7,223
Likes
4,343
Ego, Larry - Of course, you are both right in that sharpness is one of the several necessary conditions for a top-tier portrait. Lighting, color, adequate global and local contrast (without blowing highlights or having muddy shadow areas) are other factors. In fact, if I had to do something to improve the OP's first image, it would have been almost exactly what Larry did.

If memory serves, unfortunately, I don't think I have an example in my archives of the same subject with the exact same degree of sharpness, but one version with frontal lighting from a on-camera flash, while the other version has with 90 degree lighting from a gridded softbox. If I find such an example, I'll post it. If not, I'll try to take one in the next week or two.

If you have never seen such a comparison before, it's a real eye-opener to compare a photo that is sharp but without good lighting, to one which has good lighting but is soft, to one which possesses both attributes.

T
 

Sierraccr

Power User
Messages
432
Likes
275
I agree that the lighting is key - as always. There is also the issue that the dog itself is a fairly uniform, light color without a lot of topography on his face. This is quite unlike the bulldog, with all its wrinkles and folds.

In any event, I did a little editing just for practice, with a whole lot of dodging and burning and some curves adjustments. Feel free to use it and if you like it I'll tell you how I did it. :)


Pic1edit.jpg
 

Tom Mann

Guru
Messages
7,223
Likes
4,343
To follow up on my previous comments where I emphasized lighting, here's a quick demo I threw together tonight that demonstrates the difference between front and side lighting of the same subject with the sharpness the same in both cases. To verify that the sharpness/resolution is the same in both shots, look at the cat hair sticking off into space, in front of the background. It's equally sharp in both images.

For both shots, I obviously used the same camera. I mounted it on a tripod and never moved it. All settings (including focusing, f-stop, exposure time, etc.), and all post processing were exactly the same in both shots. Both images are in-camera JPGs so I didn't accidentally confound the issue with possible differences in RAW processing.

The only difference between the two is that I moved my light source (a strobe on manual with a small softbox attached) from just over the camera to a position to the left of the fabric, keeping the strobe-subject distance the same in both cases.

I didn't happen to have a wrinkled old bull dog available as a subject, so I draped a piece of wrinkled pile fabric over a piece of wood to stand in for the dog, LOL.

Upon seeing this, one's reaction might be, "Well, that's obvious -- side lighting results in more shadows", and that is *exactly* my point when comparing the two images posted by the OP. Compare the enhanced three dimensionality of my side-lit image (exactly like that of the side-lit dog) with the very flat look resulting from front lighting.

The most talented Photoshopper in the world could spend all the time they wanted attempting to reproduce such shadows in a front lit image. They will undoubtedly improve the image with their effort (as Sierra nicely did in her example), but it will never be as good as getting the lighting right in the 1st place.

In addition, from a sheer pragmatic / business POV, repositioning a light takes only seconds, whereas post processing to try to generate a similar look would likely take many tens of minutes, if not more.

T
 

Attachments

  • IMG_9828jpg-xnv_crop_698px_hi_for_web-front_lit.jpg
    IMG_9828jpg-xnv_crop_698px_hi_for_web-front_lit.jpg
    122.5 KB · Views: 34
  • IMG_9829-xnv_crop_598px_hi_for_web-side_lit.jpg
    IMG_9829-xnv_crop_598px_hi_for_web-side_lit.jpg
    106.3 KB · Views: 34

Tom Mann

Guru
Messages
7,223
Likes
4,343
Sierra - You are absolutely right that the face of Lab posted by the OP has less pronounced surface topography than the involutions of fur in bull dog example he posted, but even so, side lighting would have nicely brought out his features. To demonstrate this, I tried to find a side-lit profile shot of a white Lab, but couldn't. The closest I could come were these black labs, but the same principle holds:

http://cdn.c.photoshelter.com/img-get/I0000z0a5vNbKbCk/s/750/750/Black-Lab-Forrest.jpg
http://www.iwantcovers.com/wp-content/uploads/2012/06/Black-Lab.jpg

The nearly grazing incidence illumination in these nicely brought out the shapes of their heads and muzzles, much like in the OP's bull dog example image.

T
 

Sierraccr

Power User
Messages
432
Likes
275
No arguments from me, Tom! Now if you could just give me some insight into how to light a black cat so that (1) all the light isn't sucked into its fur and (2) the highlights aren't so blown out that the cat looks like it's been chrome plated and (3) the black mass actually looks like a cat.

Research continues....
 

rogerpb800

New Member
Messages
4
Likes
2
Guys, I am surprised that people are friendly in internet – finally some forum is helping me and people are understanding my doubts about light (art actually). I am saying that because the Labrador that I ´ve post is almost white and yes, it has no pronounced surfaces and difference of colors in its hair. So, to compose a light at least close to the black Labrador that Tom post is a big challenge for me. I´ll be trying to buy a puppet (black and white) and then I will work on my softboxes to try to cast shadows over black and white hair.

Again, many thanks!:thumbsup:
Roger
 

Tom Mann

Guru
Messages
7,223
Likes
4,343
Hi Roger -

I'm glad this thread has helped a bit.

A few more suggestions for you:

1) As you are starting to experiment with lights and modifiers (ie, softboxes, umbrellas, etc.), start incredibly simple. Specifically, start with nothing more than a small hot-shoe strobe, without any modifiers, 3 or 4 feet away from the animal (or puppet), in the right angle geometry that we've been discussing. Make sure the strobe is completely overpowering any ambient light in the room. Only after you have optimized the results from this configuration should you start adding things like softboxes, more light sources, etc.

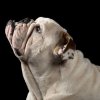
To demonstrate that such a simple lighting setup can produce decent results, take a look at the attached image. I took it using exactly the lighting setup I described above. As you can see, it nicely models the shape of the cat's face, and practically every hair is sharply defined. As such, there is nothing particularly noteworthy about it, except that I took it in 1971 on Kodachrome slide film using a completely manual Nikon F and 50mm/f2 pre-AI lens. The lighting was supplied by the very first electronic flash gun I ever owned -- no modifiers at all on it. If you can't reproduce this level of detail with a modern camera, you're doing something wrong, so don't move on to a more complicated setup until you master this configuration.

2) When you are first experimenting with such matters, if you are dealing with a white animal, use a very light background, and let enough light spill onto it so that it's about as bright as the subject. If you are dealing with a black/dark animal, do the opposite and use a black background. The reason for this suggestion is to ensure that you don't have too much contrast in your image. This is of absolutely critical importance if you are running your camera+flash on "auto", but is almost as important if you are setting the exposure and flash power manually.

In the first case, the automatic exposure system of your camera will attempt to set an exposure such that mid-gray tones in the scene are recorded as mid-gray tones in the recorded image. Unfortunately, with a black cat against a white background, or the opposite, there are no mid-tones, so you wind up with blown out brights and zero'ed out blacks (which isn't exactly conducive to fur looking like fur, LOL).

In the 2nd case (manual operation), such extremes of brightness in a scene can exceed the maximum dynamic range of your camera. This has to be prevented at all costs if you want to have any hope of seeing detail in the animal's fur.

3) In addition to exposure issues, as Sierra and others pointed out earlier in this thread, sharpness is important if you want fur to look like fur, and not some blurry blob. To maximize sharpness: (a) make sure your focus is spot-on; (b) use a small aperture (eg, f11 and higher numbers on a full-frame DSLR) to have an adequate depth-of-field; (c) make sure that your strobe completely swamps any ambient light in the room (...to prevent movement ghosting); and (d) manually set the ISO of your camera to its lowest possible value. The last suggestion minimizes grain (which tends to mask the structure of fur), and ensures that your strobe will dominate any ambient light present.

HTH,

Tom
 

Attachments

  • DSD_9837-nx2-ps01a-xnv_698px_wide-for_web.jpg
    DSD_9837-nx2-ps01a-xnv_698px_wide-for_web.jpg
    132.2 KB · Views: 22

Tom Mann

Guru
Messages
7,223
Likes
4,343
... and to demonstrate that the lighting technique I described above works equally well on a critter with white fur, here's a shot that I took a few minutes ago with a modern digital Point and Shoot camera ( a Canon G16).

T

PS - BTW, in this photo, I didn't use my own recommendation to shoot light colored fur against a light background. The main reason for making this suggestion is to control extreme contrast so that the auto-exposure system of the camera and flash isn't fooled. In this case, since I was shooting manually and could set the exposure to be whatever I wanted, I could let the (white) cat stay asleep on the brown background. He wasn't in quite the same orientation (re the flash and the camera) as in the example image, but it isn't too far off from that.
 

Attachments

  • IMG_9834cr2-acr-ps03a_698px_hi-01.jpg
    IMG_9834cr2-acr-ps03a_698px_hi-01.jpg
    264.3 KB · Views: 20

rogerpb800

New Member
Messages
4
Likes
2
Tom, the yellow labrador is actually almost white, so, it´s hard to cast shadows over its hair. I will try with another dog with a diferent color.

Thanks!
 

ibclare

Queen Bee
Messages
11,034
Likes
4,638
Sierra, what you were given to start with, I think you did a great job. The detail on face and head were almost non-existent but you brouhgt out all you could. I think I would have added a high pass filter to sharpen details a bit and give an overall brightness. If done subtley, this wouldn't diminish the details. IMO.
 

Tom Mann

Guru
Messages
7,223
Likes
4,343
OP: "...the yellow labrador is actually almost white, so, it´s hard to cast shadows over its hair...."

This simply is not true. For example, there are lot of shadows on the white fur of my cat. A white piece of paper will cast a shadow just like a black piece (except for the small amount of light that leaks through the paper).

Tom
 

Sierraccr

Power User
Messages
432
Likes
275
Sierra, what you were given to start with, I think you did a great job. The detail on face and head were almost non-existent but you brouhgt out all you could. I think I would have added a high pass filter to sharpen details a bit and give an overall brightness. If done subtley, this wouldn't diminish the details. IMO.

:D :D Thank you, Clare!!

I agree that my results could be improved on. I did no sharpening at all, which of course I would have done on anything more than an exercise in lighting. IMO, a high-pass can almost always improve the final look of a portrait.
 

Top