What's new
Photoshop Gurus Forum

Welcome to Photoshop Gurus forum. Register a free account today to become a member! It's completely free. Once signed in, you'll enjoy an ad-free experience and be able to participate on this site by adding your own topics and posts, as well as connect with other members through your own private inbox!

directional gradient


Pavel

New Member
Messages
4
Likes
1
I was trying to find the answer all over the Internet, but nothing useful came up. I hope someone here would know how to do this:


I have some random curves (already created) and I want to blur them just from one side to have the same blur distance and effect one the whole curve.
To more precisely describe what I need, I need to create gradient with direction of normal for every "point".


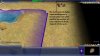
The best example I have found so far are borders in Civilization IV game. Here are two examples:
3.bp.blogspot.com/-40x9Kw5vrrA/TiHjTNwOuQI/AAAAAAAAADA/uw2NeAnsmOk/s1600/Civ4ScreenShot0008.JPG
apolyton.net/civ4/files/info-images/agade.png


As you can see, there is a solid curve, which gradually blends (i.e. alpha channel is lowered) till the gradient dissapears.
I have the solid curve and the question is, what would be the simplest way how to do this (the number of curves is around 100) gradient.
Thank you very much.
 

Attachments

  • Civ4ScreenShot0008.JPG
    Civ4ScreenShot0008.JPG
    223.5 KB · Views: 4
  • agade.png
    agade.png
    261.8 KB · Views: 65
Pavel, for me there is a clear case of "Photoshop Terminology" breakdown here! I apologize but I'm not following you at all!

Try adding some arrows to your examples to show us/me what your referring to!
 
make a gradient with the center at the line, and then erase one half of it
 
I am sorry if the description was not clear enough.

I attach another example, what I want to do.

pattern.png
This picture consists of three parts. There is solid green line, which is the curve I already have. Red arrows display the direction in which should the gradient go (as you can see it depends on the point, there is no general direction). And the gradient is displayed as a green stripe with alpha channel higher closer to the curve and lower further.

This is what I need and you can see the same effect on the screenshots from Civilization IV. The question is how can I achieve this.
 
Here's what you can try:

1. If possible, merge all your curves to one layer
1. Create new layer below your curves, fill it with white.
2. Press Ctrl-t and scale this layer to ~150%.
3. Select this layer(Ctrl-click in the Layers panel), choose Magic Wand Tool and Alt-click anywhere outside your curves.
4. With selection still active create new Solid Color layer.
5. Go to it's Layer Style options and set Fill Opacity to 0, Stroke: inside, Fill type - gradient, Gradient Style - Shape Burst, the gradient itself: from your curves color to fully trasparent. Choose the size that makes you happy.
6. Turn the white layer off.
 
Here's what I did.............

I did a search here in the forum and found this POST by Lasa and I followed the instruction with a few changes.

1. Set brush color and size.
2. Create curved path using Pen tool. Right click and choose stroke path. Choose brush.
3. Click the Layer Style button and select Stroke.
4. When the dialog comes up change the position to outside.
5. Change the fill type to Gradient. Change the color. Leave the style on Linear. Slide the size over until the gradient is where you like it.
6. Duplicate the layer and rastorize, turn off original.
7. Create a new layer. Use the Magnetic Lasso tool to follow the edge of the stroked path that I want to remove or mask.
8. Use the above layer to mask or delete the unwanted side of the gradient.
9. Clean up with eraser tool.

CurvedGradient_01.jpg

Screen Shot 2013-02-25 at 8.36.55 AM.png
 
Last edited:
Hi rufinatti,
yes, this is exactly what I want to achieve, I just want to have the black borders of the country colored as well. But those I already have (my curves).

SCTRWD thank you very much, this is pretty much what I was looking for. The Shape Burst! I was not aware of this option.

IamSam thank you too, but the problem is, that linear gradient has a global direction which is not useful for the whole shape. But thank you for your answer.
 
Hi rufinatti,
yes, this is exactly what I want to achieve, I just want to have the black borders of the country colored as well. But those I already have (my curves).

Ok...I was just goofing around and came up with a pretty simple method. I'll record a quick video in a few minutes.
 
Here you go. Quick and easy method. When done, just change the color of the color fill layers to change your border colors.

Hope this helps.

 
Pavel said:
IamSam thank you too, but the problem is, that linear gradient has a global direction which is not useful for the whole shape. But thank you for your answer.

Again, I was not understanding what you were needing. I have used a similar technique that Rufinatti describes on other shapes. I was thinking you were needing a gradient on a CURVED line and NOT a complete irregular shape!

Glad you found a solution!

Great job Rufi!
 
Great job Rufi![/COLOR]

Thanks, IamSam.

I like it when people ask questions on here because they are often trying to do something that I never would have thought of. Then I have to think about how I would accomplish the task. Basically, it gives me an excuse to try new things and learn something myself.


Hi rufinatti,
I really appreciate and thank you for the video.

However for my problem this solution is not precise enough. The color of gradient from the edge of the curve (border) is not exactly the same for all the points. You can see it even on the image you posted. When the shape of border is too zigzag, the gradient is different for different parts of the curve (because of feather function).

But anyway I have what I need -
Shape Burst it is.

Thank you all guys, you really helped me!
 
Hi,

You can do your desired effect in a few simple steps:

1. Create a new layer
2. Press U for the Shapes tool (Press Shift+U to breeze through the kind of shapes and reach your desired shape)
OR
2.1 Create a shape/curves using the pen tool
3. Create your shape on the second layer (make sure "Shape layers" is selected in the Shapes tool bar)
6. Once a vector mask is created, fill the layer with white (#FFFFFF)
7. Upon filling the layer, double click "Shape 1" (or whatever layer has the vector mask) to open the Layer Style dialog box
8. Select Stroke and choose your desired stroke size (default is 3 pixels) and color of stroke
9. After adding your stroke layer style, add an Inner Glow layer style by selecting "Inner Glow" in the dialog box.
10. Make sure the blend mode of the inner glow is set to Normal and the size of the inner glow is big (adjust the size to your shape/preference)
11. Just play around the settings of the layer style and you're set! If you want to make the shape go over an image and make that transparent, just make the "Shape 1" layer's blend mode Darken. That will make the outline and gradient of the shape float above the layer/image under it.

You can do this with ANY shape. Any shape meaning, you can create a shape with the pen tool then do the exact same thing. Or any predefined shaped that is pre-installed in Photoshop. And best of all is that you can scale the image and the gradient stays :) Just make sure you scale layer styles.

Hope you can do what you need to do! :)
Gerard Cruz
 
Here's what you can try:

1. If possible, merge all your curves to one layer
1. Create new layer below your curves, fill it with white.
2. Press Ctrl-t and scale this layer to ~150%.
3. Select this layer(Ctrl-click in the Layers panel), choose Magic Wand Tool and Alt-click anywhere outside your curves.
4. With selection still active create new Solid Color layer.
5. Go to it's Layer Style options and set Fill Opacity to 0, Stroke: inside, Fill type - gradient, Gradient Style - Shape Burst, the gradient itself: from your curves color to fully trasparent. Choose the size that makes you happy.
6. Turn the white layer off.

To preserve your original layers, make a copy-merge layer, rather than merging them. Select the layers to merge, hold down the shift + ctl/cmd keys + e. The group your original layers (select and use ctl/cmd + G, then turn off the eye for visibility. Then folow the rest of the steps. At least that is what I would do. I always work as non-destructively as possible -- though there are other ways to do the same thing.
 
As a matter of fact, there is no need in merging in this case:cheesygrin: The first step is redundant, as long as Sample All Layers for Magic Wand is checked.
 
Good point. I don't even know the options for magic wand anymore I haven't used it in so long. I prefer the quick select and think it was a novel invention Adobe made there.

Tx for clarifying that SCTRWD. Hey mon, you got some other moniker we can call u by? :mrgreen:
 

Back
Top