What's new
Photoshop Gurus Forum

Welcome to Photoshop Gurus forum. Register a free account today to become a member! It's completely free. Once signed in, you'll enjoy an ad-free experience and be able to participate on this site by adding your own topics and posts, as well as connect with other members through your own private inbox!

What Can I Do To Make My Work Better?


What corrections did you make to the image?
 
What do you mean by etcetera?

Did you desaturate the image?
 
From my experience, simply taking a color image to B&W doesn't always work out well. One of the biggest considerations in the original contrast. Black and white alone do not always contrast when muting colors, so you have to find certain colors that will boost well to give the image good contrast. With this particular image, I used the Auto Tone function, changed color to Black & White (no modifications needed) and then added in a little bit of noise. Voila!

22X.jpg

Same trick, but smoothed the image a bit and added some sharpening, but backed off on the noise a bit.

22Y.jpg
 
Last edited:
I noticed the noise in the background particularly after the B&W conversion. 'Tis why I added back in some noise after smoothing. I tried a different approach that adds in some gaussian blur in the background and no noise added. I did bump the levels a tick. 22Z.jpg
 
Last edited:
I noticed the noise in the background particularly after the B&W conversion. 'Tis why I added back in some noise after smoothing. I tried a different approach that adds in some gaussian blur in the background and no noise added. I did bump the levels a tick.

I like this version better than the second above. That's because of the level of sharpening in the latter. But I also like that much sharpening as a special effect.

I definitely agree that Solid's version needed lighting changes and you made that correction. I hope he/she will ask for guidance if it isn't clear how you made these. Nice work.
 
The very first step to good animal photography should always be to have it clear in your own mind what type of dog photo you want, eg, portrait, action, location, dog-with-family vs family-with-dog, artsy-fartsy, far_out efx, mawkishly sweet, etc.

If you aren't sure which of these you want, go to Google Images, type in the word, "dog", and figure out which of the many possibilities appeal to you. Say, dog portraits appeal to you, then re-search Google Images for {dog portraits}. Pick a few of these that you like and bookmark / save them for future reference. If you are just starting out in this field, set out to emulate one of the photos that you like instead of trying to come up with something new.

If you don't have it absolutely clear in your own mind which kind of photo you want and simply leave it up to chance, it's almost guaranteed that you won't take the best possible shot.

Next, learn how to take a good dog shot of the kind you want. Google is your friend. There are literally thousands of tutorials, threads in discussion groups, etc. on each of the types of dog shots listed above. Google something like {tutorial dog portrait} or {how do I take a good action shot of my dog}. Study a few of the tutorials.

Separate in your own mind the important components that contribute to each shot:
a) dog (and owner) control / handling / management;
b) technical aspects, ie, getting a well exposed, sharp shot with good color, good lighting, etc.;
c) posing the dog and composing the shot, ie, looking down, looking up, close, far, etc.
d) If you don't like the results of your session with the dog, my recommendation is that you not even consider photoshopping these images unless there is absolutely no way you can re-shoot the dog. Put differently, practice with your own animal first, and refine your photographic technique before you reflexively reach for PS to try to improve a murky, noisy photo.

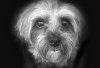
With respect to the image you posted, I take it you were looking to make a nice, fairly conventional, B&W dog portrait. If this is indeed what your goal was, here are my main suggestions:

It appears that you shot this image without flash in some location where there was weak diffuse light. This choice throws a whole bunch of problems right in your lap. Specifically, you will be forced to use a high ISO (and hence noise), you won't have much tonal separation between the subject and the background, you'll wind up with a small depth of field and/or movement artifacts (both of which soften the image), and, as the photo comes out of the camera, his fur won't have the texture you might prefer.

As far as i can tell, the suggestions in the earlier posts for post processing all were designed to try to help fix these flaws. Needless to say, it would be vastly better if you had "gotten it right" in the camera instead of after "the horses have left the barn", LOL.

If I were photographing this dog and wanted to make the final result resemble the photoshopped versions, but be better than them, I would sit the dog 5 or so feet in front of a window so that there is rim-lighting on his fur. The wall under the window would likely be in shadow, so I would position myself and use a telephoto lens so that the dark area under the window became a nice, uniform dark background. Finally, I would use a flash directly above the camera to fill in the dog, but not substantially brighten the background. Because the flash is above the camera, the shadow it throws will be hidden behind and below the dog, out of sight of the camera. The use of flash and strong rim lighting by the sun will also allow you to use a low, noise-free ISO setting, as well as a higher shutter speed and smaller aperture, all contributing to a sharper, higher contrast image.

I've taken many pix exactly as described above, however, my computer is still on the fritz, so I can't post any example images, but I hope you can envision the look this general technique can achieve.

HTH,

Tom M
 
All excellent points, Tom, but you forget that not every shot can be perfectly set up. There may be times where a quick shot is all the opportunity you have, and as a novice, you may not have a separate flash on hand (due to lack of resources, etc.).

While I do agree it is far better get it right in the camera versus after the horses have left the barn scenario, you can't always be afforded that opportunity. Perhaps in your professional world you would have never taken the shot, but shown below is one such photo for me. I had literally no time to set up the shot, as the car was moving past me. I used an entry level DSLR and I have no eye for photography. But this exact type of situation is where Photoshop excels. Sure, the final product is not perfect, but considering I failed to turn on my flash (I had it disabled due to earlier bright sunlight shooting) or select a proper ISO or other settings, the final turned out much better than I thought it would. Sadly, I do not have access to my original, as my computer crashed soon after that and I lost some data that was not backed up.

Dream_Car_by_Crotale.jpg
 
Thank you very much for the advice. I recently got a lighting setup so ill try to incorporate the things you said. I guess those kinda go for every shot in a way. Ill be sure to post my results once I get a full grasp of your advice (step by step).
 
Needs some of the surrounding area lightened in my opinion, the dogs head just looks out of place and a little too dark.
 
Crotale: "...but you forget that not every shot can be perfectly set up. There may be times where a quick shot is all the opportunity you have, and as a novice, you may not have a separate flash on hand (due to lack of resources, etc.)...."

That's the wonderful thing about photography - there are many different types of photography.

I think you are talking about impromptu / candid shots (especially street shooting) where reaction time is key, "full auto" is often all you have time for, and whatever camera equipment you have in your hand is better than no camera at all. One doesn't judge such shots by the same technical standards as slower paced shots -- content and the decisive/critical moment (re: Henri Cartier-Bresson) are overriding factors.

However, in my experience, most dog portrait shoots are planned events where, at the very minimum, one almost always has time to move around a bit to get the best background and dial in settings that will be better than what "auto" will give you. At the other extreme, some dog portraits are done in studios with absurd amounts of lighting and camera equipment, motorized / changeable backgrounds, etc.

Best regards,

Tom
 
SolidBrowser: "...I guess those kinda go for every shot in a way. .."

I didn't want to bring that up, but depending on how one works and thinks, and depending on whether you are shooting fast-paced candids or slower paced semi-planned shots, I feel that the above considerations should enter one's thought process to a greater or lesser degree.

I would go further and add that after you gain decades of photographic experience, the above factors become like an automatic check list that you don't even think consciously about - you just subconsciously run through them and do what you feel is best for each situation.

Yes, definitely do show us what you come up with! I'd love to see it.

Tom
 
There's nothing wrong with a black background / artistic look, but I would agree with Paul that it should be brighter than what you did.

Since the hair is a prominent characteristic of this breed, I would also emphasize, even exaggerate its curliness. Maybe something like this. Don't hesitate to stray away from a pure photographic rendering if something approaching a sketch or a caricature does a better job of capturing what you like in this animal.

Cheers,

Tom M

PS - So I didn't have to spend hours working on the hair with a brush in PS, I used the Topaz "Clean" filter on the dog's hair, but blended a lightened, lower contrast version of the original with varying opacities in different regions. Also, a bit of manual dodging and burning.
 

Attachments

  • 22Z-crotale-tjm01-crop-acr-ps01a-01_stylized.jpg
    22Z-crotale-tjm01-crop-acr-ps01a-01_stylized.jpg
    144.8 KB · Views: 29
I got a few points out of reading all these tips:
Forum More Tips: (DOG SHOT)


1. Think of the shot. Location, Action, Portrait, Artistic, etc…
(If not sure google it and find examples)


2. Google Tutorial Dog Portraits/Action Dog Portraits


3. Planing:
- Control,Handling, Management
-Technical Aspects; Exposure,Sharpness,Colour,Lighting, etc…
- Posing and Composition ex; Looking down, Close, Far, etc…
- If you do not like the look, then you photoshop


4. If he was in the situation;
-Dog 5 Feet From Window (Rim Lighting on Fur)
-Since the wall under the window would be a shadow I would use zoom lens to darken shadows
- Use flash to fill in the dog
-Figure out characteristics of subject (If dog’s hair then express it)

+Amazing job with my dog Tom Mann, that looks great. I hope to get as good as that one day!


ONE extra point......Due to digital vs film, shoot continuous mode...yep keep that button pressed, the second or third frame will usually look better, I don't know why I think it might be the dogs reaction to the clicks, flash and you .

The delete button will solve the need for space!
 

Back
Top