I'm just saying that since Tom Mann has posted this, and he apparently doesn't "have the time" to finish it for you ... He says "maybe someone else can take it from here", does that mean download his work and go from there, I think not (at least not me). ...
I truly didn't have the time to complete this because (a) I am under a deadline to complete the review of six 50-70 page senior design final reports, and (b) I am under a separate deadline as the official photographer for our fire and rescue service to shoot and process a holiday image for them. The shoot was last night. It involved a complicated lighting arrangement that took hours to set up (and then stand around in the cold, waiting for the equipment to arrive), involved dozens of separate photos that had to be composited together, and now is going to involve hours more of post processing. I assure you that the quotes you added around the phrase "have the time" were not called for.
Also, when I said,
"... maybe someone else can take it from here ...", yes, what I said was precisely my intent. No more, no less: I wanted to quickly demonstrate the sort of improvement one could get by starting with a de-textured version, throw out some ideas for colors, as well as providing a possible starting point for anyone who could help the OP on a shorter time scale than I could. In fact, I was delighted to see that is exactly what happened, with both the OP and ChrisD jumping in with some *very* nice work.
Probably an FFT filter or action for Photoshop Chris
Yup, I did use a FFT-based approach. Certainly no actions, tho. IMHO, the automated FFT approaches, be they PS actions, or software embedded in scanners to de-screen scans of half-tone prints never come close to what one can get by a manual process. Unfortunately, it's not obvious, even with all the tutorials on the web on this topic, just how to get the most out of an FFT approach. Here is the main technique that differentiates my work with FFTs from others.
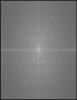
Most FFT tutorials suggest you completely black out the bright crosses in the 2D amplitude spectrum. Often, this is displayed as the red channel in some popular implementations of the FFT as a PS plugin. While a complete blackening out of the crosses does indeed reduce the unwanted texture, unfortunately, doing so, at minimum, produces it's own type of texture, a ringing artifact in the vicinity of each of the little texture elements. Even worse, if you black out too much area in this channel, especially if you black out regions along the two axes, you can easily wind up with major shifts in brightness and both local and global contrast, ie, a mess.
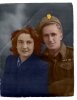
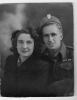
A much better technique is to tone down each of the bright crosses to the point where they blend into their surroundings - not brighter, not darker. One can do this by either painting over these crosses with a mid-gray brush, or by using the spot healing brush. It is also quite important not to use a simple circular brush large enough to take out each cross in one mouse click, but rather, to use a smaller diameter brush / spot healing tool, and restrict your touch-up work to two narrow intersecting lines that make up each cross. Below is a before-after comparison using this technique on the Russ' image.
HTH,
Tom M