What's new
Photoshop Gurus Forum

Welcome to Photoshop Gurus forum. Register a free account today to become a member! It's completely free. Once signed in, you'll enjoy an ad-free experience and be able to participate on this site by adding your own topics and posts, as well as connect with other members through your own private inbox!

How to use Photoshop to make a tooth colour analysis?


Ninanoki

Well-Known Member
Messages
89
Likes
0
how can i use photoshop to make a tooth colour analysis?
here you can see a print out from a device that does that...but i want to achieve that with ps.

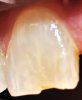
-i take a picture of my patient with a gray card and ringlight to set the correct white balance.
http://dentopolis.org/temp/001.jpg
-i also have a picture of a objective colors also taken with gray card so the white balance of those two pictures should be the same.
http://dentopolis.org/temp/kolornik.jpg

now:
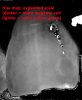
1)how can i tell what is the major/main/single colour of the tooth like here:
http://dentopolis.org/temp/002.jpg

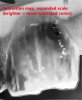
2)how can i tell what are three colours of the tooth like here (same as above but three segments):
http://dentopolis.org/temp/003.jpg

3)how can i achieve such posterized color map? http://www.mht.ch/images/micro_shademap.jpg
http://dentopolis.org/temp/004.jpg

thank you in advance for help
 

Tom Mann

Guru
Messages
7,223
Likes
4,343
I was involved in a thread about exactly this topic a few years ago. I'll try to find it and get back to u very late tonight.

Tom
 

Tom Mann

Guru
Messages
7,223
Likes
4,343
IamSam - Nope, close, but no cigar, as they say, LOL, but I eventually found it.

Ninanoki - Hi. It's good to see you again. As you may recall, you asked the same question back in 2012: https://www.photoshopgurus.com/forum/general-photoshop-board/40441-color-analysis-tooth.html

That thread ended with me saying:

...Yes, what you are asking could be done in Photoshop, but (a) it would take a fair amount of knowledge of PS, and (b) at best would never be as good as the commercial SW -- certainly not good enough for patient care.

The route I would take would be to turn a conventional image into HSL or HSV, and then quantize the hue channel into 10 or so distinct hues. The boundaries of these hues would be represented by closed contours on the image. You then could go in with the eyedropper tool to read off the hue value in each area.

Unfortunately, PS no longer supports HSL or HSV, so you would have to run one of the awkward plugins to do the conversion. You then still wouldn't have a nicely labeled color display like the commercial software, Clon3D-SpectroShade, gives you. I really don't recommend doing this for patients, but you might get away with it if it is just for a student project and only analyzing one or two images. -- Tom M

Unfortunately, the situation hasn't changed much since then. I don't know of any new Photoshop tools that have introduced in the past 2.5 years than that would be applicable to your problem. However, one thing that has happened since then is that I have had one student do a senior thesis on image analysis, and using a mathematical programming language called, "Matlab", was able to label areas of his (non-dental) images in a way analogous to that shown in the screenshot from the old thread. Matlab has a steep learning curve and assumes at least 3 or 4 semesters of engineering / scientific mathematics courses, especially matrix algebra. If you really want to try to write a program similar to the commercial software, Clon3D-SpectroShade, and already know how to use a program like Matlab, it wouldn't be all that difficult.

HTH,

Tom M
 

Tom Mann

Guru
Messages
7,223
Likes
4,343
FYI, back in 2009 or 2010, I a friend who is a dentist asked me some questions about dental photography, so I took some photos of his teeth with my 105 f2.5 Micro Nikor and a strobe light to show him what could be achieved without use of a medical ring light. The thread and original photos are here.

These were the only photos I have available of teeth, so, for this thread, I decided to do the start of a color analysis on one of his teeth. The attached images were all done in PS. They show the range of hues and saturation in one tooth as gray scale values. This would be the starting point for a full analysis. I did it using exactly the method I suggested in our earlier discussion, but as you can see, I stopped before posterizing the various hue and saturation values, and did not attempt to nicely label them as the commercial software so nicely does.

Anyway, I hope you find this interesting.

Cheers,

Tom M
 

Attachments

  • D7A_1572-nx2_jpg-acr0-ps01a-01.jpg
    D7A_1572-nx2_jpg-acr0-ps01a-01.jpg
    155.3 KB · Views: 63
  • Color_analysis-_0000_Hue_expanded_scale.jpg
    Color_analysis-_0000_Hue_expanded_scale.jpg
    117.9 KB · Views: 64
  • Color_analysis-_0001_Saturation_expanded_scale.jpg
    Color_analysis-_0001_Saturation_expanded_scale.jpg
    111.6 KB · Views: 65

Ninanoki

Well-Known Member
Messages
89
Likes
0
well...right now i'm much more motivated to complete this task...so please follow this thread and help if you can.

1)i take a picture of a tooth with (ringlight, gray card) so the white balance is correct
2)i flatten an image of a tooth with shader (bottom) and replacement colors (left)...i have already copied the inter region of each shader (it should be most accurate)
so i have this:
http://dentopolis.org/temp/test.jpg

3)Filters-Sketch-Patchwork: Square Size: 1 Relief:0
http://dentopolis.org/temp/patchwork.jpg

here you have psd file dentopolis.org/temp/test.psd

4)Image-Adjustements-Replace Color: Fuzziness 1
and i;m stuck here...when i replace colors from left to right it overlays colors so i dont know which color is where.
 
Last edited:

Tom Mann

Guru
Messages
7,223
Likes
4,343
Hi Ninanoki - Sure, I'll be glad to try to help, but to be honest, I'm not sure exactly what you are trying to accomplish with the list of procedures that you outlined in your last post. Specifically, when you said, "...when i replace colors from left to right it overlays colors so i dont know which color is where...", it sounds like (a) you are trying to come up with an image that will be a preview of how the patient's tooth will look after it is "painted" by you using some of the colors available to you in your kit, and you are selecting the colors manually.

If that's what you want, it's OK, but I thought you were trying to do almost exactly the opposite: (b) I thought you were trying to find out which colors in your kit to use that would best match the patient's existing tooth, or surrounding teeth.

Which of the above, (a), (b), or neither is correct?


Also, FYI, it is relatively easy to break down the colors on a tooth into several areas, each area being composed of only one color, so that you could use this as a guide as you paint the tooth appropriately before insertion into the patient. For example, here's something I did in PS that partitions my friend's tooth into such areas. To use such an image, you would open the PSD file, place PS's eyedropper tool in the middle of one of the areas of color in the simplified version, then switch off the simplified layer, and read the RGB value of the actual (ie, non-simplified) image at the same position. You would then go over the paint samples in your kit to find one that most nearly matches this RGB value.

This approach is similar to the commercial software used in your field, except that in addition to partitioning the tooth up into similarly colored areas, I think that the commercial software also does automatic matching to existing paint kits.

If my approach looks interesting to you, let me know and I'll write up a description of how I did it.

HTH,

Tom M

D7A_1572-nx2_jpg-acr0-ps31c_LAB_expn-topaz_simplify_cutout-8bpc-for_GIF.gif
 

Ninanoki

Well-Known Member
Messages
89
Likes
0
well i'd like to know what composite colour should i use during treatment or what porcelain colour should technician use to make a perfect crown. and there can be 3 cases:
1-when i try to find which ONE color is the most accurate (in the middle of the tooth),
2-when i make three sectors to find those colours
3-when i want a perfect mapping like in your case above.

how did you do that???:)
do those colours match some precise samples like i need? (a1,a2,a3,a3,5,b1,b2...etc)?
 
Last edited:

Tom Mann

Guru
Messages
7,223
Likes
4,343
well i'd like to know what composite colour should i use during treatment or what porcelain colour should technician use to make a perfect crown. and there can be 3 cases:
1-when i try to find which ONE color is the most accurate (in the middle of the tooth),
2-when i make three sectors to find those colours
3-when i want a perfect mapping like in your case above.

how did you do that???:)
do those colours match some precise samples like i need? (a1,a2,a3,a3,5,b1,b2...etc)?


Let me answer your last question first: No, the enhanced colors are exaggerations just to make the boundaries between areas clear. They have almost no relationship to the colors you should select from your kit. I described the way to use such an image in my previous post:
"...To use such an image, you would open the PSD file, place PS's eyedropper tool in the middle of one of the areas of color in the simplified version, then switch off the simplified / exaggerated layer, and read the RGB value of the actual (ie, non-simplified / non-exaggerated) image at the same position. You would then go over the paint samples in your kit to find one that most nearly matches this RGB value. ..."

re: your question about how I did that - it will take me some time to write up an answer. Let me try to get back to you late tonight (east coast USA time).

re: your 3 part question - -

1) to find the color of the middle of the tooth, just place Photoshop's eyedropper tool in the middle of the tooth (the not exaggerated version), set the radius to cover the area you want to sample, and read off the RGB values. It will then be up to you to match those RGB values manually to the RGB values of your sample paints.

2) to find colors in three areas, just do as I described in my answer to #1, except use a smaller sampling radius for PS's eyedropper tool.

3) to find the colors corresponding to each area in my exaggerated image, follow the directions quoted above.

Tom M
 
Last edited:

Ninanoki

Well-Known Member
Messages
89
Likes
0
what i also try right now is three things:
1)i have created new rectangles of shader colors by using color picker size 11x11 (previously they were just copied fragments from the middle part of shaders)
1)create my custom swatches (A1,A2)...
swatches.jpg
2)create colors table:
table.jpg
2)change the mode to Indexed: Image-Mode-Indexed Color-Custom
test.gif

well...it it something;)but can't think of use for it.

but afterwards i did this:
replaced.jpg
 
Last edited:

Ninanoki

Well-Known Member
Messages
89
Likes
0
i think i've got it...

ba.jpg
testafter.jpg
step by step:
1)take a picture of a tooth with gray card and one of the best matching colors from shader, setup the correct white balance
2)overlay the VITA CHROMASCALE shader (below the image) and REPLACEMENT COLOR (on the left)
3)check if the picked shade on the image is the same as picked with color picker
4)change indexed color to custom and paste back to the main project
5)replace colors...fuziness around 10
2)check the picked shade


right now i'll make an .axt file to set the replacement colors
 
Last edited:

Ninanoki

Well-Known Member
Messages
89
Likes
0
Tom, it can happen that even with a picture of a tooth and shaders...the color balance is not perfect. so to check if it is correct i'm taking a photo with 1 sample like on this picture...it is A3 sample so during color range selection it should also contain my A3 shade. how can i fix that if it A3 on the tooth picture doesn't match witch A3 shade?
question.jpg
 

Tom Mann

Guru
Messages
7,223
Likes
4,343
Hi Ninanoki - When you mention slight errors in the exact white balance causing problems, you are seeing just the tip of a larger problem. For example, if even something as simple as the brightness isn't perfectly matched between the image of the patient's tooth and the photo of the reference teeth, any method based on RGB values will have problems. For example, if the image of the patient's tooth is a bit darker than it should be, a simple RGB matching procedure will suggest that you need to use a darker "paint", when, in reality, you don't. Similarly, even if the brighter areas of two images of similar objects match in terms of brightness and color balance, it is quite likely that the darker areas of these two images won't match even if the two pix are of the same object (tooth) but taken at a different time or with slightly different equipment, camera settings, lighting conditions, etc.

There are several ways to try to compensate for this. Probably the easiest way to correct for such errors (both brightness and color balance) is to place a curves adjustment layer above the image to be corrected, and then enter numeric values into one or more points on the 3 RGB curves to bring the "output" value up or down to the value it should be. If correcting one point on each curve is not adequate, and you need to separately adjust both brighter and darker areas, it is no problem to extend this method to more than one point on each curve.

I remember writing a tutorial on this technique a year or two ago. I'll try to find it, and if you are having problems with this technique, it will fill in many of the details.

HTH,

Tom M
 

Ninanoki

Well-Known Member
Messages
89
Likes
0
hm..i tried but i'm not good enought...will wait for your tutorial if you will find time to post it.
here is my current testing file when one layer A3 color should match A3 on the other image...so color matching should be done to the whole image but based on this sample rectangle color. can't find tutorial to do it.
pyt.jpg

http://www.dentopolis.org/temp/A3.psd
 
Last edited:

Tom Mann

Guru
Messages
7,223
Likes
4,343
Hi Ninanoki -

Unfortunately, I looked hard, but just couldn't find the tutorial that I wrote about using numeric entries to use a curves adjustment layer to modify one image to agree with a 2nd image with respect to color and brightness at several representative points within the image. However, I did find someone else's tutorial on this subject:
http://www.zuberphotographics.com/content/photoshop/curves-color.htm (scroll about 1/3 rd of the way down the page to the section titled, "Color Channels Technique")
http://www.zuberphotographics.com/content/photoshop/curves.htm (probably too basic for you).

Thank you for including the PSD file. I think I know what you want to do, but I'm not 100% sure. I think you want the average color of the central tooth (as well as the sample being held) to become the color in the rectangle, with all other colors moving proportionally. Assuming that to be true, I'll work on it and send it back to you a bit later this morning.

Tom
 

Ninanoki

Well-Known Member
Messages
89
Likes
0
i will read those tutorials carefully.thank.
rectangle is a single color taken from color picker in the middle of the tooth (11x11 sample size). it should match the color A3 in the scale below.

if those color with match, my macro with color mapping should be precise.
pyt2.jpg
 
Last edited:

Tom Mann

Guru
Messages
7,223
Likes
4,343
Hi again - Unfortunately, I didn't see your most recent post before I began to construct the tutorial below, so it is not exactly what you want, but it will give you the idea of how to proceed. Specifically, when I constructed this tutorial, I thought you wanted the average color of the "A3 sample tooth" to match the color in the rectangle, so I based everything on that. Now, I see that it should match an 11x11 sample from the middle of the tooth. I think that after this tutorial, it should be clear how to match any color you want, not just the average like I did. Anyway, let me begin.

First, I placed a copy of the "A3 sample tooth" on its own layer and used the blur/average tool to flood that area with a solid, uniform color that is the average color of the entire sample tooth. I then placed a color sampler on the rectangle, and a second color sampler on the "averaged sample tooth":

01-screen_shot-averaged_target_tooth-placed_2_color_samplers.jpg

(Note: double click on these in-line small previews to see the full resolution version of each of the screen shots.)

Next, I used the RGB values of the "averaged A3 sample tooth" as the input values that I typed into each channel of a curves adjustment layer, for the output values, I used the RGB values of the rectangular area. The following screen shot shows me adjusting the blue channel.

02-screen_shot-adjusting_input_and_output_of_blue_channel.jpg


The next screen shot shows that my modifications of the curves had the desired effects. Look at the "after" RGB values of the 2nd color sampler. Notice that they are now exactly equal to the RGB values of the rectangular area.

03-screen_shot-all_3_channels_now_at_target_values.jpg


Finally, I turned off the "averaged A3 sample tooth" so that we could see the real "A3 sample tooth", but now, with the curves layer that we just generated being applied.

04-screen_shot-turned_off_average_tooth-curve_adjustment_is_on.jpg


The very last image is a GIF animation that shows the effect of the curves adjustment layer that we constructed being turned on and off.

OP's_file_A3--tjm_match_using_curves-ps02_for_GIF-01.gif


HTH,

Tom

PS - The "after" version looks a bit too bright to me. If I had seen your most recent post, where you described that the target color was an 11x11 sample from the middle of the tooth, and not the average of the whole tooth, I suspect we would have a much better match.
 

Ninanoki

Well-Known Member
Messages
89
Likes
0
on your screenshot i can see rgb values xxx/xxx (input/output) but on my ps6 i can see only xxx (3 digits). how to change that? the rest is clear to me.
 

Top