Photoshop Gurus Forum
Welcome to Photoshop Gurus forum. Register a free account today to become a member! It's completely free. Once signed in, you'll enjoy an ad-free experience and be able to participate on this site by adding your own topics and posts, as well as connect with other members through your own private inbox!
You are using an out of date browser. It may not display this or other websites correctly.
You should upgrade or use an alternative browser.
You should upgrade or use an alternative browser.
Photoshop Image Edit
- Thread starter lueiah
- Start date


")
Tom Mann
Guru
- Messages
- 7,223
- Likes
- 4,343
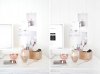
If i were to take and image like the one on the left, what kind of steps would I have to do to achieve the look on the right? Not sure if that makes sense :s
L
LHS is "before", RHS is "goal":
View attachment 53976
LHS is now after my tweaks, RHS is still the "goal":

If this is close enough for you and you are interested, let me know and I'll write up the steps I took.
Tom M
Tom Mann
Guru
- Messages
- 7,223
- Likes
- 4,343
Sure, Sam.
In a case like this, the first thing I do is stare at the starting and goal images and, for each of the major areas in the image, try to carefully figure out which of the following changes were applied:
change in brightness (all tonal ranges)
change in contrast (all tonal ranges)
change in saturation (all tonal ranges)
changes in any of the above three attributes limited to shadow areas, mid-tones, or bright areas.
other changes that aren't covered by any of the above.
Sometimes, if the image is simple enough, and you have a good eye, you can do all of the above "in your head", whereas other times, it helps to actually try out the various possibilities in PS. Most of the time, I use a combination of the two approaches.
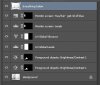
In the case of this particular before-after pair of images, once I got past the biggest change, the overall brightening, the 1st thing I noticed was that the mid-tone contrast of the objects on the table had been greatly reduced. When I tried reducing their mid-tone contrast with a single "brightness/contrast" adjustment layer, I saw that the reduction was not enough, so I had to stack two such layers.
The next thing that grabbed my attention was that the slight blue tinge of the monitor screen was completely gone -- not just in the brightest areas, but also in the mid tones of the border around the RHS of the window. So, this required separate treatment.
I noticed other areas that also needed treatment (eg, the colors of the pen tops (as you pointed out), the black of the phone case), but for a quick demo, decided that it wasn't worth it to spend more of my time on these small areas unless the OP actually requests it.
Anyway, take a look at either the attached screen shot of my layer stack, or the PSD file itself. With the above analysis in mind, and the layer names, the function of each layer should be pretty clear.
HTH,
Tom M
In a case like this, the first thing I do is stare at the starting and goal images and, for each of the major areas in the image, try to carefully figure out which of the following changes were applied:
change in brightness (all tonal ranges)
change in contrast (all tonal ranges)
change in saturation (all tonal ranges)
changes in any of the above three attributes limited to shadow areas, mid-tones, or bright areas.
other changes that aren't covered by any of the above.
Sometimes, if the image is simple enough, and you have a good eye, you can do all of the above "in your head", whereas other times, it helps to actually try out the various possibilities in PS. Most of the time, I use a combination of the two approaches.
In the case of this particular before-after pair of images, once I got past the biggest change, the overall brightening, the 1st thing I noticed was that the mid-tone contrast of the objects on the table had been greatly reduced. When I tried reducing their mid-tone contrast with a single "brightness/contrast" adjustment layer, I saw that the reduction was not enough, so I had to stack two such layers.
The next thing that grabbed my attention was that the slight blue tinge of the monitor screen was completely gone -- not just in the brightest areas, but also in the mid tones of the border around the RHS of the window. So, this required separate treatment.
I noticed other areas that also needed treatment (eg, the colors of the pen tops (as you pointed out), the black of the phone case), but for a quick demo, decided that it wasn't worth it to spend more of my time on these small areas unless the OP actually requests it.
Anyway, take a look at either the attached screen shot of my layer stack, or the PSD file itself. With the above analysis in mind, and the layer names, the function of each layer should be pretty clear.
HTH,
Tom M