What's new
Photoshop Gurus Forum

Welcome to Photoshop Gurus forum. Register a free account today to become a member! It's completely free. Once signed in, you'll enjoy an ad-free experience and be able to participate on this site by adding your own topics and posts, as well as connect with other members through your own private inbox!

Remove unwantd spots from image


Ianro

New Member
Messages
4
Likes
3
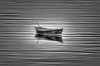
Hi all, I’m trying to learn by doing CS6 and have been retouching the attached 1.jpg. I want to add some more structure to the water to make the ripples stand out but, in this shot the tide was falling and weed was just beginning to appear on the surface. When I try to improve the structure of the ripples in the water by playing with exposure/contrast/curves the weed begins to appear as dots in the image as per 2.jpg

2.jpg has been tweaked to extreme just to highlight the problem. I have been using clone stamp to removes these spots individually but I'm not happy with the result and its going to take an age to complete.

My question therefore is this, is there a better way to remove these spots whilst retaining the ripple structure, I have tried using de speckle and remove dust and scratches but this just softens the ripple structure too much. Any suggestions appreciated.

Thanks in advance.
 

Attachments

  • 1.jpg
    1.jpg
    94.4 KB · Views: 15
  • 2.jpg
    2.jpg
    35.6 KB · Views: 72

Tom Mann

Guru
Messages
7,223
Likes
4,343
When one is faced with a large number of spots,all of which are darker than their surroundings, one improvement is to use the Dust and Scratches filter on a separate layer, but with the blend mode set to lighten, not "normal". One often gets a much better result this way. Of course you have to re-adjust the parameters of the filter carefully when you change the blending mode.

HTH,

Tom
 

IamSam

Administrator
Staff member
Administrator
Messages
22,744
Likes
13,267
I would just crop the image. It's far too centered. This eliminates some of the spottiness in the bottom and then I just zoomed in and used the Clone Stamp Tool to eliminate the remaining.
I also added a slight vignette.

Screen Shot 2014-07-21 at 5.04.24 PM.png
 

iDad

Guru
Messages
11,578
Likes
4,467
I would think with proper selection and motion blur @about 10 maybe 20 px would do it oº angle
 

Sierraccr

Power User
Messages
432
Likes
275
Add contrast, boost with levels, add motion blur and do a stamp visible layer, set to "darker color" blending mode, layer mask out the boat, and you get this. I think it's the kind of look you were wanting? I did this quickly so not quite as precise as I would do normally, but I think it gives you the idea.


1 edit.jpg
 

Tom Mann

Guru
Messages
7,223
Likes
4,343
From the degree of local contrast enhancement the OP showed in his second attachment, I suspect that the OP wants much more contrasty waves than shown in any of the previous responses.

Using a combination of the method that I suggested earlier to minimize the dark spots in the water (ie, a D&S layer set to lighten blend mode), horizontal motion blur (I think first suggested by iDad), HPF and large radius USM to increase the local contrast, topped off with a curves layer and a modest vignette, I was able to obtain the following result without manual use of the clone stamp tool, cropping, or completely replacing the background. If it's important to the OP, by overlaying my tweaked version with the original, one can see that my tweaked version retained the original wave structure almost perfectly.

If the OP is interested, I can fill in the details of this technique for him.

HTH,

Tom

PS - As I usually do in examples like these, intentionally, I greatly overemphasized the effects I wanted to illustrate, in this case, more contrast in the waves without introducing the dark spots the OP was concerned about.

It's always trivial to dial these unrealistic levels of the effect back to a more reasonable level (say, by blending with the original at partial opacity), but if a responder doesn't demonstrate that he can give the OP even more than the OP actually asked for / needs, I feel that proposed methods without this are always a bit suspect.
 

Attachments

  • 1-rjm01-acr-ps02a_sRGB-01.jpg
    1-rjm01-acr-ps02a_sRGB-01.jpg
    161.9 KB · Views: 6
Last edited:

iDad

Guru
Messages
11,578
Likes
4,467
" I feel that proposed methods without this are always a bit suspect."
Tom, why "suspect"? My suggested technique is only a suggestion, I'm not here to do it for him, as so many states we should not do. I spent about two minutes on the image to examine my idea, then only put it out there because I knew it may be of help, no suspicion required.:mrgreen:
 

Ianro

New Member
Messages
4
Likes
3
Firstly thanks to everyone who has taken the time to offer help very much appreciated.
I have only had a little time to try out the first suggestion of using the dust and scratch filter on a separate layer and changing the blending mode so I need to do a bit more experimentation.
Sam’s suggestion is also good, I have already spent over an hour with the clone stamp to get the image where it is, as a newbie I assumed there would be a better way but maybe not.
Tom is right in that I want to add more definition to the wave structure so tom if you could fill in the details of your technique I’d appreciate it.
Thanks again to all.
 

Tom Mann

Guru
Messages
7,223
Likes
4,343
@OP: I'll be back late tonight or tmmrw and will be happy to write up my method.
iDad: That was probably a bad choice of words on my part. What I really was trying to get across was that (specifically for this case) if one doesn't get the local contrast up to the level desired by the OP, the problem of removing the dark spots is vastly easier, so any suggestion / demonstration of a technique to remove them may not work at more extreme levels of local contrast.

Cheers,

Tom
 

Tom Mann

Guru
Messages
7,223
Likes
4,343
OK, here are the major steps, at least, as well as I can remember them:

1. Carefully cut out (ie, select) the boat and its reflection. Put the boat+reflection on its own layer, and keep it at the very top of layer stack through all of the steps which follow since we'll be working almost entirely on the water. Note: for some of the steps, the boat+reflection layer will need to be temporarily turned off so that it's not included in that particular processing step.

2. Using the same selection, put the water MINUS the boat+reflection (ie, a hole where they used to be) on its own layer just above the background layer. Make a duplicate of this to work on while keeping the 1st copy (ie, of the water with a hole in it) as a backup for safety.

Until otherwise stated, all of the following steps pertain to the working copy of the layer with the hole.

3. Use the content aware fill tool to roughly fill the hole.

4. Apply USM at medium radius (as I recall, r ~ 50 pixels, % about 50, threshold = 0). Adjust the BlendIf sliders of the layer so that only the mid-tones are affected by the USM operation.

5. Make a copy of the previous layer, set the blending mode to "lighten", and apply the Dust and Scratches filter to this layer. Adjust the D&S settings to help lighten the dark spots produced by the USM operation without introducing too many artifacts. Although I almost always recommend applying noise reduction (like D&S) as early as possible in the workflow, in this case, doing so had to be delayed until after the USM step so that the dark spots were prominent enough to be identified by the D&S filter.

6. Apply the motion blur filter with angle about minus 1 or 2 degrees (ie, lined up with the waves) and a distance of around 150 pixels.

7. Apply the high pass filter with a radius of 5 or 10 pixels.

8. Apply a levels adjustment, moving the end points in till they are just inside the left and right ends of the histogram.

9. Change the blending mode to soft light and turn off any layers between this one and the one where the horizontal motion blur was initially applied.

10. At this point, you should have a very contrasty, almost noise free wave pattern. Adjust the opacity and BlendIf sliders of the soft light layer to adjust the intensity of the wave enhancement.

11. Brighten the center area of the result and darken the edges.

12. In preparation for the next step, put a "levels" or, even better, a "curves" layer above this, but don't make any adjustments yet.

13. Turn back on the very top layer in the stack, ie, the boat and it's reflection.

14. Adjust the levels or curves layer that you just put it so that the brightness and contrast of the water is appropriate for the boat and gives you the artistic effect you want.


HTH.

Tom
 

Ianro

New Member
Messages
4
Likes
3
Hi Tom, Sorry for the delayed response your step by step has been a great help. I haven't reached a final version yet but I'm now comfortable that I'll be able to get the effect I want.
I've also been experimenting with isolating most of the spots. On a copy of the water layer with the cut out I have isolated the spots (after all the spots are mostly black) by using brightness,contrast and curves adjustments and used this layer to create a selection which I then use with the original water layer to fill using content aware fill. I will try inserting this between steps 3 and 4 and reducing the amount of motion blur slightly to give a less surreal effect for the water. The attached is the results so far. (already up to version 12)

Again thanks very much for taking the time to write up your process very much appreciated.
 

Tom Mann

Guru
Messages
7,223
Likes
4,343
You are quite welcome, Ianro. Thank you for coming back and reporting on your progress. I knew that the abstract / graphic look of the water and perfectly symmetrical cropping would not be to everyone's taste, but, as you discovered, one can easily dial back on the strength of the various effects to make it look more real. Whenever I am doing these little tutorials, I usually exaggerate the effect I'm illustrating to make it obvious, knowing that it can always be reduced.

If you feel like posting it, I would love to see what your final version winds up looking like!

Best regards,

Tom M

PS - Don't forget to click on the "like" or "thanks" buttons, if you feel this is appropriate.
 

Ianro

New Member
Messages
4
Likes
3
It's taken quite a few versions but I have finally arrived at a version I am happy with. Could it be better probably but for now I have invested enough time in the pic. It has been a great learning exercise and I'd again like to thank everyone for their help especially tom for writing up the step by step guide a modified version of which I used to achieve the final result which I have attached.

Ianro

boat17.jpg
 

Tom Mann

Guru
Messages
7,223
Likes
4,343
It looks beautiful, Ianro ... much more refined than the quickie version I turned out, LOL!

Best regards,

Tom
 

Top