
JohnVivaldi
New Member
- Messages
- 2
- Likes
- 0
Hi, so i am new here and to photoshop. I have been searching for the right tutorial for my problem, but i can't find it anywhere.
I saw one guy doing this, but he did it so fast that i couldn't grasp the information. For him it was easy game.
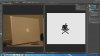
Where should i start... I am trying to put some objects on the back on the surface with perspective tool so that would fit and look nicely. All i remember, that guy linked a smart object with that surface somehow and when he changed the design in that square, it was changing on the surface too. I can't figure it out how he linked those two. He was just using 2-up window, changing objects and they were fitted nicely as they should be.
I will add some screenshot so that You, guys, could understand what i am getting at. I hope it helps.
It would really help me if someone could teach me this. Thanks.
Sincerely, John.
I saw one guy doing this, but he did it so fast that i couldn't grasp the information. For him it was easy game.
Where should i start... I am trying to put some objects on the back on the surface with perspective tool so that would fit and look nicely. All i remember, that guy linked a smart object with that surface somehow and when he changed the design in that square, it was changing on the surface too. I can't figure it out how he linked those two. He was just using 2-up window, changing objects and they were fitted nicely as they should be.
I will add some screenshot so that You, guys, could understand what i am getting at. I hope it helps.
It would really help me if someone could teach me this. Thanks.
Sincerely, John.

")