What's new
Photoshop Gurus Forum

Welcome to Photoshop Gurus forum. Register a free account today to become a member! It's completely free. Once signed in, you'll enjoy an ad-free experience and be able to participate on this site by adding your own topics and posts, as well as connect with other members through your own private inbox!

I'm tearing my hair trying to figure out how to select one of these bottles.


tomthebomb14

New Member
Messages
3
Likes
0
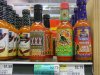
I have a project where I'm supposed to select one of these chili bottles, then delete the bottle, make it look as if the bottle is a full bottle of chili with no label (which I'm assuming I'll do using the cloning stamp and healing patch), then I have to design four unique labels and put them on the bottle. I'm so frustrated right now because I can't even select a frickin' bottle! I have to use one of the images my teacher gave me, but what's really making me mad is the fact that he took these at a Whole Foods, and the bottles are almost impossible to mask. This is because they're surrounded by other bottles right behind them, making the background impossible to separate from the bottle itself. I've tried using a pen tool, a lasso, a quick selection (which sucked) and nothing I do seems to get me a good selection of the bottle. I've tried using the mask to refine the edges, but for some reason it looks like complete ****. Is there anything else I can be doing? Is there something I'm doing wrong? Here's the image that I have to select a bottle from (it doesn't matter which bottle).

http://i.imgur.com/XgHg4eV.jpg

This was the best selection I got, but it's still jagged and pretty poor in my opinion.

http://i.imgur.com/DWAlftc.png

Do you have any tips, instructions or links to tutorials to help me? Please, I'm really frustrated at this point. Thanks so much.
 

Attachments

  • p2.JPG
    p2.JPG
    1.4 MB · Views: 3

ALB68

Dear Departed Guru and PSG Staff Member
Messages
3,020
Likes
1,332
Try making a rough selection, enter Ctrl J to put it on a layer, then add a layer mask. Then with your paint brush at black, paint away the excess around the bottle. You can add back as needed by switching to white for paint.

Gosh, I don't know how your going to get a lot better than what you got though. Any raster based image is going to show some edge pixels. Try using your blur tool on the edges. You can also take the image you did and put a layer mask on it and clean it up a bit. Upon close inspection I do see some rough edges on the left side facing it and as indicated.
DWAlftc2.png
 
Last edited:

tomthebomb14

New Member
Messages
3
Likes
0
I appreciate the advice. When I tried to make a new mask with a layer from my already-cut image, it won't let me alter it any. Is there something special about images that have already been selected and pasted?
 

MikeMc

McGuru
Messages
1,872
Likes
1,202
Duplicate the layer and mask (control J ) then click on the duplicate mask and paint black or white with your hard brush
 

ALB68

Dear Departed Guru and PSG Staff Member
Messages
3,020
Likes
1,332
Here is a resulting image using the layer mask procedure.
XgHg4eVwm.png
 

ALB68

Dear Departed Guru and PSG Staff Member
Messages
3,020
Likes
1,332
I appreciate the advice. When I tried to make a new mask with a layer from my already-cut image, it won't let me alter it any. Is there something special about images that have already been selected and pasted?

You have to paint IN the mask with black to remove pixels, paint white to recover them. The mask should be white when first applied. Painting with white in this mask at this point will have no effect.
 
Last edited:

hawkeye

Guru
Messages
2,378
Likes
1,113
A vector mask would work well for this type on image...
 

Attachments

  • ScreenShot001.jpg
    ScreenShot001.jpg
    43.1 KB · Views: 26

ALB68

Dear Departed Guru and PSG Staff Member
Messages
3,020
Likes
1,332
A vector mask would work well for this type on image...

Would be very helpful if you would walk through the steps hawk.
 

tomthebomb14

New Member
Messages
3
Likes
0
This looks really good. Would you mind detailing the steps a little more? I kept trying to use the quick selection tool and I just got so much excess selection that when I tried to use the paint method it wouldn't work. I'm honestly not sure what I did wrong.
 

ALB68

Dear Departed Guru and PSG Staff Member
Messages
3,020
Likes
1,332
Let me see if I can walk through making the vector mask.
#1 - Be sure your background is a layer and not background. (Dbl Click in it to make the layer)
#2 - With your pen tool set to path draw an path around the bottle you want to keep.
#3 -Once done, hold down the Ctrl key and click on the Layer Mask icon at the bottom of the layers panel. (mask will be transparent)
#4 - Go to Window on the menu bar and with your layer selected click Properties
#5 - On the properties panel click the little dotted circle at the bottom of the panel- all the pixels around the mask will be selected now.
#6 -Click the eyeball icon in the Properties panel to close it. Your bottle will appear.
#7.-Enter Delete..the background disappears.
#8 -Delete the vector mask (right click) as it will now have a red strikethrough.
#9 -Save your file

Edit: This was done with the pen tool set to Subtract Front Shape.

XgHg4eVvector.png
 
Last edited:

hawkeye

Guru
Messages
2,378
Likes
1,113
Make sure the layer is a regular layer. With the pen tool make a path around the bottle. From the main menu: Layer - Vector Mask - Current Path. Adjust the path as necessary.
 

ALB68

Dear Departed Guru and PSG Staff Member
Messages
3,020
Likes
1,332
Make sure the layer is a regular layer. With the pen tool make a path around the bottle. From the main menu: Layer - Vector Mask - Current Path. Adjust the path as necessary.
When I did that..this is what I got. What did I do wrong or fail to do?
whenididthat.PNG
 

ALB68

Dear Departed Guru and PSG Staff Member
Messages
3,020
Likes
1,332
Check the settings on the pen tool,it looks like it is set to subtract.

Right! This setting was set to Subtract Front. It should have been set to Combine Shapes on the dropdown. To correct this result all one has to do is change the setting after the transparent one is shown.
pentoolplus.PNG
 

IamSam

Administrator
Staff member
Administrator
Messages
22,752
Likes
13,268
From the main menu: Layer - Vector Mask - Current Path.

Just to add a quick note, there is a keyboard shortcut for adding vector masks. Hold the Command or Control key when clicking the 'Add Layer/Vector Mask' icon located at the bottom left side of the layers panel.
 

ALB68

Dear Departed Guru and PSG Staff Member
Messages
3,020
Likes
1,332

ALB68

Dear Departed Guru and PSG Staff Member
Messages
3,020
Likes
1,332
Just to add a quick note, there is a keyboard shortcut for adding vector masks. Hold the Command or Control key when clicking the 'Add Layer/Vector Mask' icon located at the bottom left side of the layers panel.
Yep, I told OP that in my convoluted methodology! Thanks for emphasizing.
 

IamSam

Administrator
Staff member
Administrator
Messages
22,752
Likes
13,268
You would think that..but it doesn't work that way. The setting determines whats revealed.

I learned something. If you use a layer mask made with a selection, you can invert the mask selection.

Inverting does not work with a vector mask. The Pen Tool setting has to be on 'combine shapes' when creating the path.

Thanks guys!
 

ALB68

Dear Departed Guru and PSG Staff Member
Messages
3,020
Likes
1,332
I learned something. If you use a layer mask made with a selection, you can invert the mask selection.

Inverting does not work with a vector mask. The Pen Tool setting has to be on 'combine shapes' when creating the path.

Thanks guys!

Absolutely. I invert regular layer masks all the time. That way you can paint "in" instead of paint "out". But as you said, it doesn't work with vector masks Shortcut is Ctrl/Cmd + I (eye)
 
Last edited:

Top