What's new
Photoshop Gurus Forum

Welcome to Photoshop Gurus forum. Register a free account today to become a member! It's completely free. Once signed in, you'll enjoy an ad-free experience and be able to participate on this site by adding your own topics and posts, as well as connect with other members through your own private inbox!

Selecting an area based on its size, working with halftones.


thelastlokean

Member
Messages
7
Likes
0
First off I'm really into halftone dots and I love the abilities with channel splitting that photoshop offers. I'm all about the split the channels, convert to bmp with custom pattern or halftone dots, then recombine for awesome printing / effects.

The biggest limitatuion / frustration I am having is setting a maximum dot size. The algorithm seems to create varying size dots spaced uniformly to represent the image. I lothe lve it overall, but I want to stop some of the bigger dots from overlapping, and destroying the white space, especially when re-combined with the other channels.

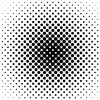
So say I have a gradient of dots like this:

pattern-black-dots-24260067.jpg

I want to reduce the largest dots in size by say 10%, while leaving the medium and small dots untouched. If you zoom in on this image, none of the big dots are actually touching there is white space around them. I can easily reduce the size of all the dots, but how to bring back the medium and small dots after, or only select/reduce the big dots?
I'm thinking it would it be possible if I converted the dots to a vector and then manipulated/filter them based on radius or some such?


So to calibrate prints, I am trying to reproduce a magazine page, screen printed in a rosette pattern. Here is a snapshot with a digital microscope around 500x.

30c4wa1.jpg

I scanned the image in 4 separate angles, and combined them, used Gaussian blur and sharpened to get a quality image free of halftone dots.

I then attempted to recreate the halftone dots in the above method and recombined them with multiply. Compared to the original it is slightly too vivid and saturated, zooming in on the same section observed with the microscope shows the largest dots fill to much of page and don't leave enough white space around the rosettes. Managing to control the maximum dot size would allow for really controlling my prints with photoshop and not getting a multiple thousand dollar RIP involved.

s5grqv.jpg

So I haven't even printed it yet, but even if it turned out perfect it will be printing something that is too vivid and saturated completely lacking in white space.

Any advice would be very appreciated! I plan on putting together a small guide on how and why I'm doing all of this.
 

Tom Mann

Guru
Messages
7,223
Likes
4,343
If I understand you correctly, you have an existing half-tone pattern, and you want to come up with some procedure by which you can modify it so that the largest circles don't touch at all.

My suggestion is that instead of starting with an existing half-tone pattern, you simply start with a half-tone generation program that allows you to do modify the max and min sizes of the dots to be whatever you want. VanDerLee's program, "Half Tone" does exactly this. First, a screenshot of some of the many adjustable parameters available to a user.

dot size controls.jpg

Next, the results of slightly adjusting the sliders shown in the previous screen shot:

adjustable_half_tone_pattern.gif

HTH,

Tom M
 

Tom Mann

Guru
Messages
7,223
Likes
4,343
BTW, although I didn't mention this in my previous post (because I thought it was obvious and for some reason, wasn't what you wanted), I presume you realize that if you are using PS's half tone tool, you can control the minimum and maximum sizes of the dots simply by adjusting the starting image so that it doesn't have any pure blacks or pure whites -- just pull in the sliders on a "Levels" adjustment layer.

Tom M
 

thelastlokean

Member
Messages
7
Likes
0
Thanks so much, that tool is exactly what I need! I have been hunting long and hard for pretty much that exact thing! I'll definitely be buying it.

I had the thought of playing with the levels, but I tended to find I couldn't get an entire image to the point I wanted by adjusting the levels... It just left some areas too washed compared to other areas, maybe I just had to experiment with the levels a bit more, I just got to a point where everything was perfect except one or two regions or the image where the dots were like 5-10% to big. So if I could redo it all with a defined maximum and minimum dot size that would be amazing!

Most people have told me I need some fancy RIP for my printer in order to achieve exactly what it lookslike Vanderlee's achieves...

Is Vanderlee's pretty much the best around for halftone generation and cool things like controlling the dot tones? I would really live something just like photohops built in pixelate-halftone filter, with just more options! Or is Vanderlee's more like doing bitmap conversions, in which I will have to do it 4 times, one for each color then recombine them?
 
Last edited:

Tom Mann

Guru
Messages
7,223
Likes
4,343
Hi -

I'm glad you found my suggestion useful.

WRT using the levels adjustment sliders to adjust the endpoints inwards, this will definitely prevent PS's pixelate/halftone filter from producing either total blank areas or merged dots - I just double checked that it worked with that filter. Just be sure you are moving the correct sliders. In a levels adjustment layer, you need to be moving the lower sliders (ie, the two "output levels") inwards, NOT the upper three sliders.

I have been using VanDerLee's plugin for ages, and consider it the best bang for the buck compared to RIP software. My only gripe with it is that, if I'm not mistaken, he hasn't updated it in a while, so it only is compatible with 32 bit versions of PS, not 64 bit versions. That's not a big deal if your files aren't huge, as even the latest versions of PS CC allow one to manually install the 32 bit version of PS alongside the 64 bit version with no problem whatsoever (...that's what I do). Do check, however, perhaps he has upgraded it since I last looked. BTW, it does work on 16 bpc files, not just 8 bpc files.

To answer your last question, yes, VanDerLee's filter is only B&W, so, you have to do the separations manually and recombine the 4 colors. OTOH, the ability of VanDerLee's filter to save groups of settings makes it a lot easier to do this precisely.

Although it certainly is not the same as a halftone filter, from what you have said, I suspect you might also like "Engraver":
http://www.alphaplugins.com/products/products.php?menu=get_prod_id&prod_id=2


HTH,

Tom M
 

thelastlokean

Member
Messages
7
Likes
0
Edit: Do you know if vanderlee's works on CS6? The compatibility chart only says up to Photoshop 5...

It was! I have been on quite the Google hunt before I decided to go find some photoshop experts to ask! I had messaged a few other people with blogs about halftone dots / rosettes, screen-printing, etc. All of them pretty much told me I had to go spend a few thousand on a RIP and compatible printer if I wanted to make dots... I haven't actually bought Vanderlee's yet, I just returned home from a weekend adventure and will certainly be picking up both of those plugins you suggested when I get paid next Friday, my funds for the printing project are tapped until then :frown:. I am slightly confused on what VanDerLee's filter does; did you just apply the filter effect to the halftone-image I provided and drag the large-dot slider to the left? Or did you just re-create a very similar halftone gradient from a new grayscale image? Also, I assume when you say the filter is B&W only you are talking grayscale and not tiff/bmp?

Do you know of any other similar photoshop plugins I might want to pick up, or you would recommend for someone working with inkjet printing, calibration ,screen-printing, and hard-proofing without a RIP? I am generally just messing around as a hobby, and am not going to spend thousands of dollars, at least not right away :lol:. I recently picked up a 2008 Epson Artisan 810 photo-inkjet printer from craigslist for $40, it really is an a high quality photo-printer but I don't think it has a postscript chip and I couldn't find any compatible RIP software, I'm not sure if something like AccuRIP would work... It isn't on the supported printer list, but lots of very similar Epson printers are. I primarily picked a semi-old Epson Artisan because they are very easy to modify with a CISS (continuous ink supply system), $40 will get you the entire system and $20 of ink will last many months of heavy printing, probably years of average use.

Again, thank you for all the input and support on this! Hopefully I'll be able to contribute back once I make it beyond being a photoshop noob.
 
Last edited:

Tom Mann

Guru
Messages
7,223
Likes
4,343
With respect to compatibility, I have used VanDerLee's filter on versions of PS from well before CS6 to the most current "Creative Cloud" version, the only caveat being what I said before -- it only runs on 32 bit versions of PS, not 64 bit versions.

With respect to your question about how I created my little GIF animation demo, I started with my own very soft edged, contone, circular gray blur on a white background, and then applied VanDerLee's Halftone filter to it -- once with the sliders in my screen shot in one position, and a second time with the sliders in a different position. To be honest, I can't remember if I was working in grayscale or RGB for the demo, and I can't look because my computer is in the middle of a major backup at the moment.

With respect to your question, "...I assume when you say the filter is B&W, only you are talking (sic) grayscale, and not tiff / bmp...", I don't understand your terminology, so let me try to clarify in my own words: VanDerLee's filter is applied to normal, continuous tone images such as photographs. I believe that if you present it with a color image, it internally desaturates the input image, and then generates the halftone pattern that you see in the images in this thread. The output is always in the exact same mode and color space as the original image, so, if you feed it a 8 bpc sRGB file, the output is also 8 bpc RGB. Specifically, it doesn't do anything like force your document to switch from an RGB mode to a black and white bitmap mode.

Finally, with respect to your question about other plugins that I might suggest, I doubt you would like "Rasturbator". The last time I looked, its output was much too crude. OTOH, I do remember (a few years ago) running across a stochastic half-tone plugin that wasn't very expensive, but, as I said, my computer is tied u at the moment, so I can't look this up for you.

Cheers,

Tom M
 

thelastlokean

Member
Messages
7
Likes
0
Thanks much, I managed to free up the needed funds to buy a copy of vanderlee's... Some initial comments and thoughts on the software. It seems to have a hard time in working with images that are beyond 600 dpi, things like 5880 dpi images are terribly sluggish and generate all kinds of memory overflow errors, it does technically still seem to work though. It also is limited to 200 LPI in the creation of halftone dots, not the end of the world as those are some pretty small dots, but you can go a bit further with other methods and images that have high dpi. Also, the software seems to have some kind of negative impact on the resulting color of the final image in comparison with the same angles, etc than using the bitmap method, or the photoshop 'color halftone' filter. On a whole, I have yet to get the software to help me achieve what I was originally going for, a nearly perfect duplicate of a scanned image dot-for-dot. I think the color issue I am having, is because the filter won't let me work in CMYK colorspace, only RGB. When I try to assign a pure 'magenta' or 'cyan' layer, it adjusts it to something like 93 cyan, 3 magenta, 3 yellow, 1 black.

On another note, I figured out another very basic thing that really seems to help me out. By using image-adjustments-'variations' within photoshop I just lightened the midtones. This resulted in any of the 'dot' creating programs creating the exact same image, just with smaller dots for all of the color sections. The resulting image is nearly a perfect match of the original magazine page in any section, the dots are nearly identical in shape, size, orientation and color.

Here is a screen shot of the resulting section on photoshop:
95r39z.jpg
 

Tom Mann

Guru
Messages
7,223
Likes
4,343
Hey, it sounds like you are having problems with the VanDerLee filter due to limited memory. I just fired up my copy of the filter on a 2 layer, 5000x5000 pixel grayscale, 8bpc image of a couple of blobs of light (see below - note the ruler shows that the size of this starting image is indeed 5kpx square) ...

5000x5000px_starting_image-screen_shot_with_ruler.jpg

VanDerLee's Halftone filter (at around 20 lpi) turned it into dots in about 10 or 11 seconds with no problems, not even a hickup, LOL. At 200 lpi, it took about a minute - no problems, just slower. Below is a crop of a small area on the edge of one of the blobs of light to show the smooth transition from light to dark.

700px_square_crop_from_5k_x_5kpx_image.jpg


FYI, I did this test on a PC running Win 8.1. It has 64 Gig of fast RAM, a moderately overclocked i7 processor, and a bunch of fast SSDs. As we talked about earlier, because this filter seems to be limited to running under 32 bit Photoshop, that's what I had to use.


With respect to the 200 lpi limitation, I wouldn't worry too much about it. If you have enough memory, you can do tricks like work on a 2x scaled-up version of your image, process it in "Halftone" at 200 lpi, and then down-rez by 2x to get an effective 400 lpi linescreen.

HTH,

Tom

PS - Glad you figured out that lightening the midtones using "variations" helped with your dot overlap problem. Basically, this is doing almost exactly the same thing that I suggested earlier, except that I like adjusting the tonality of the starting image using either a "levels" or "curves" adjustment layer. These give much finer control than "variations" does.
 

thelastlokean

Member
Messages
7
Likes
0
My system is a workstation, 2x xeon x5450 quad cores oc to 4.0 Ghz..., 128 gigs of ram, I run photoshop on a 64 gb ramdisk... I can't imagine any of my system specs are the limiting factor, such a setup will most certainly outperform any stock i7, and be quite similar when both are maximum oc'd... As I am using server memory, it is fully buffered and slightly slower, but has some benefits of accuracy and stability...

I am using CS6, the 32 bit version will only let me allocate 3.2 gb of ram. The images I am working with are 8"x10" 5760 dpi, so 46,080x57,600. But I am working with 4 instances of each of them and using them as 'smart filters', one for each color.

Everything runs smooth and fast, up until I click on the vanderlee filter, then every click takes 90 seconds of full cpu use, locking up the system and generating the error, I have contacted the VanDerLee people about the issue, maybe they will have some insight. So I am just not certain what is causing the issue.... I really wish it supported 64 bit Photoshop though! It would certainly solve all my issues. Too bad the project isn't open source, it wouldn't be too hard to make it 64-bit compatible, as long as one had access to the source code...

Regarding the color change, if I split the image into its grayscale cmyk components and then halftone with bitmap the colors turn out perfect, but I get very limited control of the dots. If I halftone those same grayscale layers with VanDerLee I get a similar result, with much more control, however my colors are getting all wonky. In both cases I am using 'multiply' to re-merge the layers. I have made sure to turn off all other possible effects in VanDerLee, smoothness set to '0', etc. I even made sure both cases were at 200 lpi, left VanDerLee small dots at 0, large dots at 100, etc.

I am going to try making the dots specifically black&white with VanDerLee's, then overlay colors on each layer with a 'mask' in CMYK mode, that also might help fix my color situation.

That sounds like a wonderful workaround to the 200 lpi issue, I can certainly handle that... The projects I am currently working on are 300 LPI. However doubling the resolution seems completely out of the question in my case without 64-bit support...

I am certain I will use VanDerLee's halftone filter in many of my future projects, however I think for this one I am sticking with the photoshop 'halftone' filter, combined with 'variations', in order to achieve my desired result.

To summarize and clarify exactly what I'm doing and why. Using a calibrated scanner a screen printed 200 lpi page at 4 different angles all 90 degrees apart is scanned, the 4 angles are then combed to get a very clean scan. I then remove all the dots with a Gaussian blur, followed up with a sharpening. I then split the image into its CMYK components, I then recreate halftone dots, and adjust the images midtones with variations in order to get a color match, which seems to result in a dot-size and spacing match. I then print the image on an inkjet printer and examine the image at a far and with a 500x microscope, it is nearly indistinguishable from the original.

I use the exact workflow and settings with all of my photos, and other things I want to print at a high quality image. The final result is undeniably superior to just printing an RGB image. I think this is the best that I can achieve without a proper RIP. Very high quality prints, on a very limited budget.
 
Last edited:

Top