What's new
Photoshop Gurus Forum

Welcome to Photoshop Gurus forum. Register a free account today to become a member! It's completely free. Once signed in, you'll enjoy an ad-free experience and be able to participate on this site by adding your own topics and posts, as well as connect with other members through your own private inbox!

Adding or Modifying Skin Pores Texture in Photoshop


Tom Mann

Guru
Messages
7,223
Likes
4,343
@chrisdesign - You have a call on the white courtesy telephone, LOL.

Hi Dirk - Chris has been a professional retoucher for decades and probably is the best person on this forum to answer your question.

When I need to add some skin texture, I have a folder with quite a few high rez images of people's faces with nice texture, and I steal skin textures from them, LOL. I'll select a corresponding area of the face, make a copy, desaturate it, run it through the high pass filter, and then put that on a layer above the face I am retouching, and set the layer blend mode to either overlay or soft light. That way, it preserves the underlying color and lighting, but adds the texture from my face library. I've heard that there are some nice brushes out there, but since I do this sort of thing so infrequently, I've never looked into them.

Hang on for a few hours - I'm sure Chris will see this thread and respond.

Cheers,

Tom M

PS - BTW, I just noticed that when I first posted the above method, I forgot to include one important step. Around a small darker area like a pore, the high pass filter will generate areas both above and below the usual rgb=128 average value. If you apply that result directly to the other image using a straightforward "overlay" or "soft light" blending mode, this will produce unwanted lighter halos around the desired, darker pore areas. So, to look realistic, it's important to use the "darken" blending mode when blending the previous result with the original. When I get a chance I'll do a little demo and write it up.
 
Last edited:

Dirk D

Member
Messages
6
Likes
1
Hey Tom,

Thanks for the response. That sounds like a great technique. I'm curious to see what Chris has to say.
 
Messages
4,145
Likes
6,072
Hi Dirk,
It's not a brush, it is a technique to "shape" skin tones to achieve a certain effect.
I always work with the frequency-separation-technique. The link below is not just a tutorial, but it explain this technique very good.
Once you get the hang of it, you'll get much better results shortly, and you have full control of "Skin Pores".
http://fstoppers.com/post-production/ultimate-guide-frequency-separation-technique-8699

This is an example I did here in the forum.
https://www.photoshopgurus.com/forum/before-and-after-showroom/50020-young-blond-pretty.html
 

Dirk D

Member
Messages
6
Likes
1
Re: Re: Adding or Modifying Skin Pores Texture in Photoshop

Thanks Chris,

This looks like it's something I'm going to have to play with to get good at. I really like Tom's technique as well. I think it might be about doing a little of both.
 

Tom Mann

Guru
Messages
7,223
Likes
4,343
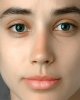
FWIW, here is a quick little demo of the technique I described in an earlier post to add pores and texture to skin.

Since this technique adds texture to existing texture, not replaces existing texture, I wanted a starting image that had almost no skin texture. I immediately thought of some of the over-smoothed responses in the well known Esther Honig project, so I selected this version:
http://blogs.dw.de/womentalkonline/files/Esther-vietnam.jpg

In a day or two, I'll tell you whose skin texture I applied to Esther, but for the moment, suffice it to say that she is very well known, considerably older than Esther, has a more red-tanned complexion (vs Esther's smoother and more olive skin tones), and has much larger pores, so, this demo exaggerates the effect compared to what one would do if this was a real project. However, what this brings out is that to get truly realistic pores, even when doing something as simple as copying from someone else, one has to get a lot of things just right.

The other problem was that the "texture source woman" I used had long hair obscuring both sides of her face, so, because of this, I couldn't directly apply texture to those areas of Esther's face except by using other methods, which I didn't really want to have to do for this demo.

Anyway, see what you think.

Tom M

PS - Total time to prepare the demo was about 10 minutes to find the two starting images, and about 5 minutes of actual Photoshop work.

PPS - Because GIF animations always muck up fine detail to some extent, I added a standard, static JPG of the final result, as well as the animation.
 

Attachments

  • girl-over_smoothed_skin-Esther-vietnam_w_GwynP's_skin_texture-ps12b_sRGB-698px_hi-8bpc-for_GIF.gif
    girl-over_smoothed_skin-Esther-vietnam_w_GwynP's_skin_texture-ps12b_sRGB-698px_hi-8bpc-for_GIF.gif
    427.1 KB · Views: 34
  • girl-over_smoothed_skin-Esther-vietnam_w_GwynP's_skin_texture-ps12b_sRGB-698px_hi-8bpc-for_GIF-0.jpg
    girl-over_smoothed_skin-Esther-vietnam_w_GwynP's_skin_texture-ps12b_sRGB-698px_hi-8bpc-for_GIF-0.jpg
    258.6 KB · Views: 33
Last edited:

Dirk D

Member
Messages
6
Likes
1
Hey Tom,

Thanks for the example it looks Awesome. Where did you get the skin pores to start ?
 

Tom Mann

Guru
Messages
7,223
Likes
4,343
The pores were courtesy of ...

girl-over_smoothed_skin-Esther-vietnam_w_GwynP's_skin_texture-ps112a_sRGB-698px_hi-transition-fo.gif

:)

Tom

PS - If you are seriously interested in this technique, there were a few other things that I did that deviated slightly from the quick description I gave earlier. For example, I had to morph Gwyneth's face to make it match the shape, size, etc. of Esther, I decided to use a slightly different blending mode, I had to sharpen up Gwyneth's photo before use, mask texture away from the eyes, etc.

PS #2 - The animated GIF is set for 0.5 sec between frames, but it's fairly big, so, when you first start to view it, it takes time to load each frame. Subsequent views should be faster.
 
Last edited:

Dirk D

Member
Messages
6
Likes
1
Hey Tom,

This is Awesome !!!! Thanks for taking the time to make the GIF. This is by far the best technique I have seen so far.
 

Pedro Castro

Member
Messages
12
Likes
7
Hi Dirk,
It's not a brush, it is a technique to "shape" skin tones to achieve a certain effect.
I always work with the frequency-separation-technique. The link below is not just a tutorial, but it explain this technique very good.
Once you get the hang of it, you'll get much better results shortly, and you have full control of "Skin Pores".
http://fstoppers.com/post-production/ultimate-guide-frequency-separation-technique-8699

This is an example I did here in the forum.
https://www.photoshopgurus.com/forum/before-and-after-showroom/50020-young-blond-pretty.html

Exactly what Chris posted.
There's a technique using the High Pass filter that uses the original skin pores. You can search the web for it for tutorials.
I think it's the best way to do this.
 

Top