
Photoshop Gurus Forum
Welcome to Photoshop Gurus forum. Register a free account today to become a member! It's completely free. Once signed in, you'll enjoy an ad-free experience and be able to participate on this site by adding your own topics and posts, as well as connect with other members through your own private inbox!
You are using an out of date browser. It may not display this or other websites correctly.
You should upgrade or use an alternative browser.
You should upgrade or use an alternative browser.
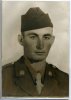
Second photo retouching!

chrisdesign
Guru
- Messages
- 4,145
- Likes
- 6,072
Very nicely done niv0070. Good job!
niv0070
Member
- Messages
- 17
- Likes
- 7
Very nicely done niv0070. Good job!
Thank you very much Chris, do you see anything that requires fixing?

- Messages
- 22,744
- Likes
- 13,267
You've done a great job, but it's far from being a complete restoration. You've addressed the larger issues, but you've left behind the majority of the repairs.
This area needs to be redone (if you worked on a new layer, this will be easy).
The edges are hard and need to be feathered out and blended.
There are flecks and specks and small areas of damage that need to be repaired. The best tool for the specks is the Spot Healing Brush.

This area needs to be redone (if you worked on a new layer, this will be easy).
The edges are hard and need to be feathered out and blended.
There are flecks and specks and small areas of damage that need to be repaired. The best tool for the specks is the Spot Healing Brush.
niv0070
Member
- Messages
- 17
- Likes
- 7
You've done a great job, but it's far from being a complete restoration. You've addressed the larger issues, but you've left behind the majority of the repairs.
This area needs to be redone (if you worked on a new layer, this will be easy).
The edges are hard and need to be feathered out and blended.
There are flecks and specks and small areas of damage that need to be repaired. The best tool for the specks is the Spot Healing Brush.
This is after taking care of the specks and the flecks, redone of the said area, and coloring.
I also added flares to the eyes for the realism.


agentmoeller
Guru
- Messages
- 1,376
- Likes
- 1,026
Great restore overall. The color in the face looks a little artificial, and is not consistent with the rest of the photo. (specifically the rear edge of his right cheek - looks like a highlight) Maybe reduce the opacity a bit on the peach, or desaturate, depending on how you created it.
niv0070
Member
- Messages
- 17
- Likes
- 7
Great restore overall. The color in the face looks a little artificial, and is not consistent with the rest of the photo. (specifically the rear edge of his right cheek - looks like a highlight) Maybe reduce the opacity a bit on the peach, or desaturate, depending on how you created it.
Reducing the opacity of the layer (only coloring layer) can do the trick?
agentmoeller
Guru
- Messages
- 1,376
- Likes
- 1,026
It will reduce the intensity of the coloring. Desaturating the layer slightly might help. You can also add a layer mask to the color layer (assuming again that it is on its own layer), and erase (with a very-low-opacity, soft black paintbrush) away some of the color.
- Messages
- 22,744
- Likes
- 13,267
This lightened area is giving the appearance of a secondary light source coming from the soldiers right side. It contradicts the the light source of the entire original image.

If you look at the original, the side of his face is shadowed.
Subtlety..............stick to what's there in the original.

It may be a good idea to step back and just work on the restoration. You can visit colorizing later.
If you look at the original, the side of his face is shadowed.
Subtlety..............stick to what's there in the original.
It may be a good idea to step back and just work on the restoration. You can visit colorizing later.
Last edited:
MrToM
Guru
- Messages
- 3,595
- Likes
- 3,321
I think you have to stop and re-assess just exactly what it is you are trying to do here.
Your thread title says 'Retouching' and yet your first post is actually a restoration, which, in my eyes should never include any 're-touching' whatsoever.
You then 're-touch' the image by adding 'color' to it...
Well OK, if this was a manipulation or a 're-touch' then fine but not on a restoration.
You then added...
On a 'real' photo to begin with?
You think you can make it look more real than real?
Its at this point I thought I should add my 2¢
You've had some good advice already from IamSam and even some more whilst I'm typing this...(Damn you Sam!), but you really should decide on what it is you want to do with this....you can do both of course but not at the same time.
Pick one, go with it and complete it first before doing anything else.
If you're going for a restoration then forget re-touching, restoration is at the name suggests....restoring the image to its former condition.....and not adding your own stuff to it.
If you are re-touching then sure....add colour, remove minor skin blemishes, change skin tones, change the background, add a third leg....whatever.
In the footsteps of Sams techniques, here is what I see as a 'restoration', not a re-touch...


Regards.
MrToM.
Your thread title says 'Retouching' and yet your first post is actually a restoration, which, in my eyes should never include any 're-touching' whatsoever.
You then 're-touch' the image by adding 'color' to it...
Why?...I tried to add a bit of life to the picture, so I added some color...
Well OK, if this was a manipulation or a 're-touch' then fine but not on a restoration.
You then added...
Realism?...I also added flares to the eyes for the realism...
On a 'real' photo to begin with?
You think you can make it look more real than real?
Its at this point I thought I should add my 2¢
You've had some good advice already from IamSam and even some more whilst I'm typing this...(Damn you Sam!), but you really should decide on what it is you want to do with this....you can do both of course but not at the same time.
Pick one, go with it and complete it first before doing anything else.
If you're going for a restoration then forget re-touching, restoration is at the name suggests....restoring the image to its former condition.....and not adding your own stuff to it.
If you are re-touching then sure....add colour, remove minor skin blemishes, change skin tones, change the background, add a third leg....whatever.
In the footsteps of Sams techniques, here is what I see as a 'restoration', not a re-touch...
Regards.
MrToM.
niv0070
Member
- Messages
- 17
- Likes
- 7
I think you have to stop and re-assess just exactly what it is you are trying to do here.
Your thread title says 'Retouching' and yet your first post is actually a restoration, which, in my eyes should never include any 're-touching' whatsoever.
You then 're-touch' the image by adding 'color' to it...
Why?
Well OK, if this was a manipulation or a 're-touch' then fine but not on a restoration.
You then added...
Realism?
On a 'real' photo to begin with?
You think you can make it look more real than real?
Its at this point I thought I should add my 2¢
You've had some good advice already from @IamSam and even some more whilst I'm typing this...(Damn you Sam!), but you really should decide on what it is you want to do with this....you can do both of course but not at the same time.
Pick one, go with it and complete it first before doing anything else.
If you're going for a restoration then forget re-touching, restoration is at the name suggests....restoring the image to its former condition.....and not adding your own stuff to it.
If you are re-touching then sure....add colour, remove minor skin blemishes, change skin tones, change the background, add a third leg....whatever.
In the footsteps of Sams techniques, here is what I see as a 'restoration', not a re-touch...
Regards.
MrToM.
MrTom, thank you very much for the honesty, I did actually mean restoration (Im from Israel and english is my second language so I didnt find the right word), I took away the paint and focused only on the restoration as you and IamSam advised, this is what I did so far (focusing on the restoration only):

Last edited:
MrToM
Guru
- Messages
- 3,595
- Likes
- 3,321
Getting there! 
Could do with a little fine tuning around the neck still but the majority of it is pretty good.
I think its just a case of practice now, and then some more practice, and when you've done that....practice some more.
One quick question....your last image seems much larger than the original in your first post.....which is what I used.....is there a larger 'original' image or did you re-sample it?
Regards.
MrToM.
niv0070
Member
- Messages
- 17
- Likes
- 7
Getting there!
Could do with a little fine tuning around the neck still but the majority of it is pretty good.
I think its just a case of practice now, and then some more practice, and when you've done that....practice some more.
One quick question....your last image seems much larger than the original in your first post.....which is what I used.....is there a larger 'original' image or did you re-sample it?
Regards.
MrToM.
The first image on the first page is the original, and the last image is made out of the first.
Its only my second use of photoshop ever, I dont know how to re-sample
MrToM
Guru
- Messages
- 3,595
- Likes
- 3,321
Well that's irrelevant, its happened and you appear to be working on a re-sampled version....Its only my second use of photoshop ever, I dont know how to re-sample...
This is not necessarily a bad thing but re-sampling to a larger size is usually not a good idea, especially if working on someones elses 'restoration' image.
Somehow you've re-sampled the image.....I'd check it with the original....you'll see the difference in size....its almost 80% bigger.

Regards.
MrToM.
niv0070
Member
- Messages
- 17
- Likes
- 7
Good to know!Well that's irrelevant, its happened and you appear to be working on a re-sampled version.
This is not necessarily a bad thing but re-sampling to a larger size is usually not a good idea, especially if working on someones elses 'restoration' image.
Somehow you've re-sampled the image.....I'd check it with the original....you'll see the difference in size....its almost 80% bigger.
View attachment 56155
Regards.
MrToM.
How can I prevent that from happening? what does the resampling do to the image? when should I resample?
sorry for the questioning.
MrToM
Guru
- Messages
- 3,595
- Likes
- 3,321
...sorry for the questioning...
No worries...
Re-sampling 'resamples' the image either to a larger, (to be avoided at all costs), size, or a smaller, (use only if you really need to), size.
PS interpolates, calculates, applies an algorithm.....call it what you will, to enlarge or reduce the number of pixels that make up the image.
Reducing an image is not as bad as enlarging as the result is more or less original pixels...with some removed to make the image smaller.
Enlarging an image requires calculation to create extra pixels an add them to the originals. Depending on how good the calculation is gives either a good result or really bad result. Most of the pixels in an enlarged image are not original....therefore its just not as good.
PS has got better at re-sampling and some images do re-sample really well.....if your HAS been re-sampled then it looks pretty good but take that as an exception rather then a rule.
As to when to re-sample....well never if you can avoid it.
People make the mistake or just don't think about image size when they first create an image, later expecting to be able to get it printed at poster size with all the clarity of the original....this is just not possible with small images.
The only option is to then make the image 'bigger' by re-sampling.....but with the downside of the above.
As to how it happens.....well, in your case I don't know, its not exactly an easy thing to do when you want to, let alone accidentally.
Its accessed through IMAGE > Image Size, which opens up the Image Size dialog....so not easy to accidentally get to.
If you are not familiar with PS and a bit trigger happy then I guess its possible you could have accidentally re-sampled the image without knowing.....best to slow down and watch what you're doing really.
Regards.
MrToM.
- Messages
- 22,744
- Likes
- 13,267
I wish I had checked first before I did some work on this, but here is a much larger version of the image.
https://milsteadgraphics.files.wordpress.com/2015/02/photorestor1a.jpg
https://milsteadgraphics.files.wordpress.com/2015/02/photorestor1a.jpg
niv0070
Member
- Messages
- 17
- Likes
- 7
No worries...
Re-sampling 'resamples' the image either to a larger, (to be avoided at all costs), size, or a smaller, (use only if you really need to), size.
PS interpolates, calculates, applies an algorithm.....call it what you will, to enlarge or reduce the number of pixels that make up the image.
Reducing an image is not as bad as enlarging as the result is more or less original pixels...with some removed to make the image smaller.
Enlarging an image requires calculation to create extra pixels an add them to the originals. Depending on how good the calculation is gives either a good result or really bad result. Most of the pixels in an enlarged image are not original....therefore its just not as good.
PS has got better at re-sampling and some images do re-sample really well.....if your HAS been re-sampled then it looks pretty good but take that as an exception rather then a rule.
As to when to re-sample....well never if you can avoid it.
People make the mistake or just don't think about image size when they first create an image, later expecting to be able to get it printed at poster size with all the clarity of the original....this is just not possible with small images.
The only option is to then make the image 'bigger' by re-sampling.....but with the downside of the above.
As to how it happens.....well, in your case I don't know, its not exactly an easy thing to do when you want to, let alone accidentally.
Its accessed through IMAGE > Image Size, which opens up the Image Size dialog....so not easy to accidentally get to.
If you are not familiar with PS and a bit trigger happy then I guess its possible you could have accidentally re-sampled the image without knowing.....best to slow down and watch what you're doing really.
Regards.
MrToM.
Well. when I save a .jpg file in PS, it opens a window with Image quality (slider from small file to large file) and format, the resampling can happen there?
EDIT: I checked the dimensions of the images (the original and the last), their dimensions are the same though the size is "significantly" (about 1mb) bigger on the edited image.
but the dimensions are the same. 2047x2874.
IamSam, that is the exact same image I used, even the same filename.
BTW, Thank you both very much for the time!
Last edited:
MrToM
Guru
- Messages
- 3,595
- Likes
- 3,321
No....Well. when I save a .jpg file in PS, it opens a window with Image quality (slider from small file to large file) and format, the resampling can happen there?
....and you don't want to save out to anything but a PSD file unless the project is 100% finished.
What I'd suggest now is for you to just take a breather, digest whats been said by everyone and then have another go.
@IamSam has very kindly found the original image so I suggest you use that and have another go.
Save often but as a PSD file....this will preserve the layers.
When you need to post your progress on PSG save your work as a PSD as normal....then use 'Save For Web...' and the preset 'PNG-24'.....this will save the image in as smaller filesize with no degradation as possible.....and upload that png file.
You can then continue working on the PSD file and just save out to png as and when you need to.
This is in fact the normal workflow for PS......ALWAYS save as a PSD when working on it.
Try to avoid jpeg if possible but if you do use it then always set 'quality' to 12.....nothing less.....and never do it more than once for any one image.
Regards.
MrToM.
EDIT:
Oh yeah....there is no need to keep posting whole quotes of posts either....it makes YOUR posts difficult to read....only use 'Reply with quote' if you really want to highlight something....otherwise 'Quick Reply' is perfectly adequate.
Thanks.
Last edited: