What's new
Photoshop Gurus Forum

Welcome to Photoshop Gurus forum. Register a free account today to become a member! It's completely free. Once signed in, you'll enjoy an ad-free experience and be able to participate on this site by adding your own topics and posts, as well as connect with other members through your own private inbox!

need clean lines


Howcho

Member
Messages
9
Likes
4
I used to photoshop a bit years ago but put it down for some reason. I am trying again but am struggling of course.

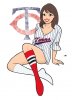
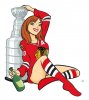
I like to take the art of Rub Ullman and change it for my personal use. I will find a picture that I like and change the uniform of the girl to one that I want.

In this instance, I am changing this 'twins' girl to a 'blackhawk' girl.

I am having a hard time already just drawing clean lines on the socks of the twins girl. I am using pen tool and ten stroking it with pencil. The lines are not clean. Can you please suggest a better method?

I have included the two pics. The one I want to change and the one I am modelling off of. The Hawk girl you see is one I did years ago, and I thought fairly well. She was originally Pittsburgh. I have just forgotten every thing. icon_neutral.gif

hawksgirlx_zpseu1pzjy9.jpg

HawksCupGirlWeb2_zpswfsdqvoc.jpg
 

Attachments

  • hawksgirlx_zpseu1pzjy9.jpg
    hawksgirlx_zpseu1pzjy9.jpg
    92.4 KB · Views: 8
  • HawksCupGirlWeb2_zpswfsdqvoc.jpg
    HawksCupGirlWeb2_zpswfsdqvoc.jpg
    98.5 KB · Views: 30
Last edited by a moderator:

Howcho

Member
Messages
9
Likes
4
Stroking with the brush really helped. Do you have an idea of how I can texture a new logo to be similar to the faded out twins logo?
 

MrToM

Guru
Messages
3,595
Likes
3,321
How are you stroking your paths at the moment?

Regards.
MrToM.
 

IamSam

Administrator
Staff member
Administrator
Messages
22,761
Likes
13,269
I think that given the low res of these images you may be better off just removing the color from the areas that you wish re-color.
The existing outline is tapered and while not impossible to re-create (fade) it's best if you save it rather than try to redo it.

Screen Shot 2015-06-03 at 8.35.46 AM.png

I'm not a huge fan of destructive editing and I would normally advocate the use of masking, however I found it much easier to just remove the color using the
Magic Eraser Tool and the Eraser Tool. By doing this I preserve the original line work.

Once I had the line art isolated, I created an outline of the areas I wanted to re-color/change using the Pen Tool.
I filled the selections with white (any color will do) and paced them on their own layer. (I named them clipping layers)

The idea being that I would place these under the line art layer.
I did do them separately and grouped them. Here you can see them all selected together.

Screen Shot 2015-06-03 at 8.49.04 AM.png

I can now use clipping masks to alter the colors.

Screen Shot 2015-06-03 at 8.52.44 AM.png

Screen Shot 2015-06-03 at 8.53.06 AM.png

Screen Shot 2015-06-03 at 8.53.25 AM.png

Screen Shot 2015-06-03 at 8.53.35 AM.png

Now I can change her shirt and socks into any color I want.
Next would be adding the graphics.

I did not forget about the shading, I have just not gotten to it at the time of this posting.

edit: Added the shading and the sock stripes.....
Screen Shot 2015-06-03 at 9.53.07 AM.png
 
Last edited:

Howcho

Member
Messages
9
Likes
4
Wow, thanks for the tutorial. I fear that most of that is beyond my current understanding. I don't grasp masking yet. I will have to watch some vids.

I know that I am likely doing most everything the hard way.

Here is my progress.
hawksgirl_zpsp3e88fbp.jpg
 
Last edited:

Howcho

Member
Messages
9
Likes
4
I know this is not likely up to the standards of this board, but here is my finished product. The hair could have gone better..

Thanks for the advice and support all.
hawksgirlx_zpsdvdvjawj.jpg
 
Messages
1,376
Likes
1,026
Howcho, it looks good. I see a lot of artifacts in the red coloring on the jersey and socks. Is that from saving as a jpg?
 

IamSam

Administrator
Staff member
Administrator
Messages
22,761
Likes
13,269
I see a lot of artifacts in the red coloring on the jersey and socks. Is that from saving as a jpg?
Just click on the image and view the larger version. The artifacts are in the thumbnail.
 

MrToM

Guru
Messages
3,595
Likes
3,321
Howcho, it looks good. I see a lot of artifacts in the red coloring on the jersey and socks. Is that from saving as a jpg?

Just click on the image and view the larger version. The artifacts are in the thumbnail.

I hate to say it but I see them in the 'larger' version too...

jpeg_MT_01.png

Using jpeg compression with a quality of only 5 probably isn't helping.

Regards.
MrToM.
 

Howcho

Member
Messages
9
Likes
4
Thanks for your help all. Oh and yes, I did save it as a jpeg. Is there a better option for me?

When saving it as a jpeg, there is a dialogue box that comes up with lots of options, but I just go with whatever is there.

I would love to know how to correct that for future reference.
 
Last edited:

MrToM

Guru
Messages
3,595
Likes
3,321
...better option for me?...
It very much depends on the use for the image...as you have seen, jpeg compression is pretty good but there are drawbacks.....big ones!

Jpeg isn't actually a file format, its a compression method...and a very complex one....so complex in fact that nobody adopted it as a file format.

JFIF came along which was much simpler to use so everyone started using that instead, it still used jpeg compression and so the file extension kind of stuck....hence why JFIF files have a JPEG file extension.

The downside to jpeg compression is that at lower 'quality' levels it throws away so much information that images can become unrecognizable. Its known as a 'lossy' compression for this reason....pixel information is literally 'lost' in the process.

The 'quality' level that you've so far ignored is in fact denoting which 'quantization' table to use when throwing this info out....each 'level' just uses a different table....the lower ones throw more out than the higher ones.....the 'Quality' name is just something easy for us humans to understand....and it kind of fits with the results you get too.

One thing to realise is that if you start with a 'jpeg' image then it has been compressed once already......if you save it again using jpeg compression then it can only get worse.

You should never save a jpeg AS a jpeg.....the exception to this is to always use the highest 'Quality' level, usually 12 for PS, which doesn't compress the image at all......which begs the question why use it at all when there is PNG?

PNG is a 'lossless' compression method....so what you put in is what you get out....it doesn't have a 'Quality' setting....and doesn't need one either.

Unlike jpeg, PNG's support transparency. PNG-8 is just an 'on / off' affair, PNG-24 supports variable transparency.

You don't have to have transparency in the image to save in this format and it is widely accepted in most browsers. Its a good egg all round.

So in conclusion try and stay away from saving in jpeg....unless you absolutely need to, its very good at compression but you've seen the mess it can make.......you have to be careful with it.

Always Always save your work as a PSD file before you do anything, work on it, edit it, and then save out to whatever format you need.....saving your PSD first of course. If you need more than one format, say one for printing and one for the web then it can easily be done from your PSD file....as many formats as you like, as many times as you like....keeping your work safe in the PSD.

If you're still awake and haven't gnawed your arm off yet.....well done! :thumbsup:

Regards.
MrToM.
 

Howcho

Member
Messages
9
Likes
4
That is great advice. I will stay away from jpg. I had only used .png previously when I needed to preserve transparencies.
 

Top