What's new
Photoshop Gurus Forum

Welcome to Photoshop Gurus forum. Register a free account today to become a member! It's completely free. Once signed in, you'll enjoy an ad-free experience and be able to participate on this site by adding your own topics and posts, as well as connect with other members through your own private inbox!

How to select an area bounded by a scattered edge


Naomi Nissen

Member
Messages
9
Likes
1
I sketched a delicate line drawing that I scanned into photoshop. The edges of the flowers are comprised of thin walls of scattered black pixels that don't create a solid boundary. When I try to select just the interior of a petal using the magic wand tool to do a fill, the selection of course seeps out and grabs the whole drawing. Is there a way to change the settings on the tool so that it is blocked by pixels even if they are a distance apart and not touching? Decreasing the tolerance won't work as I'm down to one, and it's only black and white anyway and not color dependent. This would be kind of like encountering the space between an electron and the nucleus, and being blocked, on purpose. :)

thanks!
Naomi
 
Hello Naomi and welcome to PSG.

If the pixels are not connected then I fear that there's not much you can do with the Magic Wand tool. The tool is used to select pixels on the basis of their luminosity values, if none are present then it will "seep out" as you say and include similar pixels to the edge of the canvas.

Options.........you can use the Brush Tool to fill in the missing pixels or you can use the Pen Tool in which you would be in control of what's selected.
 
I agree with Sam that using either the Pen or brush tools is almost always the best way to handle a situation like this, but I just wanted to point out that one can make some progress with the magic wand tool. The secret is to build up the selection slowly using the "add to" and "subtract from" modes of the tool, and carefully adjusting the sampling size (...I used 5x5 pixels) and the tolerance (...I think I settled on a value around 45).

Here's the test pattern (with rough edges) that I started with:

Select_rough_edges-ps01-03_texturized.jpg


With the magic wand tool in "add to" mode, I clicked a couple of times in the interior, near the center, staying well away from the edges. Next, I switched it to "subtract from" mode, and carefully clicked all around the outside of the pattern using a large radius when I was far away from the object, and working my way down to a smaller radius as I got closer to the edges of the object. Doing this dramatically helps constrain the selection should some area "wants to escape", LOL.

I then repeated this procedure, switching back and forth from + to -, but finally had to give up when I got to the really low contrast region towards the bottom of the star. My final result was this:
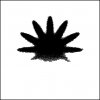
Select_rough_edges-ps01-05_magic_wand_plus_and_minus_on_texturized_version.jpg

The result is not great, and certainly wouldn't give the pen tool any serious competition, but there have been times when a little "add to" and "subtract from selection" action has allowed me to quickly complete a selection task, so it's one of those tricks I keep in the back of my head.

For comparison, here's what I started with before I blurred it and applied the texturizing filter to get the rough edges.

Select_rough_edges-ps01-01_original.jpg

Cheers,

Tom M
 
Ok, so I've discovered (I'm don't use PS often enough!) that I can use the magnetic lasso tool to bridge those gaps in dark pixels and in effect create a boundary, at least in selection. Is there anyway to use that selection to superimpose a line over it, without having to actually paint along the edge? I have too many edges to do.
thanks.

Hello Naomi and welcome to PSG.

If the pixels are not connected then I fear that there's not much you can do with the Magic Wand tool. The tool is used to select pixels on the basis of their luminosity values, if none are present then it will "seep out" as you say and include similar pixels to the edge of the canvas.

Options.........you can use the Brush Tool to fill in the missing pixels or you can use the Pen Tool in which you would be in control of what's selected.
 
That's quite a trick, Tom! I don't think it will apply in my case. I scanned in a simple pen drawing. I have a choice between two colors: black and white. I'm going to assume that increasing or descreasing the breadth of the selection of the magic wand will choose either all the white - or just the few black pixels that are contiguous.
 
Hi Naomi - We can give much more specific technique recommendations when we have a real image in mind. If you would like, why don't you post a portion of the image you are working on, and we'll see what we can do.

Cheers,

Tom M
 
Ok, so I've discovered (I'm don't use PS often enough!) that I can use the magnetic lasso tool to bridge those gaps in dark pixels and in effect create a boundary, at least in selection. Is there anyway to use that selection to superimpose a line over it, without having to actually paint along the edge? I have too many edges to do.
thanks.
I agree with Tom, we are very limited in what we can recommend without seeing the image in question.
 
flowers.jpg

The colored area is what I am trying to achieve and have been able to do so far. The flower on the left is what I'm starting from. Reducing this down to a jpg actually condensed a lot of the edge, but in the original the black edges are quite spotty.
 
Just to be sure I understand: You want to select the interior areas of the leaves that are colored, right?

Tom M
 
I want to select the interior of the petals that are NOT colored and do fills. That said, I've already successfully filled the magenta areas, using the linear lasso tool to define a boundary, then stroke to create a closed boundary enabling me to do the fill. That's what I discovered I could do in the course of these threads.
 
What I would do is the following.......

Duplicate the layer
Use Select / Color range in order to select all of the white (I used a fuzziness of about 40) on the new layer
Delete the selected area - this will leave the black flower edges that can be used as an overlay
Now use the pen tool to trace alonge the middle of the petal edges
Nor right click on the path and select Make selection - use a feathering of about 5
Make sure you have a new layer below you layer that has the flower outlines showing and that you are on that layer
Fill using the gradient tool

You should now have a fairly soft edge under the outline

I took me about 20 seconds for a petal.

Cheers

John
 
Last edited:
Last edited:
Unless you specifically need to know how to implement the process you are struggling with I'd do it without having to select anything.

The first 3 minutes does the whole thing in one go, which may or may not be enough. The rest is each petal on its own layer, making the gradient more relevant to each petal rather than the whole.

7:16 NO AUDIO

If you need anything explaining just note down the time at which your query happens and include it in your question here.

Regards.
MrToM.
 
Last edited:
Thanks for all these terrific tips! I love how the layers enable the soft color blending underneath the black edge. I will have to play around that, not something I've had much guidance for but I'm looking forward to trying this out.
 
Thanks for all these terrific tips! I love how the layers enable the soft color blending underneath the black edge. I will have to play around that, not something I've had much guidance for but I'm looking forward to trying this out.

Best of luck - keep experimenting, that is the best way to learn! Come back and ask if (and when ;) ) you get stuck.

Cheers

John
 
Sorry to be so late to this thread..........had to work.

Now that I've seen the drawing, there's no question that I would use the same technique as described by MrToM with a few minor differences.

Since we seem to be making videos, I'll do the same.

What I will show is how I would set the layers blending mode to darken before I would add the gradient. Doing this allows me to visualize exactly where the gradient will go. You can also use the Move Tool to re-postition the gradient if you want.

I will also show how to quickly change the color without having to create an new layer mask.........you just use the existing one.


Back
Top