What's new
Photoshop Gurus Forum

Welcome to Photoshop Gurus forum. Register a free account today to become a member! It's completely free. Once signed in, you'll enjoy an ad-free experience and be able to participate on this site by adding your own topics and posts, as well as connect with other members through your own private inbox!

Problem with colors in photoshop


Akis

Member
Messages
7
Likes
0
Hello there , I have a problem with opening a certain photo I took.
When I open on windows it looks like this : Screenshot_2.jpg
And on photoshop cc and lightroom 5 it looks like this : Screenshot_1.jpg
Some detail on the street is completely lost and the colors are different. I shot this picture in raw format.
Does anybody know what could cause that problem?
Thanks!
 

ALB68

Dear Departed Guru and PSG Staff Member
Messages
3,020
Likes
1,332
Hi Akis and welcome to the forum
When you say"When I open on windows it looks like this : " what do you mean exactly?

And assuming you have everything set right in your Photoshop color settings, when you save the image from Photoshop, what profile are you saving it as? By that, I mean sRGB, Adobe 1998 etc.
 

Tom Mann

Guru
Messages
7,223
Likes
4,343
Immediately, we can say quite a bit about what went on. For example, below are the RGB histograms for your two screen shots. For each of your two screenshots, two sets of RGB histograms are shown below: One is for the entire image, and the second is for just the affected area. You can tell which is which by rolling over them and looking at the file names. You can see that there is almost no structure, no color variation, etc. in the affected area in your Screenshot1, but there is in your Screenshot2.

Screenshot1-color_histograms-1whole_image.jpg Screenshot1-color_histograms-2bad_area.jpg

Screenshot2_color_histograms-1whole_image.jpg Screenshot2_color_histograms-2bad_area.jpg

The reason for the difference in that area between your two shots is obvious -- in the "bad" area, the blue channel is almost completely blown (ie, max'ed out) in your "Screenshot1", whereas some process or setting in your workflow has valiantly attempted to restore texture to that area by the time you took "Screenshot2".
---


By far, the quickest way to figure out what caused this difference is if you post both your RAW file, as well as your PSD file for thIs image.

Also, as ALB68 said, we need to know your ^EXACT^ work flow. Specifically:

a) You said that you shot in RAW, but did you have the camera set to save both the RAW file PLUS an in-camera JPG?

b) If you did, could you post that as well.

c) If you did, are you absolutely sure that your processing was done on the RAW file, not the JPG?

d) You said that you "looked at" the image in both PS and LR. When you open a RAW image in PS, it actually opens first in ACR, Adobe's raw converter. Is this what happened? If so, were ALL the sliders zero'ed (yes, in ALL the panels)? Go to the camera calibration tab (2nd from the rightmost tab). Tell me what it says in the "Process" and the "Camera Profile / Name" boxes.

----
Shooting highly saturated colors like these always presents a problem. The same problem almost always occurs when photographing theatre and live music performances, as well as with some flower photography. The way around it is not, as we are doing now, to worry about exactly what process tried to restore detail to the areas with blown channels, but rather, to prevent blown channels in the first place. To do this, you need to set your camera to display color histograms, if possible. After a first test shot, you then need to carefully examine the histograms on the back of your camera and then reduce the exposure to the point where no channel is blown. Typically, this will be at least 1 or 2 stops less than the exposure suggested by your meter. You can then restore the image to maximum brightness in post processing.

With static subject matter, like this, another approach is to put your camera on a tripod, shoot a series of bracketed exposures, and re-combine them in an HDR program. When the subject matter permits, this can work wonders.

We look forward to hearing from you.

Tom M
 

Akis

Member
Messages
7
Likes
0
Hi Akis and welcome to the forum
When you say"When I open on windows it looks like this : " what do you mean exactly?

And assuming you have everything set right in your Photoshop color settings, when you save the image from Photoshop, what profile are you saving it as? By that, I mean sRGB, Adobe 1998 etc.

Hello and thank you!
I mean when I open it on the image viewer of windows.
The profile is Adobe RGB 1998 as it shows here:

Screenshot_3.jpg
 

Akis

Member
Messages
7
Likes
0
Hello Tom!
First of all I shot the photo only in RAW without the in-camera jpg. So yes when I open it in photoshop it opens it first in camera raw.

Process and camera profile boxes : Screenshot_4.jpg
Also another thing I just noticed is that while I open the photo in image viewer it is cropped and looks like when I apply the lens profile correction on photoshop.


So how it looks when I open the same file in image viewer : ScreenHunter_1057 Dec. 06 00.17.jpg


And how the same file looks in photoshop with all sliders in zero in all panels : ScreenHunter_1058 Dec. 06 00.18.jpg
So something is really messed up here. It's confusing. Also when I save it in jpg or tiff the colors still look blown out.
Also the image looks like the first picture when I see it on the cameras screen.

I can't upload the raw file it takes a long time and then does nothing. Anyways I hope now I made things more clear about the problem.
Thank you Tom for the detailed answer and tips!
 

Akis

Member
Messages
7
Likes
0
Deleted
 

Attachments

  • Screenshot_3.jpg
    Screenshot_3.jpg
    222.4 KB · Views: 4
Last edited:

Tom Mann

Guru
Messages
7,223
Likes
4,343
Sorry, Akis - I'm really short of time right now. I'll try to get back to you in the next day or two. T

Tom
 

Tom Mann

Guru
Messages
7,223
Likes
4,343
Hello Tom! ...snip... Also another thing I just noticed is that while I open the photo in image viewer it is cropped and looks like when I apply the lens profile correction on photoshop.

So how it looks when I open the same file in image viewer : (screen grab removed) ... And how the same file looks in photoshop with all sliders in zero in all panels : (screen grab removed). So something is really messed up here. It's confusing.

My guess is that you have accidentally set the defaults for ACR to automatically include lens distortion corrections. This strongly suggests that your default settings for ACR also probably include some settings (eg, highlight recovery) that are causing the initial problem you reported.

...I can't upload the raw file it takes a long time and then does nothing. Anyways I hope now I made things more clear about the problem. Thank you Tom for the detailed answer and tips!

Without the raw file, there is very little I can do to further diagnose your problem. It sounds like you may have a slow connection, and, in addition, may also be running into some problems in uploading an example raw file to this forum. So, may I suggest that instead, you upload it to some place like www.dropbox.com (you can get a free account there, the last time I checked), and then post the link to the file here.

Sincerely,

Tom M


PS - Oh, also, try resetting the default preferences in ACR to their factory settings, ie ...
 

Attachments

  • reset_ACR_defaults-ps01a-01.jpg
    reset_ACR_defaults-ps01a-01.jpg
    255 KB · Views: 23

Akis

Member
Messages
7
Likes
0
I reset all the settings in acr to default but still the same. But I managed to fix the problem with the blown out colors somehow in acr by going to camera calibration and change the process in 2010 instead of 2012 and also changing the hue and saturation of the blue. Looks really good now.
Here's the file : http://www37.zippyshare.com/v/13214917/file.html
 

Tom Mann

Guru
Messages
7,223
Likes
4,343
Hi Akis -

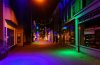
Thanks for making the raw file available. It was very useful and it confirmed what I thought was going on: The blue sensors in that area are just about maxed out. Put in other words, the blue channel is completely saturated (ie, "blown") in that area. This means this area is almost completely out of gamut for your camera, let alone the much smaller gamuts of your working color space and your final color space (ie, sRGB).

Early in this thread, you made the comment, "When I open on windows it looks like this...", and then clarified it by saying, "I mean when I open it on the image viewer of windows....", and stating that the image was recorded only in raw format, not raw+jpg. This means that when you "opened it in windows", what you were really doing was having Windows Photo Viewer read a small jpg that is embedded in the ARW file.

This small jpg is created in-camera using some default settings that almost never are optimal for a difficult shot like this. Usually, this is OK because the jpg embedded in your ARW file is meant only to be used for preview purposes. This explains why what you see using Windows Photo Viewer looks bad in one way (ie, a sharply defined, almost cyan area of detail inside a blob of featureless blue), and looks so different from what you see when you open the file (ie, read the "real" raw data, not the preview) in Photoshop's ACR, ie, it's a different type of "bad" (LOL), just a giant blob of blue with no interior detail whatsoever.

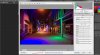
The next thing to explain is why the default conversion in ACR looks bad in it's own way. The reason is simple, the default ACR settings are not at all optimized for recover of areas like this that are so close to being completely blown. As you discovered, it's relatively easy to optimize the ACR settings to get a much nicer look in this area. FWIW, I had a go at it myself, and came up with the attached image in which I was able to recover reasonable detail throughout the formerly blown area.

So, the question is what to do both for this image, as well as for your future shooting. For this image, it sounds like you are well on your way to getting an image that you like. Also, feel free to use my conversion of your ARW file. For the future, the suggestion I made at the end of my first post in this thread still is right on the mark:

"...Shooting highly saturated colors like these always presents a problem. The same problem also is common when photographing theatre and live music performances, as well as with some flower photography. The way around it is not, as we are doing now, to worry about exactly what process to triy to restore detail to the areas with blown channels, but rather, to prevent blown channels in the first place.

To prevent this problem from occuring, you need to set your camera to display color histograms, if possible. After a first test shot, you then need to carefully examine the histograms on the back of your camera and then reduce the exposure to the point where no channel is blown. Typically, this will be at least 1 or 2 stops less than the exposure suggested by your meter. You can then restore the image to maximum brightness in post processing. With static subject matter, like this, another approach is to put your camera on a tripod, shoot a series of bracketed exposures, and re-combine them in an HDR program. When the subject matter permits, this can work wonders. ..."


And, one final comment: In Post #4 of this thread, you said, "The profile is Adobe RGB 1998 as it shows here...". That's not quite true. At the point that you are viewing the image and see that reference to Adobe RGB, the image has not yet had been converted to a final color space for output from ACR (either to a file, or to be transferred over to PS). That reference to Adobe RGB is a clickable link that lets you change your ACR preferences, letting you know that your current preference is that AFTER ACR is done with the image it will be (not is) converted to Adobe RGB.

HTH,

Tom

PS - Don't forget to double click on the in-forum preview to see the much larger sized version that I tweaked, then uploaded.
 

Attachments

  • DSC00250arw-tjm02-just_ACR-ps02a_sRGB-3499px_wide-01.jpg
    DSC00250arw-tjm02-just_ACR-ps02a_sRGB-3499px_wide-01.jpg
    3.3 MB · Views: 4

Akis

Member
Messages
7
Likes
0
Now I understand what happened a bit better :) , I am really new to shooting with a dslr and I'm a bit of a noob with the settings and stuff :p. Your edited image looks really good in color and detail. I managed to have a result almost like this by changing the camera profile to camera landscape, I think you also messed with blacks maybe? Anyways thanks a lot for your time Tom , you 've been really helpful!
 

Top