What's new
Photoshop Gurus Forum

Welcome to Photoshop Gurus forum. Register a free account today to become a member! It's completely free. Once signed in, you'll enjoy an ad-free experience and be able to participate on this site by adding your own topics and posts, as well as connect with other members through your own private inbox!

Bad lighting fix! Help!


kuzumi

Active Member
Messages
33
Likes
8
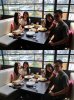
Hi guys, hope everyone's well! I need help on making this image not too ruined by the bad lighting, could you please help me make some adjustments to the photo so that we could all look proper? The waiter only took one photo and it turned out pretty dark. I would also appreciate it if you could re-upload your adjustment where I can download it in high-res as with the original image and also if you could give me a general idea on which adjustments you've used in Photoshop so I may learn how you've done it!

P/S: I tried using HDR toning, it turned out weird, I probably did it wrong. :\


http://i.imgur.com/1iIwuCK.jpg


thank you and have a nice day! :cheesygrin:
 
I think a real simple solution to this would be, duplicate the layer, put the layer on top in screen mode.

Then mask out or erase the window area to get rid of the haze look
 
You can probably follow somebody else's suggestions of taking pictures the right time first.... :mrgreen:
 
@iDad - I wonder what fool would ever suggest such a silly thing. LOL.

@OP - Yes, of course it can be "saved" using Photoshop, but the result will never be as good as if you set the camera up correctly to take a good shot in strong backlight.

The trick is to use a feature often called, "balanced fill flash". Most cameras have this. It adds flash to compensate for the bright background. I don't know what camera you used, so, unfortunately, I can't be more specific about how exactly to set this up on your camera. Read the manual.

FWIW, here's an example of a shot I took just last night. Like yours, it (intentionally) has a very bright background, but I adjusted the fill flash level for a good exposure of the subjects. If I had left everything on "automatic" it would likely have become very close to a silhouette, similar to your photo.

HTH,

Tom

!!!-lighting_example-balanced_fill_flash-blinding_white_background-D7B_7190nef-LR3.jpg
 
Hi, I tried correcting the lighting.
But before posting it I'd like to add that I am a beginner when it comes to lighting correction.

I made a before and after pic and I resized it a bit, but if you like it , I can upload the full size version
 

Attachments

  • Untitled-4.jpg
    Untitled-4.jpg
    1.3 MB · Views: 5
If the image is sufficiently important (ie, newsworthy, one or more subjects are no longer alive, situation will never happen again, etc.) so that one really wants to spend a lot of time repairing the lack of even basic photographic technique, then, of course, one can do a lot with the image.

For example, I ran the image through ACR three times, each with different settings: once for mid-tones, once for the view of the outdoors through the window, and once for the deep shadow areas. Then, using layer masks to select each area, once put in a layer stack within PS, I then did a final tweak of the curves and colors for each area, then combined them using the blend_IF sliders to get nice transitions between the areas.

Below are:

(a) a down sized version of the original so that it can display in-line in the form and will be present should the original on the external site ever be removed; and,

(b) my lightened version.

My tweaks produce an image that has much better tonal balance than the original, but has its own problems. For example,

1. The distribution of light within the scene is not as realistic as if you had lit it properly in the first place. It looks almost HDR-like; and,

2. Trying to pull detail from the deep shadows and the nearly burned out bright areas inevitably introduces ugly artifacts into each area. In this image, This is particularly evident by the dark splotches of noise in the shadow areas of the guy's shirt.

This is why even though one can do a lot in PS, it's always better to get it right (or at least reasonably close) in the camera.

Tom

1iIwuCK-00_orig-xnv_698px_wide.jpg

1iIwuCK-tjm01-acr0-ps03a_698px_wide-01.jpg
 
PS - @OP: I just noticed that in your original post, you requested that the final result be high resolution. I'm sorry, but while I'll go to great lengths to teach someone how to use PS, I don't do either freebies or for-pay jobs in this forum unless it's a true emergency. Hence, I downloaded a version that is OK for on-screen display, but won't print well except at very small sizes. Sorry.
 
Parinaa, your correction is very good and gently done, though it looks still bit too dark.

Sam, I like your version best.

Tom, I'm not surprised of your awesome result, though it is a little overdone, the interior with people is a bit too bright, and the outside is too saturated. But I'm certain your version is the OP's favorite.
 
Hi guys, thank you all for your effort, I like how Parinaa's edit doesn't make it look far from reality. :)
2014-02-13_212836.jpg
Here is my attempt. Tom, I totally understand your intentions and I am grateful for it. This photo is not of much significance apart from it being a small reunion. Personally I feel that the outdoors are a little too satured, as Chris has pointed out. =\ I like Sam's one, too. :)
 

Back
Top