What's new
Photoshop Gurus Forum

Welcome to Photoshop Gurus forum. Register a free account today to become a member! It's completely free. Once signed in, you'll enjoy an ad-free experience and be able to participate on this site by adding your own topics and posts, as well as connect with other members through your own private inbox!

Black and White Adjustments


Landlocation

Well-Known Member
Premium Member
Messages
184
Likes
23
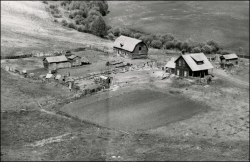
Have been having issues trying to even out image and then removing the line that runs vertical before printing this image, any suggestions? Thanks.

84-46-29376.jpg
 
Was the image already like this? Or did you make it like this by adjusting one half of it? If the latter, try using a gradient in a layer mask to make a smooth transition from dark to light.
 
Was the image already like this? Or did you make it like this by adjusting one half of it? If the latter, try using a gradient in a layer mask to make a smooth transition from dark to light.
No , this image was like this on the negative.
 
Thanks, I have tried this but I still get the line down the middle , don't seem to be able to smooth it out enough, can see it when I print it.

When you say you are still getting a line down the middle, is that happening on the one I did? Or did you try doing one on your own?
 
When you say you are still getting a line down the middle, is that happening on the one I did? Or did you try doing one on your own?
Not on the one you did, it happens on my end, just not enough expertise I guess. Or just don't know the tricks.
 
Here are some detailed steps:
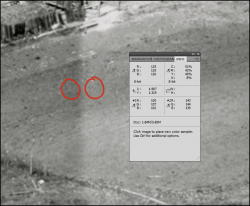
  • Using the Color Sampler tool, select two spots that are supposed to be the same brightness. It's hard to see in Black & White, but below you can see the little numbers 1 and 2 (inside the red circles), which are the two spots I selected. When you click with the Color Sampler, you should automatically see the Info panel, which gives you the RGB readouts for those two spots.
  • The Info panel for Spot #1 shows R105, G107, B102. In a true B&W image, these three numbers would be identical—perhaps R105, G105, B105. The fact that they're not identical means that there is a slight color cast to your image. But it's so small we can ignore it.
  • The goal is to darken the light half of your photo so that the RGB value of spot #2 (currently 143, 144, 139) gets darkened to match spot #1. That will (hopefully) translate accurately to the rest of the photo to even out the lighting. For simplicity, let's say that spot #2 needs to become R105, G105, B105.
1599074127292.png

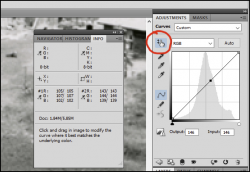
  • The next step is to open a Curves adjustment layer. Activate the little hand pointer where I have drawn a red circle. (I have a 10-year-old version of Photoshop, so your Photoshop may look different. But this pointer tool should be there somewhere.)
  • With the hand pointer active, click exactly on Spot #2 that you created above. When you do that, the Curves adjustment layer will show at the bottom the Output and Input values for Spot #2. It currently shows them as 146 (the average RGB value of Spot #2).
1599074261183.png

  • Click your mouse on the Output box and replace 146 with 105. You are literally typing the number 105 into that box. When you do that, you are telling the Curves adjustment to make spot #2 exactly R105, G105, B105. This change will then affect the entire photo.
  • For the moment, the Curves adjustment has simply darkened the entire image. You now need to apply a layer mask to the Curves adjustment. To start, fill the mask entirely with Black.
  • In your original image, the far right side looks good as it is. The brightness problem is really just a band down the center of the image.
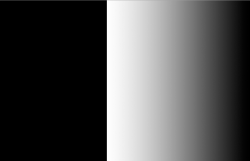
  • The layer mask needs to be a gradient—going left to right—where the mask gradually goes from White to Black, starting at the border of the problem area.
  • Activate the gradient tool and apply the layer mask as I've described. When you're done, The layer mask should look like this:
1599080778295.png

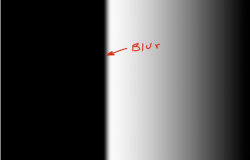
Now apply a Gaussian Blur to the layer mask itself, to soften the sharp divide between blacl and white. Try a blur of about 25 pixels, something like this:

1599080927206.png


At this point, your photo should look like this. It's better, but it still has a noticeable dark shadow:

1599081056158.png

  • To fix that final shadow, you need two new Curves adjustment layers: one that brightens the image and one that darkens the image. After you've created these new layers, fill the layer mask on both of them entirely with black.
  • The last step now requires a lot of patience. Select a soft brush and lower the Flow to about 4%. This means that every brush stroke you make will only have 4% of normal strength, which allows you very fine control to gradually paint white in the layer mask to brush away the shadow.
  • Start by using the Curve layer that brightens. Paint in the mask with white and try to brush-out the dark shadow where our original gradient mask overlaps an area that was already dark to begin with.
  • Then switch over to the bright side of the border and paint white into the layer mask of the Curves layer that darkens. Be patient and try to feather these two layers to fully eliminate the unwanted border.

Hope this is helpful.
 

Back
Top