What's new
Photoshop Gurus Forum

Welcome to Photoshop Gurus forum. Register a free account today to become a member! It's completely free. Once signed in, you'll enjoy an ad-free experience and be able to participate on this site by adding your own topics and posts, as well as connect with other members through your own private inbox!

Challenge 11: Create Your Own Lighting Effects


ibclare

Queen Bee
Messages
11,034
Likes
4,638
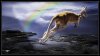
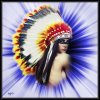
There are often times when you want to create a special effect, and lighting effects are a big one. It may be challenging to do if you haven't made any before or only know how to make a simple lens flare or spotlight. To get those crazier effects or to know how to manipulate the flares to do what you want may take a little more know how. This is your chance to play around with techniques and add lighting effects to your bag of tricks, and maybe pick up some other new skills and tips along the way.

The deadline for entries is Saturday, June 8th, Midnight, GMT.

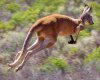
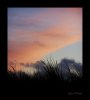
This challenge is to make a lighting effect that you have not done before. You can make just the effect or you can incorporate it into a larger piece.

It can be any kind of image or manipulation including text.

Please post the tutorial you used or make a short tut if you created the effect yourself. Give credit where credit is due!

Please do not make fire effects for this challenge.

There are plenty of tutorials to help you design trails of light, spheres, neon effects, etc., without using fire effects which are really a different animal.

Here are some tutorial collections to browse, with an example from each collection. Use them or find your own.


http://vandelaydesign.com/blog/design/ps-tutorials-lighting-effects/

cosmique.jpg

http://www.tripwiremagazine.com/2012/12/photoshop-effects.html

super_slick.jpg

http://www.demilked.com/light-effect-photoshop-tutorials/

constant_slip.jpg

Have fun with this. Push yourselves.

I'm really looking forward to your entries. And like iDad said in so many words, do it because you enjoy doing it, not for the win.
 
Last edited:
I've not entered any of these recently lol...

So I will most certainly try this one.
 
sounds good , got to put the creative cap on and see what unfolds ,best part of any challenge i think is coming up with an original plan and expanding on it to finish with something you like
 
Going through some of the tutorials I posted, so far I haven't found any that use PS only to create lighting effects. Obviously I haven't seen them all. But if you would like to learn more about creating lighting effects, spotlights, light bursts, and so on, these are some interesting tutorials.

http://www.youtube.com/watch?v=oN5PkdDnt6U


http://www.adobepress.com/articles/article.asp?p=1860949

http://www.photoshopessentials.com/photoshop-text/text-effects/light-burst/

http://saehral.deviantart.com/art/Photoshop-Light-Burst-Tutorial-209181952

http://www.msjphotography.com/index.php/2011/04/photoshop-workbench-274-light-burst-effect/
 
awesome work ink and smoke , wouldnt be an aussie if i didnt add a kangaroo at some point never put a rainbow in before or light brushes which is what i used, also the burn and dodge tool to create a higher contrast from the light ray to the rest of the image , i used mystical 2.0 program for the light rays
 

Attachments

  • roo resized for web.jpg
    roo resized for web.jpg
    185 KB · Views: 84
Last edited:
stocks used
 

Attachments

  • IMGP0344_N_Red_Kangaroo.JPG
    IMGP0344_N_Red_Kangaroo.JPG
    49 KB · Views: 47
  • Stormy_Day_by_CedaCo.jpg
    Stormy_Day_by_CedaCo.jpg
    75.2 KB · Views: 1
  • __bangalley_light_ii_by_mgl001-d4tnaib.jpg
    __bangalley_light_ii_by_mgl001-d4tnaib.jpg
    107 KB · Views: 1
  • Pink_Sky_and_High_Grass_by_Madambond.jpg
    Pink_Sky_and_High_Grass_by_Madambond.jpg
    87.3 KB · Views: 1
its a tail light for safety , added that in just for the challenge the image i just posted in my portfolio doesnt have the tail light

might even just post the image without the tail light im not a fan of it lol
 
Last edited:
just changed my photo without the tail light i never liked it , light is a huge factor in building an image ,and one im really trying to train myself too look at the details which is what i got out of this challenge so far , now i might have a go at something more in the line of what ink has done if i can find the right idea
 
Hi ibclare...

I didn't use a tutorial... i just put everything together.... the only thing i used for the lines of lighting were some brushes.. the rest i did my self.

I don't know if you can see it on the image but there is a long color wavy streak both top and bottom from the ends of the staff hes holding.

To get that effect what i did was this.

i made a solid color of around 6 px, of 5 colors, in this case blue, green,yellow,purple and red, each line was against the next then a merge them together. added a gaussain blur then a motion blur... then used the warp tool for the swooping affect. when doing this i pulled the warp handles down and together at one end which makes the colors blend slightly and then pulled it in to a point.
2013-05-26 08_35_41-The Show Man.psd @ 25% (Layer 4, RGB_8).png

Once that was done ( and i know you said no fire ) but what i did was get a fire image as a reference... i held the cont key down on the fire image and then made a new layer and filled it with orange. then removed the fire image. Then again the 2 blur methods and the warp tool in the same way to place it over the first color sweep i did.

After that a did 3 lines around 3 px again in a orange color but each one apart. i made them at an angle of 45 deg at the end of the staff so i could get the distance between the lines equal to the end of the staff and just ever so slightly wider than the last affect.

Gave it an inner and out glow of slightly brighter orange and then merge them together and again used the warp tool to bend them around the sweeping lines and again pulling the end handles together.

The bg was just a wall, then a few cloud brushes used and mask out the areas not needed , a fill layer on top with a gradient of light brown at the top and dark brown at the bottom set to multiply on the blending mode and mask out in the middle.
2013-05-26 08_33_40-The Show Man.psd @ 25% (Layer 4, RGB_8).png

Then another layer with colors like this at opacity around 50% on normal blending mode.
2013-05-26 08_34_06-The Show Man.psd @ 25% (Layer 4, RGB_8).png

another 3 layers of color with a soft brush like this
2013-05-26 08_35_02-The Show Man.psd @ 25% (Layer 4, RGB_8).png
Bottom green layer set to liner dodge at 75% opacity, blue layer set to screen at 37% opacity and the brown edge color at the top was a soft brush on normal blending at 100% opacity.

The male model with the staff was duplicated and then blur with filters. once blur a mask was done to remove the effect in the middle at to just before the edges to soften the image.the mask was applied the image also.
2013-05-26 08_46_49-The Show Man.psd @ 25% (Background copy 3, RGB_8) _.png

The rest was just soft brush effects all over the image to give some glowing effects around the main male layer, some smoke brushes and some particle brushes , all with inner and outer glows. i also did a grunge brush around the outer edge of the model to get effect around the edge if him.

Having read back through the posts maybe i got the scope wrong.... did you just want something where we created lighting effects just using Photo shop .... if so i will re do another using just these tools.
 

Back
Top