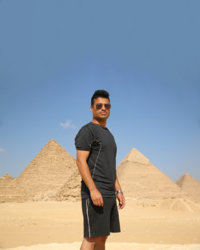
I must appreciate the efforts put in by the OP in trying to learn something new. Below, I will detail the steps I followed in getting the image above. If the OP has any questions, he may ask and I am happy to explain further.
Aim 1 : To separate foreground (Subject, which is a person in this case) and the background (Pyramids only without the person) into two separate layers.
1) Make a copy of the background and call it "Subject". Make the background layer invisible. Select the person using Magic Wand Tool for a quick rough selection. Next, zoom in and go through all edges to see if they were properly selected or not. If you need to include more into the selection, make sure the "+" appears inside the Magic Wand Tool cursor (might have to press and hold Shift). If your selection is over what you need, make sure the "-" appears inside the Magic Wand Tool cursor (might have to press and hold Alt). While using Magic Wand Tool, do not worry about hair too much.
2) Make the selection more accurate by clicking on "Refine Edge" (now called "Select and Mask") while you have any of selection tools active. Have a check mark on Smart Radius on the right with a value of around 5 then select the "Refine Edge Brush Tool" and then select the hair more accurately.
Here is more info and a video on Select and Mask.
Once you are happy with the selection, select "Selection" for "Output To" and select Ok. You should have marching ants around the person's outline. Now select the "Add Vector mask" icon which is under the layers panel - it is the one which shows a circle inside a rectangle.
You should now have Subject layer with all background masked out and just the person showing.

This is first part of our Aim 1. Second part is easy.
3) Make a copy of "Subject" Layer and rename it "Background Sans Subject". Make the actual "Subject" Layer invisible. Select the MASK area of the layer "Background Sans Subject" and press CTRL+I to invert the mask, showing the background pyramids and showing transparency where the person was. If the person was selected instead of the mask, you would end up getting a negative film on the person - you experienced this already.

We need to fill this transparent area up with parts of the background. Easiest way of doing this would be to get Photoshop to automatically do the filling for us. Right click on the MASK area of "Background Sans Subject" layer and select "Apply Layer Mask" to have the mask applied onto the layer. Now, click on the MASK area of the "Subject" Layer to have selection of the transparent area. We need to expand the selection area. Do so by going to Select>Modify>Expand... and selecting 10 pixels because the image is HQ. This is how your work area should look like when zoomed in.

Next, go to Edit>Fill... or press Shift+F5 to get a window. Make sure you have "Content-Aware" selected in the "Contents" List box. check "Colour Adaptation" option and rest of options as shown below and press Ok.

You should have a decent enough fill job done by Photoshop as shown.

But, when you zoom in, especially near the hair area, you may find that hair and part of spectacles still appears, as shown.

These need to be cloned out. Deselect the marching ants selection. Clone Stamp tool may not help much even if you use a soft brush because the sky might appear patchy. I used the "Healing Brush tool", while sampling several times around the area. This picture shows how I am resampling every few strokes

and when I get to clouds, I am resetting the sample area and starting again.

There might be areas like the hand hairs that might still appear. It is up to you as to what level of detail you wish to get. By this stage, this is how your image should look like.

Remember, I said this step is 'easy'. If you don't believe me, you can try using the Clone Stamp tool to fill the transparent area to compare if it was easy or not.
")
Now, our Aim 1 is complete after separating the background and the Subject onto two separate layers.
Aim 2: Resize to suit.
4) Open a new file, in the window select following:
Orientation: Portrait
Units: Pixels
Width: 1080
Height: 1350
Resolution: 72
Colour Mode: RGB + 8 Bit
Then click Create.
5) From the other file which has "Background Sans Subject" layer, drag it onto this file. While dragging and dropping, make sure Move Tool is selected. (Tip: You might have to zoom out to see the edges of the freshly dropped layer because it is much larger than the new document's dimensions)(Tip: Before you release the mouse button, press and hold Shift to centre the dropped image to align with center of the canvas area.) Resize the file such that the width fits to the edges. (Tip: You can use shortcut CTRL+T to resize.) (Tip: While you resize, if you hold Alt, the image decreases from all sides towards the center.) Move the layer towards the bottom. You should now have a large transparent area on top, as shown:

You can delete that Layer 1 layer if you want. Now, our aim is to fill that transparent area with the sky. Again, let us get Photoshop to do the work for us.
6) Select Rectangular Marquee Tool and select the top level sky without including tops of pyramids. While selection is on, press CTRL+J to get this sky into a new layer. Call this "Extended Sky" layer. Select Rectangular Marquee Tool again and select everything from the top of the image to just including the top of the sky area, as shown:

Make sure a little bit of the sky is selected as well otherwise you would have to spend time cleaning up patches.
Now, select Edit>Fill... or press Shift+F5 exactly as we did on Step 3 as follows:
Now, you will have the sky filled up as follows:

Now turn the "Background Sans Subject" layer on and deselect the marching ants. You might notice the sky is a little dark towards the sides. You need to use Healing Brush Tool as before to fix any imperfections. Now, our background is ready to accept the subject ANYWHERE in it.
7) From the other layer, drag and drop the "Subject" layer. Resize the Subject layer to suit and place wherever needed. If there are any imperfections in the background, try and cover them up.
This completes the tutorial.
I will be happy to take any questions. I took the time out to make this tutorial because I see you have been trying hard and I decided to assist. Have a great time creating. Enjoy!