What's new
Photoshop Gurus Forum

Welcome to Photoshop Gurus forum. Register a free account today to become a member! It's completely free. Once signed in, you'll enjoy an ad-free experience and be able to participate on this site by adding your own topics and posts, as well as connect with other members through your own private inbox!

How to fill a text with color? (Easy question, right?!)


rageofanarchy

New Member
Messages
2
Likes
0
Hi,
I'm looking to fill this text with the color white. I'm trying to use a clipping mask, however whenever i do I get the opposite effect - the white replaces the black outline of the font instead of filling the inside with white. Help!

(Up until now I've rasterized the layer and filled each letter with the paint bucket, but I think this isn't the most efficient way to do things?)

Sam

Screen Shot 2019-06-15 at 8.25.53.png
 
Hello. No worries, this is an easy fix.

This font is what I call skeletonized type or font. This means that the main body of the font is transparent.
Screen Shot 2019-06-14 at 11.27.36 PM.png

So.........if you change the font color it will only affect the actual pixels that comprise the font and not the body.
Screen Shot 2019-06-14 at 11.28.34 PM.png

The same rule holds true for a clipping mask. The Clipping mask will only be seen in the pixels.

If you make a selection by holding Cmd/Cntrl + clicking on the type layers thumbnail, it will only select the pixels.
Filling this selection will just have the same affect as seen above!
Screen Shot 2019-06-14 at 11.33.38 PM.png

So what to do? We have to make a selection of only the outside of the font!

The following looks like a lot of steps but it's not really, I just explain in high detail.
READ ALL THE WAY TO THE END BEFORE YOU ATTEMPT THE TUTORIAL

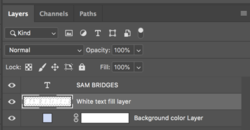
1. Create a new layer beneath your text/type layer. Name it "White Text Fill Layer"
2. Select/choose your Magic Wand Tool. Set your sample size to "Point Sample". Set your tolerance to 32. Check/tick anti alias and contiguous.
3. Select/Highlight the text/type layer in the layers panel.
4. ****With the Magic Wand Tool and on the canvas, click and drag from left to right just outside both S's, release the click once you reach the right side. This will make a selection of the outside of the letters like this............
Screen Shot 2019-06-14 at 11.01.00 PM.png

Note that the marching ants include the letters and the border of the canvas. Hit Shift + Cmd/Cntrl + I to invert the selection. Should now look like this with only the letters selected......
Screen Shot 2019-06-14 at 11.03.21 PM.png

5. Select/Highlight the "White Text Fill Layer" in the layers panel.
6. Press D on your keyboard. This sets your foreground and background colors to black and white default.
7. Hit Cmd/Cntrl + delete, this should have filled the selection with white. Like this....
Screen Shot 2019-06-14 at 11.07.17 PM.png

8. Hit Cmd/Cntrl + D to deselect.

You will now notice that you have some white areas left behind on the S's.

9. Select/Highlight the text/type layer in the layers panel again. Zoom in on the S's and use the Magic Wand Tool to select the unwanted white areas by clicking on them one time. After the first selection/click, hold down the shift key to make the other three selections.

10. Once the selections are made of the unwanted white areas in the S's, select/highlight the "White Text Fill Layer" in the layers panel again. Then hit the delete key. Hit Cmd/Cntrl + D to deselect. This should remove the unwanted white areas in the S's like this......
Screen Shot 2019-06-14 at 11.17.11 PM.png

Screen Shot 2019-06-14 at 11.17.44 PM.png

DONE.

****In step 4 you could just select the inside of the letters with the Magic Wand Tool (hold shift key to add selections) and save the step of removing the unwanted white areas in the S's. However, I have found that you sometimes don't get full coverage of the letter which may require further repair. It's better to select the outside of the letters so that the white will be under the black and you will always get full coverage in the body of the letter. It works well both ways. You use whatever technique is easiest for you.
 
More food for thought..........

This is the White Text Fill Layer using the selection inside the letters.
Screen Shot 2019-06-15 at 12.03.14 AM.png

This is the White Text Fill Layer using the selection outside the letters.
Screen Shot 2019-06-15 at 12.03.39 AM.png

Other than coverage, the inside selection will look different with layer styles applied.
Here's a comparison between the two using an inner glow with the same settings.

Inside selection
Screen Shot 2019-06-15 at 12.07.14 AM.png

Outside selection
Screen Shot 2019-06-15 at 12.07.31 AM.png

So it's up to you in choosing which technique meets your needs the best.

Note: You should group the text/type layer with it's white text fill layer. You can now select/highlight the group and move it as one if needed.
 
If you really want to get fancy......

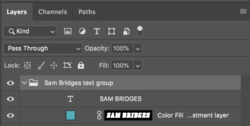
1. Create a color fill adjustment layer by going to LAYER > NEW FILL LAYER > Solid color... or you can use the "half moon" icon (Create new fill or adjustment layer) located at the bottom of the the layers panel. Click and choose "solid color".
2. Move the Solid Color adjustment layer below the text/type layer.
****3. Make a selection of either the inside or outside of the letters with the Magic Wand Tool as described above. If you select the outside of the letters, after the initial drag selection, just hold the shift key and add the areas of the S's to the selection. Don't invert the selection, this time you want the marching ants to be on the letters and the outer edge of the canvas.
4. Select/highlight the Solid Color adjustment layer. Click once on the layer mask of Solid Color adjustment layer (white brackets will appear around the mask). Hit Cmd/Cntrl + delete to fill the selection with black.
5. Group the layers.

Screen Shot 2019-06-15 at 8.26.01 AM.png

****If you select the inside of the letters with the Magic Wand Tool, you will have to invert the selection by hitting Shift + Cmd/Cntrl + I.

By using this method you can quickly change the text colors if needed by double clicking the Solid Color adjustment layers thumbnail. The color picker window will open and you can choose the color you want.
Screen Shot 2019-06-15 at 8.28.49 AM.png
 
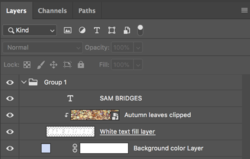
Also remember that with any of the techniques described above, you can use a clipping mask on the text/type color layers.

Lets say you want Autumn themed text. Just drag and drop a new image above the text/type color layer and clip.

Screen Shot 2019-06-15 at 9.18.28 AM.png

Screen Shot 2019-06-15 at 9.19.38 AM.png
 

Back
Top