What's new
Photoshop Gurus Forum

Welcome to Photoshop Gurus forum. Register a free account today to become a member! It's completely free. Once signed in, you'll enjoy an ad-free experience and be able to participate on this site by adding your own topics and posts, as well as connect with other members through your own private inbox!

Need help replicating a vignette effect


CactusBack

New Member
Messages
3
Likes
1
Hey everyone! I'm trying to replicate the vignette effect from sketchfab.com, which is an online 3D model viewer. I'd appreciate any advice on how to do it.

Here's an example of a scene that has the vignette effect - link (the background color under the effect is #DDDDDD). In the options on the right side from the viewer you can toggle the vignette effect on and off. I'd like to be able to replicate this effect on any image in Photoshop. So essentially what I want is to be able to get a screenshot in Sketchfab with the vignette effect toggled off, then replicate the effect in Photoshop with the end result looking absolutely identical to a screenshot that would've been taken in Sketchfab with the vignette effect toggled on.

What I've tried so far:

1. I guess the most obvious thing to try is perhaps enable the transparent background in Sketchfab and export an empty scene with the vignette effect toggled on. That should in theory give us only the vignette effect itself, which I could later apply to any image, right? Well, it doesn't work like that unfortunately. It does give me a vignette effect but the result after applying it to an image looks different to an image that would've been generated by Sketchfab with the vignette effect toggled on. And the difference is not only in the opacity percentage of the effect. The hardness is different too.

2. I also tried generating an empty non-transparent screenshot both with and without the vignette effect, then putting the layer with the screenshot with the vignette effect on top of the screenshot without the effect, then changing the blend mode to Difference and using the result as an alpha mask for a fully black layer put on top of the screenshot without the vignette effect. The end result looks somewhat close to what would've been generated in Sketchfab but the effect transition seems too hard and the opacity percentage is off as well.

I also tried replicating the effect manually with the use of gradients in Photoshop but that was a total disaster, I couldn't produce anything that would look even remotely like what I want.

So I'm at a total loss here. Any help would be greatly appreciated.
 

Rich54

Guru
Messages
1,739
Likes
3,425
I was able to get something pretty close using two Photoshop gradients. Not sure if this is good enough for your purposes, or whether you really need it to be precisely perfect.
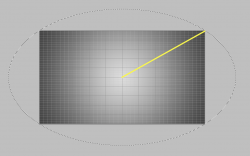
  • I started with a blank file and activated the gridlines (View>Show>Grid) so that I could see the exact center.
  • I selected the darkest and lightest shades from your Sketchfab sample and set those as my foreground and background colors.
  • I created an oval selection as shown below and applied a radial gradient. The yellow line illustrates the direction of how I dragged-out the gradient.
  • Make sure to save the oval selection to use later.
1634924493992.png

  • Next, I reset the gradient tool as Foreground to Transparent, where the foreground color is the lightest shade of your Sketchfab sample.
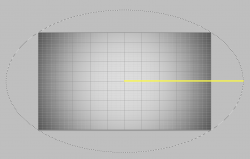
  • On a new layer, I created another radial gradient. This time, I dragged it out horizontally from the center, as shown by the yellow line.
1634925049701.png

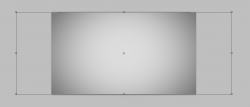
  • Now I used Edit>Transform>Scale on this new gradient. I held down the Alt key to keep it centered and then stretched it horizontally (see below) until it looked like it matched the sample. I also turned off the gridlines.

1634925498320.png

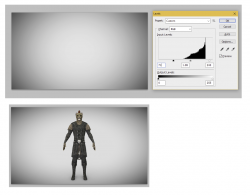
  • As a final step, I applied a Levels adjustment with the settings shown, just using my eye to tweak the shading for a better match to your sample.
1634926320641.png
 

CactusBack

New Member
Messages
3
Likes
1
I was able to get something pretty close using two Photoshop gradients. Not sure if this is good enough for your purposes, or whether you really need it to be precisely perfect.
Yes, what you got seems pretty close to what I need. It definitely looks much better than any of my attempts :) So I'll probably use this method if I can't come up with anything better. Thank you for taking the time to help!
 

thebestcpu

Guru
Messages
2,994
Likes
2,760
@Rich54 approach gives a lot of flexibility to adjust the effect quite accurately. Here is an approach that is quite simple yet more limited

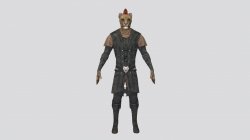
1) Start with image without vignette (derived from you link)
Screen Shot 2021-10-23 at 10.58.06 AM.jpg

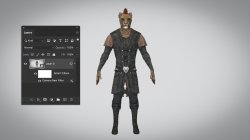
Turn it into a Smart Object and apply the Camera Raw Filter with the Vignette Slider (under the Effects module)
Screen Shot 2021-10-23 at 10.54.48 AM.jpg

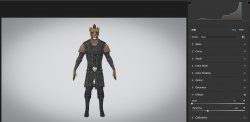
Here are the specific settings I used in the Camera Raw Filter that seemed to give a similar result:
Screen Shot 2021-10-23 at 10.55.14 AM.jpg

Just another approach to consider
John Wheeler
Note: I did not extract out the shadow of the character in the starting image so this was just for demonstration purposes
 

Rich54

Guru
Messages
1,739
Likes
3,425
What I've tried so far:

1. I guess the most obvious thing to try is perhaps enable the transparent background in Sketchfab and export an empty scene with the vignette effect toggled on. That should in theory give us only the vignette effect itself, which I could later apply to any image, right? Well, it doesn't work like that unfortunately. It does give me a vignette effect but the result after applying it to an image looks different to an image that would've been generated by Sketchfab with the vignette effect toggled on. And the difference is not only in the opacity percentage of the effect. The hardness is different too.

Hi, I was thinking about this attempt #1 that you described and it got me curious. Could you possibly post two things?
  1. An example of an exported empty scene with the vignette applied. (I wasn't able to figure out how to do that myself in Sketchfab.)
  2. An example of an image that you would want to insert into the empty vignette.
I'd like to play around and see what I get.

Rich
 

polarwoc

Guru
Messages
1,576
Likes
1,421
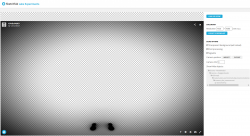
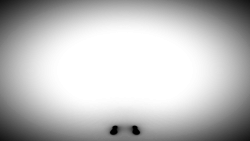
An example of an exported empty scene with the vignette applied. (I wasn't able to figure out how to do that myself in Sketchfab.)
I hope I understood you correctly, Rich. My settings are shown to get the transparent background.
1.png
The Background itself (I am yet to figure out how to remove the shadow):
k9_hbuf4d_u.png
 

polarwoc

Guru
Messages
1,576
Likes
1,421
That should in theory give us only the vignette effect itself, which I could later apply to any image, right? Well, it doesn't work like that unfortunately. It does give me a vignette effect but the result after applying it to an image looks different to an image that would've been generated by Sketchfab with the vignette effect toggled on. And the difference is not only in the opacity percentage of the effect. The hardness is different too.
The following PSD has Vignette in a background layer and the 3D character in foreground layer. I would like to understand why you think the image generated in PS looks different from the one generated in Sketchfab?
 

Attachments

  • 1789-After-k9_hbuf4d_u.psd
    9.8 MB · Views: 3

Rich54

Guru
Messages
1,739
Likes
3,425
I hope I understood you correctly, Rich. My settings are shown to get the transparent background.
The Background itself (I am yet to figure out how to remove the shadow):

Yes, this is what I was asking... thanks.

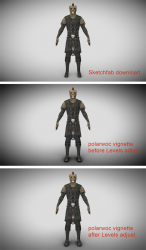
It's interesting that when you downloaded the vignette by itself, the corners seem much darker than in the original link that the OP provided. I took your latest file (from your Post #7) and added a new layer immediately above the vignette layer. I filled that layer with the lightest shade of the OP's background (color # dddddd) and changed the layer blend mode to Darken. In order to match what the OP originally linked, I then needed to add a Levels adjustment to lighten the darkest blacks. (see images below)

It appears that, within Sketchfab itself, the darkness of the vignette is altered depending on which image is placed into it. I guess we now need to go back to the original question: what is the OP trying to achieve? It seems to me that, depending on which image we are talking about, the vignette needs to be modified—either darker or lighter—with a Levels adjustment.

1635039313904.png
 

polarwoc

Guru
Messages
1,576
Likes
1,421
@Rich54 That image after Levels adjustment looks very, very close to the original.

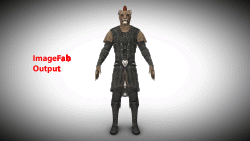
Here, I made a GIF consisting of two images, each showing for 2 seconds. First one is the output from ImageFab, and the other being the PS file with separate Vignette layer in background with the 3D character in foreground layer.
1789-After-k9_hbuf4d_u.gif
There is definitely differences visible especially on the character's face and legs. PS image has more light on the face while ImageFab has a darker face. Photoshop has darker feet while ImageFab has brighter feet.
Probably with introduction of Rich's Levels adjustment the differences could be minimised.
 

CactusBack

New Member
Messages
3
Likes
1
Thanks a lot for the replies, everyone!

The following PSD has Vignette in a background layer and the 3D character in foreground layer. I would like to understand why you think the image generated in PS looks different from the one generated in Sketchfab?

Yes, like @Rich54 explained, when you download the vignette by itself on the transparent background, the corners are much darker than on screenshots with non-transparent background.

The level adjustment method described by Rich seems to provide good results though. I might use that one, although adjusting the levels for each image might be a pain. But I only plan to use it for images with the same background color (#DDDDDD) so maybe I'll only need to adjust the levels once. I'll try to experiment with it.

The Background itself (I am yet to figure out how to remove the shadow):
To remove the shadows from the generated screenshot you can simply move the model outside of the scene with the right mouse button.
 

polarwoc

Guru
Messages
1,576
Likes
1,421
To remove the shadows from the generated screenshot you can simply move the model outside of the scene with the right mouse button.
That worked. Another option is to use the scroll and zoom the character out until it becomes a tiny speck that is invisible! What an excellent program SketchFab is.
 

Top