What's new
Photoshop Gurus Forum

Welcome to Photoshop Gurus forum. Register a free account today to become a member! It's completely free. Once signed in, you'll enjoy an ad-free experience and be able to participate on this site by adding your own topics and posts, as well as connect with other members through your own private inbox!

Need Help


andrewcs

Member
Messages
6
Likes
1
Hai..
Does anyone know how to make a black background behind the text as shown in the picture?

01.jpg
 

IamSam

Administrator
Staff member
Administrator
Messages
22,765
Likes
13,269
Hello and welcome.

Create your image with the text.

Create a new layer below the "The Best" text layer.
Use your Rectangular Marquis Tool to make a selection around the "The Best" text layer.
Screen Shot 2019-05-30 at 9.07.50 PM.png

Fill the layer with black and name Black band 1
Screen Shot 2019-05-30 at 9.09.18 PM.png

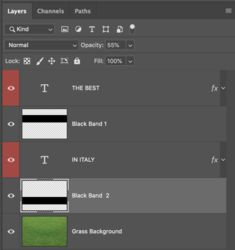
Duplicate the Black Band 1 layer by hitting Cmd/Cntrl + J
Name the duplicated Black Band 1 layer to Black Band 2
Drag the Black Band 2 layer below the "In Italy" text layer.
Use the Move Tool (on the canvas) to move the Black Band 2 behind the "In Italy" text.
Screen Shot 2019-05-30 at 9.22.51 PM.png
Screen Shot 2019-05-30 at 9.09.30 PM.png

Lower the opacity of the two Black Band layers to suit.
Screen Shot 2019-05-30 at 9.12.02 PM.png

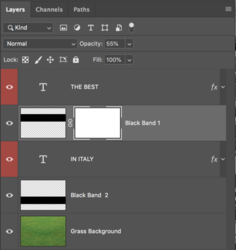
Now select the Black Band 1 layer.
Add a layer mask to Black Band 1 layer by hitting the "add layer mask" icon located at the bottom of the layers panel.
Note that the layer is selected/highlighted and by clicking on the layer mask, there are white brackets around the layer mask.
Screen Shot 2019-05-30 at 9.28.11 PM.png

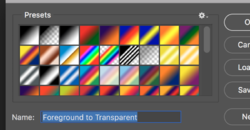
Now Choose the Gradient Tool.
Click on the Gradient editor located on the far left of the tools option bar (top).
When the widow opens, select foreground to transparent preset. Then close.
Screen Shot 2019-05-30 at 9.32.27 PM.png

Make sure black is your foreground color and white is your background color. Hit the D key.

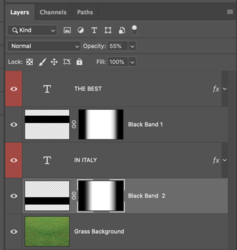
With the Gradient Tool, work from the ends of the Black Band 1 (one at a time) while holding down the shift key. It may take you several strokes to get the gradient where you like it.
Screen Shot 2019-05-30 at 9.14.09 PM.png

When you have it like you want it...........repeat the process for the Black Band 2 layer.
Screen Shot 2019-05-30 at 9.40.39 PM.png

Screen Shot 2019-05-30 at 9.15.38 PM.png

Done
 

andrewcs

Member
Messages
6
Likes
1
Hello and welcome.

Create your image with the text.

Create a new layer below the "The Best" text layer.
Use your Rectangular Marquis Tool to make a selection around the "The Best" text layer.
View attachment 99124

Fill the layer with black and name Black band 1
View attachment 99125

Duplicate the Black Band 1 layer by hitting Cmd/Cntrl + J
Name the duplicated Black Band 1 layer to Black Band 2
Drag the Black Band 2 layer below the "In Italy" text layer.
Use the Move Tool (on the canvas) to move the Black Band 2 behind the "In Italy" text.
View attachment 99127
View attachment 99128

Lower the opacity of the two Black Band layers to suit.
View attachment 99129

Now select the Black Band 1 layer.
Add a layer mask to Black Band 1 layer by hitting the "add layer mask" icon located at the bottom of the layers panel.
Note that the layer is selected/highlighted and by clicking on the layer mask, there are white brackets around the layer mask.
View attachment 99130

Now Choose the Gradient Tool.
Click on the Gradient editor located on the far left of the tools option bar (top).
When the widow opens, select foreground to transparent preset. Then close.
View attachment 99132

Make sure black is your foreground color and white is your background color. Hit the D key.

With the Gradient Tool, work from the ends of the Black Band 1 (one at a time) while holding down the shift key. It may take you several strokes to get the gradient where you like it.
View attachment 99135

When you have it like you want it...........repeat the process for the Black Band 2 layer.
View attachment 99138

View attachment 99137

Done
Do you know the type of font used in the picture?
 

Eggy

Retired Moderator
Messages
5,313
Likes
5,085
The font used in the original picture is 'Big Noodle Too' and it's not a free font.
 

Top