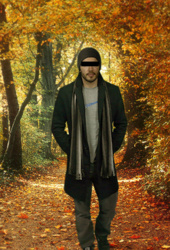
What's new
Photoshop Gurus Forum

Welcome to Photoshop Gurus forum. Register a free account today to become a member! It's completely free. Once signed in, you'll enjoy an ad-free experience and be able to participate on this site by adding your own topics and posts, as well as connect with other members through your own private inbox!

Object looks 'out of place'


HansVader

Member
Messages
5
Likes
0
Hi everbody

I just can't get a realistic looking result. Something is missing and I can't figure out what.
The person was inserted using a greenscreen. I softened the edges and applied light- and color filter to make the object fit the background. But somehow it still looks fake..

Any tips?

Thank you
 

Attachments

  • 94b46aadc97ba58d8129f41a977102cc.png
    94b46aadc97ba58d8129f41a977102cc.png
    231.9 KB · Views: 14
  • Standin_Freigstellt_Cast.png
    Standin_Freigstellt_Cast.png
    1.2 MB · Views: 18
  • Unbenannt.PNG
    Unbenannt.PNG
    1.9 MB · Views: 19
Hello Hans
The Green Screen cutout and replacing the background was done well.

What I noticed in all three images is the the lighting source direction and hardness/softness for the subject is totally different than for the background. It therefore gives the impression that the subject is not one with the background ... as if there were other lighting sources directed right at the subject or in their own local studio.

Crating the right lighting/shadows after the fact is quite the chore yet what probably is needed to make the object look as if they fit into the background

Just my opinon of course.

John Wheeler
 
Hi John

Thanks for your reply.

Yeah that sounds about right. How can I adjust the hardness and lightning so that it fits the background? Do you have by any chance some good links to tutorials or guides? I'm not really a PS expert so everything I've learned so far was by watching others do it.
 
Hello Hans
I don't have a tutorial handy or anything automated so here is what I do (I took an example and did a real fast adjustment so no where near perfect)
1) Determine from the background where the source of light is coming from
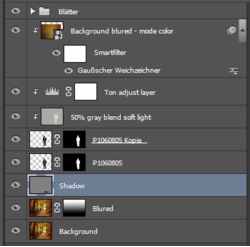
2) Duplicate original and mask out your object that needs different lighting
3) Add a clipped mask Layer that is 50% gray with Blend of soft light
4) Add a second clipped mask Layer that is a Level or Curves adjustment Layer (I used a Levels adjustment Layer for expediency)
5) Use Levels adjustment Layer so Tone of Object directly in the light source matches that background that is directly in light source for black point, white point, and average point
6) Paint Gray level with low opacity brush with Black to burn the areas of the object that are away from the light soruce (in this case the backside of the person. Softness of brush determines how hard the shadow is and hardness shoudl be based on hardness of shadows in the background
7) adjust for taste/match

I provide the example below as a very quick approach to give you an idea on how to go about making it fit in better. Subtle differences in shadwos, black point, white point, color temperature, and expected focus all make a diffeence if it looks like it fits.

Hope this incremental information is helpful.

John Wheeler

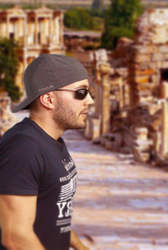
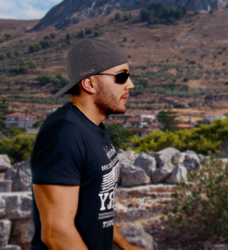
The image below shows your image on the right and adjusted image on the left per instructions above.

Screen Shot 2017-11-29 at 4.01.15 PM.png
 
Hi John

Thanks a lot. That looks promising. I will try it out myself as soon as I have some spare time. (Probably the weekend)
I'll post the result here.
 
Soo I finally managed to produce something which I feel like isn't complete garbage. ^^
Can you take a look at it and tell me what you think?

I used the gray blend soft light layer and tried to get the colors right by kinda apply the background to the object.

Saddly I can't attach the project itself as it is too large.
 

Attachments

  • filters.PNG
    filters.PNG
    23.6 KB · Views: 3
  • 1_Final_cut.png
    1_Final_cut.png
    509.5 KB · Views: 3
Its hard to say for sure in that low resolution but at fast first look i think it needs more contrast, light warm tone. Made a fast example (1minut).

1_Final_cutf.jpg
 

Back
Top