What's new
Photoshop Gurus Forum

Welcome to Photoshop Gurus forum. Register a free account today to become a member! It's completely free. Once signed in, you'll enjoy an ad-free experience and be able to participate on this site by adding your own topics and posts, as well as connect with other members through your own private inbox!

Specific Red blotches on wedding suit, need get uniform colour please


Messages
62
Likes
4
For some reason, one of the 12 wedding photos has strange red blotches on my suit. Have tried several methods but nothing very successful. I have added two images, one is the untouched scan, the second image, Auto tones only, can someone help please ? Thanks


2-original.jpg

2-Auto Tone.jpg
 
Definitely some improvement, still some red showing, or is that merely the weave ? May I ask what method you used ?

had a thought, if I desaturated the suit entirely, would the shadow info still be retained ? Could I then not fill it with the correct colour ? And if so would that look too flat ?

or convert the suit to black and white then colourise it.....may be crazy ideas, still learning 🙃
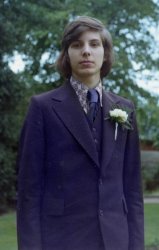
 
This is what I did:

Duplicate the image onto another layer.

Image/ Auto-Tone

Duplicate that image onto another layer.

The image is riddled with tiny white speckles, I tend to use an old 8bit filter called ‘Polaroid Dust and Scratch Removal’ which requires an old 32bit version of PS. I also scan into that version since it still does TWAIN. At this defect size, little damage is done to the image.

Duplicate that image again.

I used a Hue/Saturation layer (with a Clipping Mask) and picked ‘Red’ instead of ‘Master’ and used the tool specific eyedropper on a typical blotch and tweaked the color select parameter. Hue, Saturation and Lightness were modified. That got rid of most of the blotches so at that point I picked ‘Magenta and used the eyedropper again and tweaked Hue, Saturation and Lightness. 99 % gone. There were at that point a few left and I cloned them and the obvious surface defects out at 200%.. It turns out the white speckles are the center point of many of the blue dots that presumably were from the printing process…probably a highly reflective blue ink.

I erased the face because many of the reddish parts had been adversely affect. The lower layer had not been affected because of that Clipping Mask. I merged those two layers .

I selected the head onto another layer and sharpened it. Bad stuff emerged and I ended up keeping the eyes and mouth only and erased everything else.

Finally I used a Color Balance procedural layer to modify skin tones and let the rest of the image follow suit.
 
Last edited:
>>>

had a thought, if I desaturated the suit entirely, would the shadow info still be retained ? Could I then not fill it with the correct colour ? And if so would that look too flat ?

or convert the suit to black and white then colourise it.....may be crazy ideas, still learning 🙃
Interesting idea. Here's my very sloppy 10 minute proof of concept.

Selected the suit and desaturated it. Then used a bush (with Color Mode and both opacity & flow at 50%) using either a selected blue (tie) or violet (suit). Works better than I thought but the red is not necessarily the same value (light/dark) as the nearby suit.

BTW I think most of the red you see above is weave but the are some easily cloned tonal blotches on the lapel and a few other here and there. Go get 'em.

Red Blotches_proof of concept.jpg
 
Last edited:
Working with the original, used curves to balance the RGB values. Boosted the reds a bit more - I felt the shot was too cold.
Then used the spot healing brush to get rid of the red spots (at least the ones I could see).
Used a high pass filter to sharpen.
- Jeff
2-original edited.jpg
 
Wow, thank you so much, I tried a similar approach, but yours was much more thorough.

have you saved the final work as a TIFF FILE, DROPBOX or similar ? Would like to keep,it in that format if possible, only use JPEG’s when printing, as photo machines don’t like TIFFs

thanks again

P.S. wonder why just this one photo was so badly affected ? Do you think it was a faulty photo to begin with ? Or a pigment breakdown ?
Looks very good, was the method complicated ? Could you kindly upload the TIFF file to dropbox or similar for me ? Thank you
 
Wow, thank you so much, I tried a similar approach, but yours was much more thorough.

have you saved the final work as a TIFF FILE, DROPBOX or similar ? Would like to keep,it in that format if possible, only use JPEG’s when printing, as photo machines don’t like TIFFs

thanks again

P.S. wonder why just this one photo was so badly affected ? Do you think it was a faulty photo to begin with ? Or a pigment breakdown ?

Looks very good, was the method complicated ? Could you kindly upload the TIFF file to dropbox or similar for me ? Thank you


You're very welcome. The file in TIFF format is HERE

I have never come across this problem in the past so I'm no help to you as to the causation. Others here are far more experienced with such issues than I am.
I started with removal of the 'dust' in PSCC with Dust and Scratches, selected the jacket to an alpha channel and used this channel to isolate the addition of painting on a new layer in Colour Mode to even the jacket colours, the clone and Spot Remover tools to remove the still visible discolored areas and then added back in some noise. I then cropped the picture, keeping the original size but with a little less of the background.

Cheers.
 

Back
Top