Hi Joy -
A big welcome to PhotoshopGurus.com.
To me, the image that you posted actually looks quite realistic, and in my own perverse way, rather like it.
That being said, in over 60 years of taking pictures, many, many times, my eye has tricked me and I've experienced the disappointment of trying to take a photo of what seems to be picture-perfect landscape, but because of the particular meteorological conditions (slight haze, slight yellow sky), it comes out looking exactly like your photo. Not terribly appealing to most folks, but definitely realistic. So, I think the question is *not* how to correct for possible flaws in the camera, but rather, how to improve on what nature has handed you on that particular day.
The first order of business is to try to minimize the haze. Although this can be done fairly easily using tools that have been in PS for years (eg, curves, vibrance/sat, etc.), the latest version of PS (ie, CC2015) includes a brand new, wonderful de-haze tool in ACR. If you encounter this problem a lot, this tool will rapidly become your friend.
")
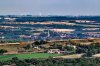
The original:

Here's where the new de-hazing tool is in ACR CC2015:

The result of just the de-hazing tool:

After this initial de-hazing, the image still has some un-desirable aspects, eg, the overall yellow cast, as well as the reduction of color saturation and contrast with distance. The can be handled using other adjustments within ACR, as well in PS using both sharp edged and gradient masks. One finally can come up with something like this.

To be honest, the result is not really all that close to the image you could produce on a perfectly clear, haze-free, sunny day, but at least it's moved the image in that direction and may make it appealing to folks who, for some strange reason, like a more picture-postcard look to their images, LOL.
HTH,
Tom M