What's new
Photoshop Gurus Forum

Welcome to Photoshop Gurus forum. Register a free account today to become a member! It's completely free. Once signed in, you'll enjoy an ad-free experience and be able to participate on this site by adding your own topics and posts, as well as connect with other members through your own private inbox!

Why person A looks different than person B?


relboon

New Member
Messages
1
Likes
1
Hi.
I'm sorry if that is not the right place for this question, please point me to where it should be.
I'm a noob practicing for fun and here is a picture where the guy looks like he was cut out from a different photo than the girl (he was).
I don't understand why. I've tried playing with luminosity, brightness, saturation... but it just seems like his whites are too white...or... I don't know, something. I'm not a painter and I can't put my finger on it, I just see that they are different and I can't tell why.
So why do they look so and how can I make the guy look like a natural part of the photo?

thank you.
grayv.jpg
 
Hello and welcome to PSG.

The number one largest factor in completing a realistic face or head swap is in choosing the right face to exchange in the photo! You have not chosen the right face to swap out. The main issue is that the lighting is wrong. While some of this might be adjusted or "faked", you will have a difficult time blending this guy into this photo with any realism. It will be an exercise in failure.

What are the conditions of the original photo that need to be matched? Whatever photos you choose for your face swap, make sure they are similar in size, color, luminance/brightness, resolution/grain, angles, and lighting.

Look at the lighting on her compared to the lighting on the "swap face", are they close? Where is the light source coming from in the photo? Is it the same on the "swap face"? The idea is to choose a "swap face" that matches the conditions of the photo as closely as possible.

You may want to take some time and run through some of these HEAD. and FACE SWAP TUTORIALS. They may help you in learning how to choose compatible photos, match conditions, and blending.

Over time I have learned that face and head swaps only work well when you have a set of studio shots where the subjects of different photos were all photographed under the same exact conditions at the same time. Like family studio sessions were you can't get the kids to all be looking at the camera at the same time. You can head swap these photos very well!
 
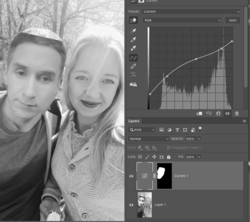
Try making a selection of the man and use a curves layer adjustment. Basically you need to match the shadow, mid-tone and highlight the same as source image. Note the curve is pretty flat.Screen Shot 2019-11-29 at 8.28.41 PM.pngScreen Shot 2019-11-29 at 8.28.41 PM.png
 
A better selection outline would make this composite a million times better. You should also consider adding a few rays of sunlight over his face to match the ones on the woman who is really there.
I've tried playing with luminosity, brightness, saturation...
Saturation wouldn't do much for you here. The photo is black and white. Saturation controls the intensity of colours. If there are no colours to begin with, it has nothing to change.
Try making a selection of the man and use a curves layer adjustment. Basically you need to match the shadow, mid-tone and highlight the same as source image. Note the curve is pretty flat.
Yes. This. Curves adjustment layers are your best friend. Nearly all mainstream photo editing programs have them. I never used to like them very much, but once you've learned how to use them, they can work absolute miracles.
The way Curves adjustments work is simple. It's an input/output graph. The horizontal axis shows what brightness levels the photo already has, and the vertical axis allows you to make changes to those values based on where they are.
There's one specific resource I recommend for learning how Curves adjustments work. His name is Unmesh Dinda (PiXimperfect); he has a couple of videos about using Curves.
If you're new to Photoshop, I very strongly recommend that you subscribe to his channel; his tutorials are extremely useful, fun, relaxing, and educational. I recommend his channel not just for learning Curves, but for learning anything in Photoshop.
Also, don't be afraid to use multiple adjustment layers, or to draw masks around your adjustment layers to reduce them to certain parts of the image. Sometimes that's the only way to remove (or add) shadows to certain areas.
However, @IamSam is right. To get ideal results, you'll want to just use a different photo. The lighting conditions don't match very well in the one you've chosen.
 

Back
Top