Photoshop Gurus Forum
Welcome to Photoshop Gurus forum. Register a free account today to become a member! It's completely free. Once signed in, you'll enjoy an ad-free experience and be able to participate on this site by adding your own topics and posts, as well as connect with other members through your own private inbox!
You are using an out of date browser. It may not display this or other websites correctly.
You should upgrade or use an alternative browser.
You should upgrade or use an alternative browser.
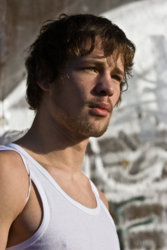
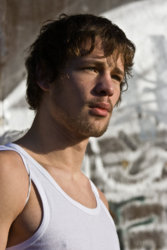
Who knows a good technique of cutting awkward hair on photoshop?
- Thread starter Kaleshe
- Start date
peta62
Guru
- Messages
- 726
- Likes
- 190
Select it and Fill -> Content aware ?
ibclare
Queen Bee
- Messages
- 9,890
- Likes
- 4,028
No such thing darling; not if you want to keep all the hair.I'd like a technique that isn't time consuming.
I have used workarounds such as smudging in parts of the hair or painting them. But for this many hairs I would recommend a rather simple method using channels. Here is the quick job I did. Needs lots of cleanup, but you can see how it works. And the cleanup is not too detailed. My job has probably lost some of the finer hairs but you can decide how aggressive to be in the techniques used for this kind of extraction. It is a bit more difficult because of the darker BG.

Last edited:
thedirtyknapkin
Well-Known Member
- Messages
- 199
- Likes
- 61
i usually just use the refine mask, and smart radius tools
ibclare
Queen Bee
- Messages
- 9,890
- Likes
- 4,028
Here's how you do this and actually, once you have done it a time or two, it goes pretty fast:
First duplicate your original layer (this is just a safety precaution -- you never know when you might find that you have just been painting for three minutes on the layer, not the mask, etc.).
Now open the channels panel. Click each of the channels one by one, red, green, blue. Highlight the channel which has the most contrast -- blue in this case, usually for skin.
Drag the blue channel onto the "create new channel" icon. Exactly the same icon as "create new layer."
Now for the levels adjustment. You'll do this directly on the duplicate channel so do a cmd/ctl + L to get your levels dialogue box. Move the right (light) slider inward till the background - especially where it is darkest around the hair - gets lighter. Be careful not to go too far (I went a bit too far) and obliterate all the details of hair strands. Adjust the left (dark) slider so the blacks in the hair become darker without thickening too much or making the BG darker. In this image you will need to adjust the light more.
Now paint in the entire solid body and head with black. Paint up to just before you can see strands and background. The next step you can do to lighten the background a bit more. Switch the color to white, set the brush mode to overlay and a low opacity. Brush lightly around the thinner hair strands but not too much.
You can go back and forth with black and white to restore or remove detail as needed.
Once satisfied, select the duplicate layer in the layers panel, ctl/cmd click on the duplicate blue channel to create a selection. Click the layer mask icon to apply it, ctl/cmd + i to inverse it and you will have what I have posted, more or less.
Just use brushes as you would on any mask to clean it up.
PS: You may like to "cheat a bit" and add some details with a small hair brush -- deviantart.com has good, safe brush and image downloads.
Hope this helps.
Last edited:
ibclare
Queen Bee
- Messages
- 9,890
- Likes
- 4,028
i usually just use the refine mask, and smart radius tools
I don't find this to work too well. What is your method? If you have a minute, maybe you could post the extraction on this and describe your steps. Oh, I guess you'll need a couple minutes.
thedirtyknapkin
Well-Known Member
- Messages
- 199
- Likes
- 61
I don't find this to work too well. What is your method? If you have a minute, maybe you could post the extraction on this and describe your steps. Oh, I guess you'll need a couple minutes.
it only really works when there ir a good contrast between foreground and background, and even then it's frustrating because you can't use the undo command
thedirtyknapkin
Well-Known Member
- Messages
- 199
- Likes
- 61
here is my under 5 minute effort

i just did a quick select, then expanded that selection, but only around the head, so it included all of the hair
then i used refine mask, and turned on smart radius, pushed the radius slider about 1/3 of the way across, and brushed around the hair to get all of the concrete
then to finish it i put the contrast slider at 31, and hit ok
ibclare
Queen Bee
- Messages
- 9,890
- Likes
- 4,028
Refine mask works well for this case. 2 minutes.
What's your original selection method?
What settings are you focusing on in refine mask?
Well, Refine Edge is quite an easy tool, but there are some not obvious details.
1. Make a rough selection with Quick Selection Tool.

2. Go into Refine Edge mode.
3. Fun begins. Now we need to draw a transition zone (whith both hair and background). Refine Radius Toll is already active. Press "R" (Reveal Layer) so we can see where the hair is, ajust Brush size and draw the zone.

NB: Isn't it better to simply turn Edge Detection - Smart Radius option on and move the slider? Well, it's designed to automatically make transition zone, but it's too smart for me and leaves crap near hard edges and you dont have direct control over the zone.
To be honest, Edge Detection - Smart Radius is easy to use, it can achieve decent results. But I prefer to draw manually.
4. Press "W" (On White) to see the result on white Okay, pretty nice result, but we have some defects.

5. Hit "K" (Black&White), to see our mask and its defects. Now choose Erase Refinement Tool and retouch the mask. Just erase white things near the hairs.

6. At the and you can make output to layer mask and hit ok.

PS I forgot to cut his beard.
1. Make a rough selection with Quick Selection Tool.

2. Go into Refine Edge mode.
3. Fun begins. Now we need to draw a transition zone (whith both hair and background). Refine Radius Toll is already active. Press "R" (Reveal Layer) so we can see where the hair is, ajust Brush size and draw the zone.

NB: Isn't it better to simply turn Edge Detection - Smart Radius option on and move the slider? Well, it's designed to automatically make transition zone, but it's too smart for me and leaves crap near hard edges and you dont have direct control over the zone.
To be honest, Edge Detection - Smart Radius is easy to use, it can achieve decent results. But I prefer to draw manually.
4. Press "W" (On White) to see the result on white

5. Hit "K" (Black&White), to see our mask and its defects. Now choose Erase Refinement Tool and retouch the mask. Just erase white things near the hairs.

6. At the and you can make output to layer mask and hit ok.

PS I forgot to cut his beard.
Last edited:


