Photoshop Gurus Forum
Welcome to Photoshop Gurus forum. Register a free account today to become a member! It's completely free. Once signed in, you'll enjoy an ad-free experience and be able to participate on this site by adding your own topics and posts, as well as connect with other members through your own private inbox!
You are using an out of date browser. It may not display this or other websites correctly.
You should upgrade or use an alternative browser.
You should upgrade or use an alternative browser.
Direct overhead lighting
- Thread starter RobNJ
- Start date
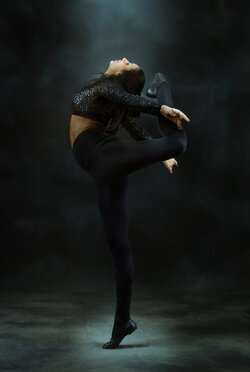
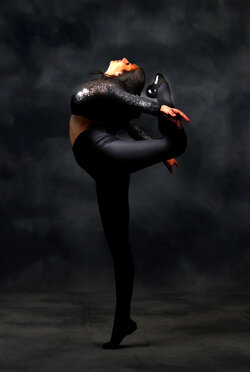
My approach is to think of it as painting with light, imagining a strong top-light and then darkening what should be in shadow and brightening what should be illuminated. The darks and lights can be accomplished with a combination of adjustment layers (Levels or Curves), layer blend modes, and a bit of manual painting.
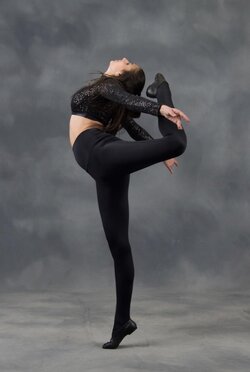
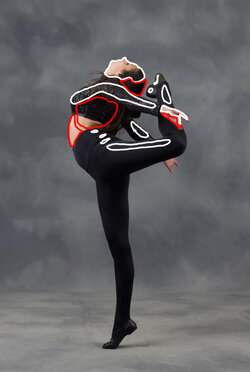
I first identified everything that would be facing the light (circled in white) vs. everything that should be in shadow (circled in red). Whether or not her right arm is in light is debatable.
Here are the steps I took:
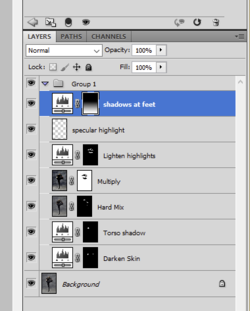
Here's my layer stack:
I first identified everything that would be facing the light (circled in white) vs. everything that should be in shadow (circled in red). Whether or not her right arm is in light is debatable.

Here are the steps I took:
- Add a Levels adjustment to darken the skin of her stomach and the palms of her hands. Those would probably be in shadow.
- Add another Levels adjustment to create a deep shadow on the side of her torso that would be created by her breasts.
- Copy this combined new image to a new layer using Stamp Visible (Shft+Ctrl+Alt+E).
- Change the blend mode of this new layer to Hard Mix. I recently discovered Hard Mix, which gives a very glowy effect. The important step is to greatly reduce the layer Fill (not the layer opacity) down to around 33%. Add a layer mask and mask-away everything except her face and the tops of her hands.
- Copy the combined image again to a new layer using Stamp Visible.
- Change the blend mode of this new layer to Multiply, which puts everything in shadow. Add a layer mask and mask away areas that are facing the light, such as the top of her breasts, shoulders, arms, left ankle and foot, and the hips and thigh of her raised leg.
- Add a levels adjustment to further lighten the highlights of these same areas I just mentioned.
- I added some white specular highlights to the edge of her shoe and the top of her breast, trying to enhance highlights that are already there.
- Add a levels adjustment to darken the lower third of the image. Use a gradient to fade the effect.
Here's my layer stack:


Last edited:
I selected the subject, then used that selection to darken the background, then darkened the subject and selectively brought back brightness where the light would strike if it were coming from above. Rather than try to describe all the steps, here is the .psd file with layers intact so you can see exactly what I did. Pay attention to the different blend modes of the layers.

Last edited:
That is even better!
Wow! That is really goodI selected the subject, then used that selection to darken the background, then darkened the subject and selectively brought back brightness where the light would strike if it were coming from above. Rather than try to describe all the steps, here is the .psd file with layers intact so you can see exactly what I did. Pay attention to the different blend modes of the layers.
View attachment 141344
JeffK
Guru
- Messages
- 2,510
- Likes
- 2,906
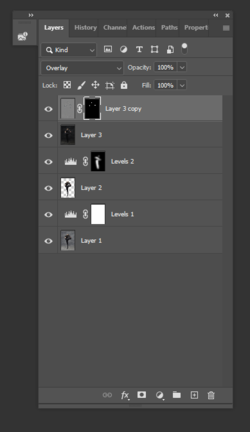
Maybe I'm oversimplifying - I tried this one by firsts separating the subject from the background;
Then used a levels adjustment to darken only background;
Used the lasso tool to choose the areas I wanted in deeper shadow;
Using another levels adjustment, made those areas darker;
Made a combo layer, duplicated it, added a high pass filter to the top composite, and changed that layer to overlay;
Masked out that top layer and spot sharpened come ares
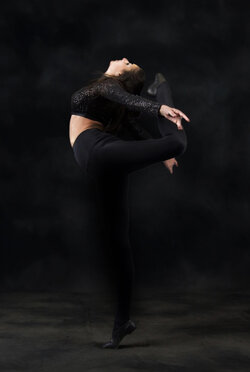
Screenshot of my layers - you can play around with those settings or even substitute curves adjustment for the level adjustment
Then used a levels adjustment to darken only background;
Used the lasso tool to choose the areas I wanted in deeper shadow;
Using another levels adjustment, made those areas darker;
Made a combo layer, duplicated it, added a high pass filter to the top composite, and changed that layer to overlay;
Masked out that top layer and spot sharpened come ares

Screenshot of my layers - you can play around with those settings or even substitute curves adjustment for the level adjustment

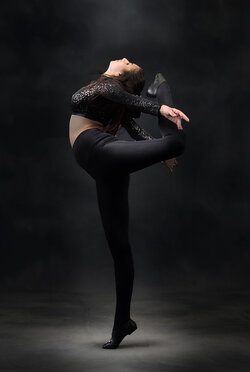
Another approach ..
- made a selection of the dancer to an alpha channel
- inverted this selection and used curves to darken the FG and BG
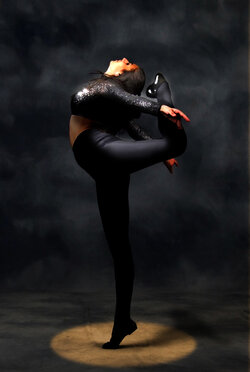
- painted on the curves mask with a soft low opacity black brush to reveal the lighter layer, imagining the shape of an overhead spotlight including on the stage around her feet
- selective (filled the mask with black and painted with that same white brush) curves adjustment layers in luminosity mode to darken where I thought that the light would not hit
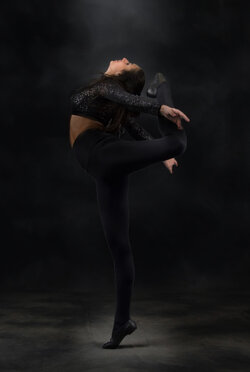
Used a levels adjustment to balance each of the RGB values to get this ....

- made a selection of the dancer to an alpha channel
- inverted this selection and used curves to darken the FG and BG
- painted on the curves mask with a soft low opacity black brush to reveal the lighter layer, imagining the shape of an overhead spotlight including on the stage around her feet
- selective (filled the mask with black and painted with that same white brush) curves adjustment layers in luminosity mode to darken where I thought that the light would not hit

Used a levels adjustment to balance each of the RGB values to get this ....
