What's new
Photoshop Gurus Forum

Welcome to Photoshop Gurus forum. Register a free account today to become a member! It's completely free. Once signed in, you'll enjoy an ad-free experience and be able to participate on this site by adding your own topics and posts, as well as connect with other members through your own private inbox!

How to Save an Image with Blending Modes?


LyssaTalbot

Member
Messages
6
Likes
0
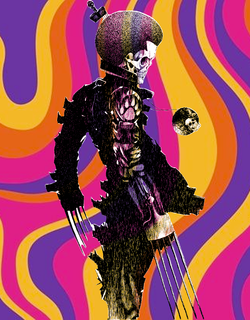
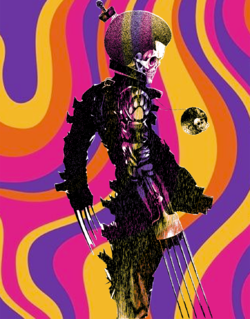
My file contains a background layer and an image layer above that is set to pin light. I've tried rasterizing, merging, saving as png & jpg, apply image, etc. - and NOTHING maintains the blending mode setting.

There has to be a way to export or save the effect in a flattened image...how else are you suppose to deploy the final product? You cannot upload a photoshop file to your website or to send to a printer.

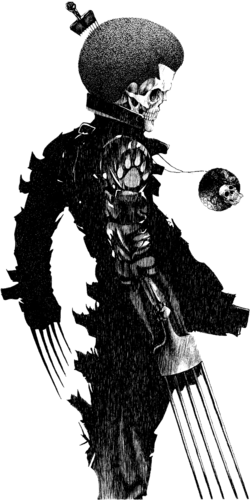
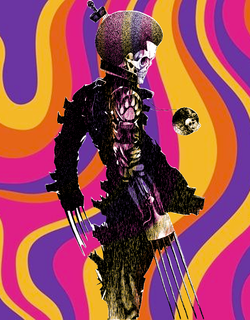
The screenshot image shows what the effect looks like & the png shows what the export, merged layer, etc. look like. Someone please help! There has to be a work around - otherwise what is the point in having blending modes to begin with??
Thank you!
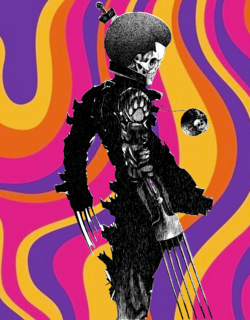
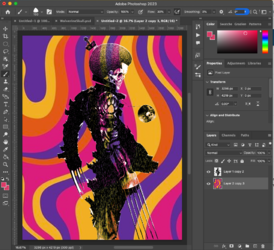
WolverineSkull copy.png

Screenshot 2023-11-13 at 1.45.45 PM.png
 
Last edited:
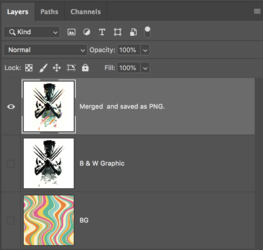
Two layers.
A BG layer
A Graphic layer set to Pin Light blending mode.
61Uekp4KnhL.jpg

Third layer is a merged (Stamp Visible> Shift + Opt/Alt + Cmd/Cntrl + E) layer of the two...
saved as PNG...
psychedelicvector.png
Screen Shot 2023-11-13 at 1.22.49 PM.png
 
Thank you. It still isn't working. The pin light blending mode makes all the white transparent (or atleast shows a preview of this). However, I realized that when I zoom in 100% the white is no longer transparent. I really just want to be able to export the effect in image I put in the original post. I have attached the two layers...let me know if your able to make it work on your end. Thank you so much for your help. I am going crazy.

Layer 2 copy 3.png

Layer 1 copy 2.png
 
Can you post your PSD file? Not sure what you may be doing wrong.
 
That seems to work with "multiply" but every time I try it with "pin light", it just gets rid of the effect. Any idea what I'm doing wrong? Do I need the color profile or bits per channel set to something specific?
 
You are using 16 bit/RGB.

I'm using 8 bit/RGB

You can try to change that!
 
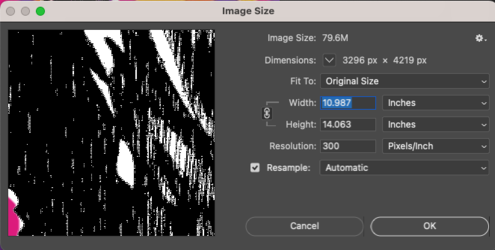
I had to reduce the size drastically but here it is. I just noticed that it worked with reducing the size of everything. Any idea why that would be? Here are the size specs for the original psd file.
Thanks

Screenshot 2023-11-13 at 2.42.27 PM.png
 

Attachments

  • WolverineSkull_layerstyles_small.psd
    20.5 MB · Views: 3
This is directly from your file. Saves as PNG just fine. How are you merging the layers?

WolverineSkull_layerstyles_small.png
 
I had to reduce the size drastically but here it is. I just noticed that it worked with reducing the size of everything. Any idea why that would be? Here are the size specs for the original psd file.
Thanks
I used the original images you posted in post #4 for posts #5 #10 and #11. I don't think sizing has anything to do with it.
 
Yes I just realized that when I reduced the size of the overall image, it worked. But then I downloaded the images from here (that I originally uploaded) and created a new doc and that works. I cannot for the life of me figure out what the problem was. I'm just worried about replicating this in the future if I run into the issue again.
 
Yes I just realized that when I reduced the size of the overall image, it worked. But then I downloaded the images from here (that I originally uploaded) and created a new doc and that works. I cannot for the life of me figure out what the problem was.
Great!

I could not replicate the issue myself so I can't say what was causing the problem. Sometimes Ps just decides to be stubborn! I have always been told that resetting prefs cures just about any unknown Ps issue.
 
Yes I just realized that when I reduced the size of the overall image, it worked. But then I downloaded the images from here (that I originally uploaded) and created a new doc and that works. I cannot for the life of me figure out what the problem was. I'm just worried about replicating this in the future if I run into the issue again.
Hi @LyssaTalbot
If you send a link to the full-size PSD file on a file-sharing service (e.g. Dropbox or otherwise) I am confident the root cause could be quickly determined.
There are a number of known cases with fine patterns in original full-size files that will cause strange behavior in Photoshop due to performance speed tradeoffs when displaying especially at lower magnifications.
The same issues can potentially manifest when saving as well.
I am guessing that this is the issue as I saw hints of that problem after extracting out the transparency of the foreground image.
This test could also be done on a cropped portion of the image at the full original resolution.
Just a suggestion
John Wheeler
 
Hi @LyssaTalbot

As a shortcut to demonstrate what I think is the likely issue, I will create a demonstration using part of your image.
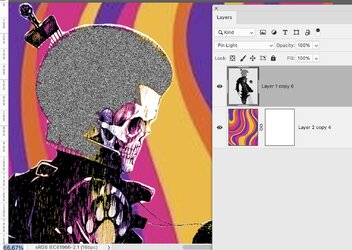
All I did was increase the size of the reduced-size image you supplied, and for the Afro Skeleton image, I took the hair and replaced it with a black-and-white pixel random pattern (done with the dissolve blend)

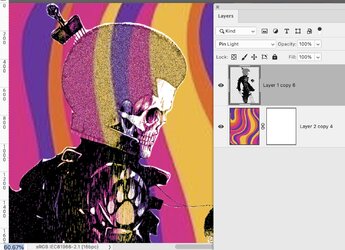
Using the same Layer Stack and Blend that you were using, when viewing at less than ~66 percent magnification, it appears that you can see underneath the background color:

Screenshot 2023-11-13 at 7.08.17 PM.jpg

However, when you increase the magnification above 66.67%, the head turns to pure black and white:

Screenshot 2023-11-13 at 7.08.51 PM.jpg

This seems to be akin to the behavior you are seeing.

The problem is that Photoshop does not show the image properly because, for speed reasons, it takes a shortcut that when you are viewing at reduced magnification, it merges the nearby pixels before it does the blend. So, all those black-and-white pixels for the head look like gray-level values at reduced magnification. Using gray values with the Pin Blend mode creates a look through to the lower level (I won't provide the details of the blended math).

The good news is that I believe this explains why you are having an issue.
The bad news is that the Pin blend mode (by itself) when it sees either a black or white pixel will leave them as black and white and you have no see-through capability. So, when you chose this blend with the very fine black and white image detail (at lower magnification) you are seeing a false blend.

You will note that in the areas where you had a very fine black and white pattern, the blend works, yet not in the white areas that are of a larger area.

So there are a couple of workarounds.

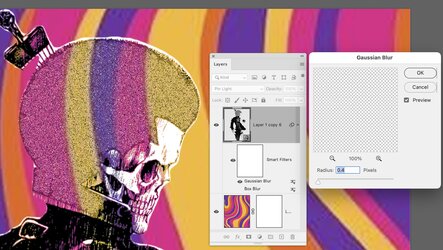
- One would be to add a bit of a blur to your black-and-white skeleton image (I did this by turning it into a Smart Object and using a Gaussian blur. Be sure to view at 100% when you adjust the blur level or you will again get a false blur:

Screenshot 2023-11-13 at 7.43.03 PM.jpg

Another approach is to use a different approach such as Blend If sliders to have the white areas to see through to the background color swirls. By itself, this does not give the same look though, and may require additional steps (e.g. masking)

I will stop here and see if this is helpful for you or not and if you want to explore additional approaches or you are good with the ones I already shared.

John Wheeler
 
My file contains a background layer and an image layer above that is set to pin light. I've tried rasterizing, merging, saving as png & jpg, apply image, etc. - and NOTHING maintains the blending mode setting.

There has to be a way to export or save the effect in a flattened image...how else are you suppose to deploy the final product? You cannot upload a photoshop file to your website or to send to a printer.

The screenshot image shows what the effect looks like & the png shows what the export, merged layer, etc. look like. Someone please help! There has to be a work around - otherwise what is the point in having blending modes to begin with??
Thank you!

View attachment 140953

View attachment 140954
While the pin light layer is active, do Alt-Ctrl-Shift-E to stamp those two layers to a new, third layer, followed by Ctrl-Shift-E. You should be able to save that with all the effects intact.
 

Back
Top