What's new
Photoshop Gurus Forum

Welcome to Photoshop Gurus forum. Register a free account today to become a member! It's completely free. Once signed in, you'll enjoy an ad-free experience and be able to participate on this site by adding your own topics and posts, as well as connect with other members through your own private inbox!

Restoration of girl


raid2506

Active Member
Messages
36
Likes
21
This is a practise restoration I did last year on a stock photo.

There are some minor errors, which I wouldn't make now but the colour was the real bug for me.

It has a wintery light to the image and I was never happy with the finished lighting and colours.

hatgirldouble1.jpg

Feel free to comment.
 
Last edited:
View attachment 29726Nice processing, but here I go again with my take........ I would reduce color noise just a bit and duplicate layer and put top layer in overlay mode but a few other layer modes my pop it a bit better. . Just a preference thing I guess
 
Thanks iDad. I think this is something I will be up against for some time.

I like the way your version works in some parts of the image but it seems to kill detail in other areas, or is that just me?

Am going to run with your idea and play around with some layer modes, looks like that could be the way to go.

Thanks again.
 
There are a lot of ways to improve anything, lots of us tend to over look noise reduction, but if tweaked right it works wonders.i only spent maybe 2 minutes on that to see what noise removal would do ( the more time spent, the better the out come).......unless you pass the line of over processing, (even that can be pretty cool)but as i said. It really is a preference thing.
 
The overlay effect is a bit bright I agree raid. One thing you can do is duplicate the final layer, set it to overlay, then reduce the opacity to find a happy medium. But what iDad did really does help the BG and the vibrance overall. You could also use an adjustment layer for the vibrance/saturation, then use the mask to selectively reduce it and bring back details.
 
Raid, you said that this image was a stock photo. However, even the left image of the 1st pair you posted already looks quite processed. I think this is the cause of a lot of the problems we are facing. By any chance, do you happen to have a version of it that is even less processed?

Tom M
 
Never mind ... I found it: http://argint-diavol.deviantart.com/art/Smile-172917581

Here's my take on it. Note - I didn't pay a lot of attention to the cracks and scratches - I was much more concerned about colors and tones.

I regard the main challenge in retouching this image as a classic example of mixed light sources - uncontrolled in color, brightness and contrast. Effectively, this means that you are forced to make separate corrections to these quantities in the various areas in the image. Also, the background exhibits not exactly the most wonderful bokeh, so I also smoothed that out a bit, straightened the image, and made a few other minor tweaks.

T
 

Attachments

  • hatgirldouble1-tjm01_LHS_only-acr-ps02a-02.jpg
    hatgirldouble1-tjm01_LHS_only-acr-ps02a-02.jpg
    238.8 KB · Views: 55
Thanks Tom, that's the sort of result I was looking for with the girl.

I will have to try the techniques you suggest, I like to review my previous work every 6 months or so.
 
where can I learn about this ...I have a number of images like this...I just mess them up ?
 
Hi Mike, BTL, Raid -

Normally, I would be happy to send you my PSD file for this reconstruction, but, so that I didn't have to spend a lot of time on this little demo, I used a bunch of 3rd party commercial plugins such as NIK Color Efx Pro and probably a couple of ones from Topaz, so unless you have them, my PSD file isn't going to do you much good.

There are also a couple of good books on retouching that I'm familiar with, Eismann's and Ctien's, and I can heartily recommend them, but they just scratch the surface (pun intended). You really need to work on lots and lots of photos to get your chops up.

That being said, probably the best way to get into this sort of work is to deal with one problem at a time, not everything at once (like in this image). For example, Mike, if you are having problems with getting rid of the cracks in the emulsion, we can go through those steps separately. What's the area that gives you the most problems?

Tom
 
Never did it....just not sure where to start....This is an example...I have the orig, but it shows its age...I would love to get this current....as it is my Dad, who died 7 yrs back

POP.jpg
 
Never did it....just not sure where to start....This is an example...I have the orig, but it shows its age...I would love to get this current....as it is my Dad, who died 7 yrs back

I have lots of dust and fine scratches


POP1.jpg
 
Last edited:
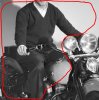
Hi Mike - What a great picture!!! (and great scan, except for the dust)

Obviously, the best way to fix this is to re-scan the photo after cleaning it carefully.

However, even if you do that, there will always be some remnant (white) dust and dark spots, so here's how to treat this problem in a semi-automatic way using the Dust and Scratches filter.

Make two copies of the original. Set the blend mode of one to darken (this will take care of the white spots), and set the other to "lighten" (to take care of the dark spots).

Apply the D&S filter to each layer, in turn. Adjust the sliders in the D&S dialog boxes for the best removal without mucking up the surroundings too badly.

Make a new layer on top (cntl-alt-shift-E) that combines the effect of both D&S layers.

Temporarily, mask it completely black and turn off the individual D&S layers below it.

Even at their best, these filters always produce significant artifacts around desirable bright spots/edges, as well as desirable dark spots and edges, so the idea is to roughly brush in white into the mask in areas where the dust is most objectionable, but leave important areas (the face, the chrome of the bike, etc.) masked in black.

The following screen grabs should be self-explanatory.

HTH,

T

Attachment: first, the layer stack
 

Attachments

  • D&S_layer_stack.jpg
    D&S_layer_stack.jpg
    27.5 KB · Views: 21
Here is are cropped before and after views. Note: even though I applied the D&S filters to the entire image, I only masked "ON" the area shown in red.

As usual, the description of this takes vastly longer than it takes to do the actual work.

HTH,

Tom

PS - BTW, the forum uploader really squished the dust artifacts. I suggest you ignore the in-line thumbnails and just click on them to see the two full rez versions (ie, b4 and after).
 

Attachments

  • POP-tjm01_acr0-ps01b_cropped-01_no_dust_reduction.jpg
    POP-tjm01_acr0-ps01b_cropped-01_no_dust_reduction.jpg
    233.5 KB · Views: 3
  • POP-tjm01_acr0-ps01b_cropped-02_selective_dust_reduction.jpg
    POP-tjm01_acr0-ps01b_cropped-02_selective_dust_reduction.jpg
    227.5 KB · Views: 3
PS - I just noticed that you posted a version that you tweaked. You can see that whatever NR reduction method you used really cut into the resolution. That's why I prefer the method I outlined in my previous post.

T
 
PS - I just noticed that you posted a version that you tweaked. You can see that whatever NR reduction method you used really cut into the resolution. That's why I prefer the method I outlined in my previous post.

T

You are good ! I was not happy with the res... especially the face....I will try your idea, makes sense!

Looks a lot better, I am going to work more with this.

POPTM.jpg
 
Last edited:

Back
Top