What's new
Photoshop Gurus Forum

Welcome to Photoshop Gurus forum. Register a free account today to become a member! It's completely free. Once signed in, you'll enjoy an ad-free experience and be able to participate on this site by adding your own topics and posts, as well as connect with other members through your own private inbox!

Help with a photo


reeksy86

Well-Known Member
Messages
93
Likes
4
Hi Folks,

Need a little bit of help with a photograph i have taken, I am planning on having it printed it up into a canvas, but wonder if can be sharpened up a little bit first, ie, the bit of blur on the fairy lights if possible?

Would appreciate it if you are able to help out for me.

Cheers
 

Attachments

  • DSCN1766a.jpg
    DSCN1766a.jpg
    3.4 MB · Views: 6
Nothing you can do with those lights really. They are devoid of detail. The outer glow hardly sharpens but a glow should be soft anyway. What you really should do with this (IMHO) is open it in Bridge and bring it into Camera Raw.

I decreased exposure just a bit, brought temperature into the blue, increased the recovery a lot, increased the black, the fill light, the contrast, the clarity, and the vibrance, mostly in minimum to moderate degrees.

Then importantly I sharpened the whole images, zeroing in on the faces, real tight. I didn't do much with the other sliders. Tried luminance but it didn't help much.

Then I opened it in PS. It comes in as a smart object. If not, make it one. Select the lights and as little else of the trees as possible and nothing else in the photo. Go to filter>sharpen>unsharp mask or smart sharpen and give the trees a tweak. Then take a soft brush at 30 to 50% opacity and brush around the edges of the sharpening and on branches that look too crisp -- do this on the filter mask.

I think the sharpening itself helps since, unless you want to go into every lightbulb and add some imagery, you aren't going to sharpen a totally white area.
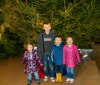
Nice kids!

I made the photo here about half size. It's huge! But you can make the changes and keep it that size if you want. Did you by any chance increase the resolution in Photoshop?


xmasGROUP-1.jpg

Looking at this loaded up here, it looks like I went too far with the blue filter. Maybe it needs no temp adjustment after all. Or perhaps the kids have to be isolated from the background and color balanced a bit more. They also appear to need a bit more contrast on their faces which are noisy. This doesn't strike me as an originally 300 or 240 res photo . . .
 
Last edited:
I couldn't attach the original as apparently it is too big to upload, so i have had to bring the resolution down from 4320 x 3250 to 3500 x 3000 i believe, so that i could upload it, if i make it much smaller, wouldn't that just undo all the hard work you have done?

I have added a new copy of the original picture with a greatly reduced size 1500 x 1125 if that helps at all?

As this is going onto a canvas anything else you would recommend i should do before going to print?

Cheers for your really, i really do appreciate it.

Thanks
DSCN1766bb.jpg
 
I made a new copy of your original image converted with threshold and painted out the kids, just to leave the majority of tree lights.
I then did a motion blur but moved the blur direction dial around until the lights looked a little rounder than smudged to one side (if you under stand what i mean)...
Did a overlay of that threshold layer on top of the original image layer lowered opacity to 70%.

LIGHTS.jpg
 
For yucks, I thought I'd try a very different approach: First, I selected the blurred highlights (in one operation), then I filled them in (again, all at once) using the content aware fill tool. (see image attached below).

My intent was to then replace the removed blobs with nicer-bokeh blur circles and maybe even some diffraction stars.

I think it's looking very promising, but unfortunately, I've got to run and had to stop after the removal step, but I thought I'd just post what I have up to this point anyway.

I've got to say that I never cease to be amazed at what the (fairly) new content aware fill tool can do. It would have taken me ages if I had to remove all the bright blobs one-at-a-time using either the stamp or patch tool. Now, I can do something like this in just one button click.

T

PS - I also did some other tidying up such as fixing all the red eyes.
 

Attachments

  • DSCN1766a-01_acr-ps04a_8bpc_698px_wide-01.jpg
    DSCN1766a-01_acr-ps04a_8bpc_698px_wide-01.jpg
    541.6 KB · Views: 38
I just removed that light reflection from the Boy's forehead.. removed the red eye... sharpened the image a bit.. increased the color saturation a bit.. and here's how it looks.

DSCN1766a.jpg
 
Tom i hope you don't mind but i borrowed your excellent idea and added a selection of stars from my brush pallet.

again.jpg
 
Stars are white color and the boy in the middle has Yellowish reflection on his forehead.. :cool2:
 
"Tom i hope you don't mind but i borrowed your excellent idea and added a selection of stars from my brush pallet."

Absolutely NOT! In fact, I was hoping that someone would pick it up where I left off since I knew I wasn't going to be able to get back on the air for 24 hours or so. Nice job.

So, tonight I decided to have some fun and go completely bonkers with this image. I figured that since the OP mentioned that he/she was eventually going to print it on canvas, why not see what it might look like with fake texture, fake white vignetting, a fake frame, fake glows, and diffraction patterns from beyond. ;-)

Yours in fakedom,

Tom M

PS - For those that might be interested, the stars were created in Xero / Quasar. That plugin has a nice randomizer feature that makes for a bit more interest.
 

Attachments

  • DSCN1766a-01_acr-ps06a_8bpc_698px_wide-ending2-border-01.jpg
    DSCN1766a-01_acr-ps06a_8bpc_698px_wide-ending2-border-01.jpg
    802.9 KB · Views: 1
Last edited:

Back
Top