What's new
Photoshop Gurus Forum

Welcome to Photoshop Gurus forum. Register a free account today to become a member! It's completely free. Once signed in, you'll enjoy an ad-free experience and be able to participate on this site by adding your own topics and posts, as well as connect with other members through your own private inbox!

Making clothing look more life like


Zugfrig78

Member
Messages
15
Likes
3
Hi,

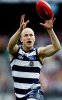
I run a fantasy sports comp where players choose a number of real life players to score points for their team.

As a bit of added visual fun I try and change the color of their players uniform (to match the fantasy colors) in photos of their players

The problem I have is that when i do so, the colors look very flat and un-lifelike in that there is no ripple or stretching of the players jumper....

you can see my attempts here
View attachment 27397
 
Just set the color layer to a different blend mode and adjust the color and opacity as needed. Try color, soft light, hard light, multiply. This will blend the color down and keep the details. If you think the result is still too flat, duplicate the color layer and set it to overlay or vivid light or maybe even screen and lower the opacity. Just play!

BTW, our spam-o-matic moderated these posts for whatever reason, so I'm sorry you had to post twice.
 
Last edited:
many thanks for your interest in my problem...

im preety new to this so you might have to direct me a little closer (eg photoshop for dummies) to how to adjust this "colour overlay" feature (eg buttons to press)

also will this just alter the colour of the jumper cause i usually painbruch the new jumper over the real jumper.. her is one i done yesterday which clearly shows how my work looks like a kids has colouring in over a real photo, lol.
250635_10151378305331192_66127273_n.jpglfcc.png
 
You have to do the painting on a separate layer above or forget it, unless you duplicate the original and put it below, but thats not a solution.

I guess you are a newbie: buttons to press, lol!

You really should learn the basics of Photoshop. There are too many options within what I said for you to understand very well. However, I will try to guide you through this as it is not complicated, just a lot of options.

You will need to do the painting on a layer above. Down at the bottom of the layer panel, second icon from the right is the make new layer "button" to click.

Do your painting here. Another way to make your color application is to make a selection of the clothing on the original layer, using any of the selection tools. My favorite for this kind of work, simple selection, is the quick select tool, but you do need to smooth the edges in most cases. Let me know which method you will use, so I can tell you how to do that. In the meantime, I will assume you are going to paint onto the layer.

Once you have finished the painting, look up at the top of the layer panel. You'll see a window that says normal with a dropdown arrow. Click that and you will see a whole lot of choices. I suggest you try setting the "blend mode: to one of the following and see what you think. Try any of them out that you like. I won't go into how they work. Application is the important thing for you.

I suggest: soft light, hard light, color, possibly overlay or multiply. You can then adjust the opacity of the layer to get the color right. If it's too pale, you can duplicate the layer to increase the color . Ctl/cmd click + J to duplicate the layer. Another option is to ctl/cmd click on the layer thumbnail and change the color till you get something you like.

If you're using more than one color, do each color on a separate layer.
 
Whoa, get off the train. Sorry. I just realized that what you want to do is change the entire color and pattern, not just the color. So this is more complicated. Hopefully someone will stop by with more info as I have to get going for now.
 
Anyone who can help. Pm me you email address as I've typed up (with pics) a detailed bedroom of what I'm trying to do here
 
To tell you the truth, IDK an easy way to do this. You can use a displacement map which might properly transfer the folds, but on low resolution pics, sometimes all you get is what looks like rips in the fabric. Let me give it a try. Any other method I can think of at the moment will be very labor intensive.

The displacement map works based on the direction of lights and darks. Even if this were a higher res img, the black stripes will throw off the folds and direction of the distortion which should mimic the shadow and highlight of the folds.

The labor intensive way would be to clone out the badges and the black stripes so your shirt is one solid color keeping the folds of course. Then you can superimpose a new design.

That's the limit of my knowledge here. C'mon Gurus! Ideas?
 
Last edited:
Here's my take on it. I've attached my psd file as well so you can load it up in photoshop to see what I've done then you can do the next ones yourself.
 

Attachments

  • jersey.png
    jersey.png
    225.2 KB · Views: 43
  • jersey.psd
    1.2 MB · Views: 5
Last edited:
Here's my take on it. I've attached my psd file as well so you can load it up in photoshop to see what I've done then you can do the next ones yourself.


Rufinatti, In a nutshell, YOU ARE A LEGEND! That is exactly what I want.

Im home now and only have my iPad but I will be sure to open your file first thing in the morning and hopefully can understand what you have done and how you got there.

hope you don't mind if I have any questions as I'm somewhere between newbie and intermediate photoshop skill wise....

great work
 
lol, ok ive opened the file and can see how the make up of layers works but i need to know how you produced layer 3 and colour fill 1
 
Layer 3 is just a regular layer of some other guys shirt. Then a layer mask is applied on top of this to hide the unwanted parts of that layer (press the button that's the rectangle with the circle in the middle, next to fx).

Color Fill 1 is just a layer with a solid color, again masked to hide the unwanted parts (Layer - New Fill Layer - Solid Color).
 
hi, found that button and applied and it created a white box besie the original picture... how do i hide the unwanted parts?
 
I THINK, i have the t-shirt and colour fill steps down pat (although my edges are a little rough ( i used the lasoo tool to outline it)

Its is the introduction of additional colours ( in this case the white V ) that i am struggling with

gary-ablett-2.jpgga.jpg aiming for aaaaa.png (probably a bad example withthe secondary colour being white again


later on for other teams there can be up to 3 colours per jumper egaaaaza.jpg
 
Use a soft brush on the layer mask and go over those edges again to make them look more like the original. You'll probably also have to turn down the saturation as it looks a bit too vibrant to be realistic.

I also forgot to mention, to blend it in more you'll need to paint in shadows on the shirt to match the original photos lighting (eg under the right arm).
 
hi yeah starting to play with the and i have the base colur and effect looking good... im stugglig witht colour 2 (eg the "V" or other designs i will need to do as above)

Any ideas?
 
Well do the best you can on them, then post your results so we can help you out.
 
im just confused cause the guy who helped looks to have put the v design in both the colour fill layer and an extra (layer 5) but still has the jumper outline mask.. i tried it with the same method as the first jumper colour but it failed.
 
might not be the right way but ive found if i just keep adding colour fill layers and marking the area with a the lasso tool it gets the result... colour vibrancy might still be a little unrealistic though.. maybe i need a base t shirt with more ripples?

ab3.jpg
 

Attachments

  • gary-ablett-2.jpg
    gary-ablett-2.jpg
    24.8 KB · Views: 13
Layer masks are a little tough to get your head around at first, but you'll get it. White = visible, black = invisible and the different grays in between define the opacity of the layer.

Looks good so far. The edges are still very harsh though.
 

Back
Top