What's new
Photoshop Gurus Forum

Welcome to Photoshop Gurus forum. Register a free account today to become a member! It's completely free. Once signed in, you'll enjoy an ad-free experience and be able to participate on this site by adding your own topics and posts, as well as connect with other members through your own private inbox!

Comic book color restore


Status
Not open for further replies.

sselraef

New Member
Messages
3
Likes
0
Hello guys,

recently i'm traveling a lot, so i decided to upload my old scanned comics to my tablet. Sadly my old scanned comics quality are pretty crap...

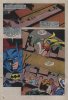
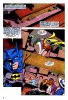
I had in my head to restore the color somehow. I attached 2 file. One is the original the other one is what i already modified.

step 1 i resized the image 1920x2816
step 2 set the curves auto
step 3 still in curves: i set the black and white points.

but i stuck here.

i would like to get rid of the noise without loosing the original colors.

I would be happy for any advise.
 

Attachments

  • forumraa.jpg
    forumraa.jpg
    247.2 KB · Views: 53
  • forumra.jpg
    forumra.jpg
    3.9 MB · Views: 60
In Photoshop,

Add a Curves adjustment layer to the original and lighten.
Then add a Vibrance adjustment layer, raise the vibrance to +75 and the saturation to +12.

If you want to pull the blacks down slightly, add a Selective color layer with the color setting set to Neutrals and bump the black up.
(You could also just use the Selective color layer for the color adjustment as well!)

ComicPage_01.png
 
I strongly suspect that the aspect of the image that is bothering you is not noise, but is the pattern used to print the comics (low quality, fairly large runs) on an offset press. There are also easily visible JPG compression artifacts present.

The "dotty" pattern that you see is intrinsic to mass produced and some other types of printing (eg, newspapers, magazines, photos in many books, even inkjet prints (to a lesser degree)). It's called half tone reproduction ( http://en.wikipedia.org/wiki/Halftone ). It can be a major PITA to remove, but, if a given image is printed this way, you must start the clean-up process by removing this pattern.

Unfortunately, I haven't written about it yet on this forum, but I can post links to posts on another forum where I have addressed similar questions. Scroll down to posts by me in these other threads. These postings (and the above wikipedia link) may help you get started:

http://photo.net/digital-darkroom-forum/00ZrZ5
http://photo.net/digital-darkroom-forum/00ZkUz
http://photo.net/digital-darkroom-forum/00aCx2
http://photo.net/digital-darkroom-forum/00YgrJ

In addition to the post-production software approaches I discuss (ie, Fourier tranform and other specialized de-screening and NR software), many scanners have a built-in "de-screening" mode.

HTH,

Tom M
 
Tom is correct. The scanner's software interpreted the half tone print as a sort of crosshatch pattern in some portions.

In Photoshop, copy the original layer and call it Layer 1. Navigate to Filters > Blur > Surface Blur. Set Radius to 10 pixels and Threshold to 15 pixels. Click Okay. This will remove most of the harsher unwanted artifacts without damaging the overall image.

Then, go to Image > Auto Color. This generally brings back the original colors without needing to make serious tweaks and usually without oversaturation. It also eliminates the yellowed coloring on the page itself.

Copy Layer 1 and rename it Layer 2. Go to Filter > Noise > Add Noise. Set to 2% Amount, Uniform Distribution, and untick Monochromatic. Click Okay. This step adds back in a light bit of uniform noise to cover up any leftover minor inconsistencies.

Next step is to copy Layer 2 and rename it as Layer 3. Go to Image > Adjustments > Selective Colors. Change the color to Black, and then adjust the Black level to +20. This will plus up the blacks to provide more consistent borders around your colors.

While this method is not foolproof,. it will get you in the general ballpark you want to be without use of third party tools, although many of those third party tools can be highly effective.

forumraaCE.jpg
 
I strongly suspect that the aspect of the image that is bothering you is not noise, but is the pattern used to print the comics (low quality, fairly large runs) on an offset press. There are also easily visible JPG compression artifacts present.

The "dotty" pattern that you see is intrinsic to mass produced and some other types of printing (eg, newspapers, magazines, photos in many books, even inkjet prints (to a lesser degree)). It's called half tone reproduction (...). It can be a major PITA to remove, but, if a given image is printed this way, you must start the clean-up process by removing this pattern.

Unfortunately, I haven't written about it yet on this forum, but I can post links to posts on another forum where I have addressed similar questions. Scroll down to posts by me in these other threads. These postings (and the above wikipedia link) may help you get started:
(links)

In addition to the post-production software approaches I discuss (ie, Fourier tranform and other specialized de-screening and NR software), many scanners have a built-in "de-screening" mode.

HTH,

Tom M

I'm having a similar problem - need to remove half tone screening from scanned images. It's a rare old computer manual I'm trying to digitize, so the product needs to be as high quality as I can get it. It's 136 pages, most of which use two ink colors with both screened areas and solid ink intermingled. I can't figure out how to create a selection of just the screened areas, to apply blur to them, without blurring the edges of the solid ink areas (text and lines.)
Here's an example from one page, scanned at 600dpi, so the screening is fully resolved:
pg_045_screen.png

There are also some screened gray-scale images, but I can deal with them by selecting and blurring.
My scanner's 'descreen' feature fails to adequately remove the screening, so I turned it off for the scans.
The end objective is to convert the flat screened areas to perfect flat colors, so as to achieve maximum final image compression. But without damaging the edge integrity of text characters and lines. The final images will be PNG with a html wrapper, in a RAR-book. Most page images will have a small palette of only white, black, a tan, a gray, and some intermediate colors for edge shading.

It's kind of surprising photoshop doesn't seem to have a facility for selecting screened areas of an image.
Once selected it's easy. But it's getting that selection, with accurate boundaries, that beats me.
 
Status
Not open for further replies.

Back
Top