What's new
Photoshop Gurus Forum

Welcome to Photoshop Gurus forum. Register a free account today to become a member! It's completely free. Once signed in, you'll enjoy an ad-free experience and be able to participate on this site by adding your own topics and posts, as well as connect with other members through your own private inbox!

Auto rotation and alignment of... stamps


Adamci

New Member
Messages
3
Likes
1
Hi all,

I have a problem which I cannot find a solution to. I know almost all functions of PhotoShop, but might have problems with more complex issues like scripting. I might be deficient in PS lingo.

I scan a lot of stamps. I can scan them stack on stock album pages (behind transparent strips) so they are aligned. The problem with that method is time wasted for cleaning all contaminations afterwards (little threads, specks of paper etc.). The other problem is that the transparent strips are quite often scratched or creased or covered with dust - scan catches those imperfections and the picture of the stamp is not clear.

The other solution is to scan stamps like on the picture attached to this post, however it's difficult to place stamps on a scanner perfectly (or well) aligned. When I scan them this way, I have to ratate each scanned stamp individually and then align them. It applies to a set of stamps, and a set can have anything from 2 to 30 and more stamps of a similar design.
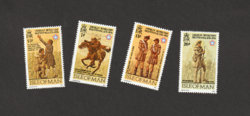
sample 2 small.jpg

I was trying to automate the process without success. I was trying to search the internet without success. The stamps' perforations on the edges do not let me use automatic crop & align. The background I use for scanning is never perfectly neat, so the magic wand excludes little lighter specks that are there. I was experimenting with magic wand, then placing each stamp into a separate layer and then thick outlining each layer, but it still produced poor effects with that auto crop & align function. On the other hand, I cannot abuse magic wand, because I do not want to lose the actual outline of stamps' perforations (do not want to smooth them), as those little imperfections on perforations are (for collectors) very important.

So I am stuck. My knowledge ends here. Maybe I use wrong lingo trying to find the solution. I would appreciate any tips: how to automate this process as much as possible, that is when I scan the stamps and the resulting image is like on the attachment, how to put them straign and align using a macro?

Greetings from Gdynia!

Adam
 
Hi Adam
Thought about your problem for a while and your options go up quite a bit if you get each of the stamps into their own file.
There is a way to do that with a little bit of manual work so you can decide on how acceptable.
What you need to look up is how to use the slice tool and have the option based on guides.

1) Take your image and put horizontal and vertical guidelines just between the stamps (not outside edges)
2) Was that is done you can Export in Legacy mode and save to the desired file type. Where you put the guidelines will be where the stamps will be cut an put into their own files in the same folder.
3) From there batch processing each individual stamp gives you more options to consider and some of the tools (even Automate Crop and Straighten) start to work

Unfortunately, the crop and straighten is probable too brutal by itself (would probably cut off some of the stamps edges) so a little more creativity is needed.

I can see a number of options yet the job gets a lot easier if you are using a scan of the stamps wtih a very consistent background that is in high contrast to the edges of the stamps such as a very clean dark matte.

Since your requirements are not too specific and not clear how high a resolution you are scanning, I did not want to invest in a path that may not meet your full needs. For example, do you need all of the stamps aligned/rotated of would it be fine if they stayed in rotation as you place them on the scanner. That adds some flexibility and some simplificaiton to any automation. If not, just more automation work would get the job done I bet.

Thought I would get you going with this possible direction for you to consider and you can always come back with more questions.
Hope this helps
John Wheeler
 
Hi John,

Thank you so much for your input.

I scan in 600 DPI. I cover the white plate of the cover with a black paper (special, matt and almost smooth black, used by artists). The stamps are placed on the scanner not well aligned - this is due to the fact that they are not perfectly flat, but bent (longer edges usually bend a bit downwards due to the gum on the reverse side of the stamp). In other words, it is difficult to align them, even with the help of a straight tool with a softer edge. Even if I am successful aligning them quite well, when I place the scanner cover down, they start rotating a bit (as they are "concaved", not flat).

That is why most people scan them on collectors' cards, which have transparent strips holding stamps aligned and flat. But, as I mentioned above, it doesn't give a good final outcome as those strips could be scratched and, after a little while, specs of paper and dust collect behind the strips. Cleaning all that mess in PhotoShop is not an option.

The edges of stamps have perforations and, to make it worse, the edges are not always exactly parallel (it depends how the perforating machine cut them). Perforations are not equally long (minute differences, which is normal), some perforations have flatter tips, corner perforations can stick a bit out, some perforations might have a thinner gum underneath so that the tips are slightly transparent, many of them have thin fibres of paper stack to them. The design of the stamp (the picture on it) is also not perfectly aligned to the edges of the stamp. All those aspects confuse PhotoShop tools, like magic wand for example. To make it worse, any philatelist will notice immediately if the picture was brutally processed, for example perforations look too smooth.

At the end, rotating and aligning is more intuitive than robotic. The final result is like below:

Wyspa-Man.jpg

So far I do is as follows:
  1. I place stamps not so close on the scanner to have more space between them an scan them in 600 DPI.
  2. I have learned how to quickly create layers for each single stamp, which I cut out with the Select tool, then copy & paste (created an action for that).
  3. Then I can rotate each stamp (straighten it) using the ruler tool - that job I cannot automate.
  4. After they are straight, I create new layers with stamps cut out close to the perforations (again: Select tool, then copy & paste, simultaneously removing the "old" layers).
  5. Now I can move each stamp and snap it to a horizontal line of the grid.
  6. Then I need to move stamps sideways so the spaces between them are more or less equal.
  7. Now I can add the background of just the scanned paper (so the remaining frames around the stamps fuse with the background).
  8. The rest is trivial (like flattening picture, changing levels, sharpening mask etc.)
Points 2 and 3 are the pain. My brother is helping me currently with automating 4 to 8.

Maybe there is a simpler way?

Adam
 
Sounds like you are quite a ways there.

Once you have each stamp separated (its own Layer or own file), there are some options I will point out below.
Yet, it may be worth while considering the slice tool and getting stamps to their own file
If you have an array of MxN stamps, cropping each takes MxN crops
Using the slide tool, you only have to set up M + N guides and then they are all sent out to their own files. So that can be a time saving for a large number of stamps
-----------------
Now whether you have them in Files or Layers there is a slick too in Photoshop that will help do the rotate/straighten more automatically. Note that the stamp has to have a little room around it to allow rotating properly with it is originally cropped or sliced
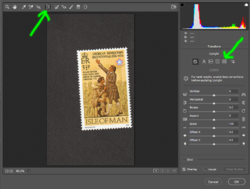
Take each stamp one by one and (optionally turn to Smart Object) apply the Camera Raw Filter and use the Transform tool for both Horizontal and Vertical transformation (image below). That will rotate properly the stamp without cutting anything off

ACR-transform-tool.png

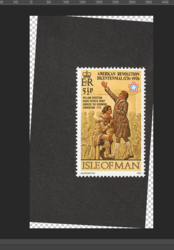
When coming back from the Camera Raw Tool the stamp is pretty well aligned and all that is needed is the background Layer and/or Content Aware fill to cover the created transparent areas (I can give more details with that:

Screen Shot 2019-06-29 at 5.51.55 PM.png

Also, there are some pretty straightforward steps after the content aware fill to trim it to just the right size around the stamp.
One consider using the Automate > Contact Sheet II automation when all the files are straighten and trimmed.
Just another path to consider
John Wheeler
 
Hi John,

Thank you for advice and your effort.

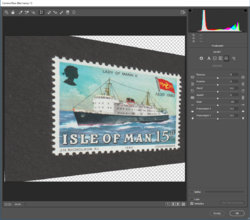
I tried Camera Raw filter, however it doesn't do the job properly at all times. Sometimes it distorts the stamp for some reason, like below:

camera-raw.jpg

I tried various things, like cutting out with more black background, cutting out closer to the stamp etc. Sometimes it does it perfectly, sometimes it does not.

So far manual rotation is by far the best. I can also use the magic wand with tolerance of about 30-40 and it does not affect the perforations. It cuts the black background close to the stamp, however leaves out little specks here and there on the background, which is a nuisance later (after rotation of each layer) when trying to align layers with the automated "Layer > Align" function, as it aligns to some speck of greyish left out. A perfectly smooth and matt black background would be an answer at this stage.

Greetings from sizzling Gdynia,

Adam
 
As far as those little specs, here are a couple steps that might get rid of them (I use it all the time)


1) After selection of the background use Select > Modify > Expand and use and amount slightly larger than half the largest spec diameter (2 or 3 pixels often does the trick. This swallows up the very small selections
2) Then use Select > Modify > Contract and use the same or slightly larger number of pixel size in step #1. This restores the selection back to the prior edge now with the spec selections gone. The slightly larger size for the Contract amount is because sometimes corners get rounded in the process and the selection may slightly cut across a corner if the exact number was used.

Best wishes on your project
John Wheeler


Write your reply...

Back
Top