Hi All,
My first post") hoping I've come to the right place and you guys can help..
hoping I've come to the right place and you guys can help..
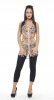
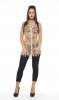
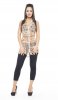
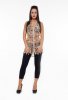
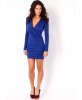
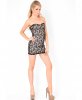
I need to brighten up a set of images, to be honest not sure if brighten up is the exact word as its a bit dull, I guess it is more to do with the lighting or add some form of lighting to the images. The image in question is Orig.jpeg and need it to have the effect seen on the Final.jpeg and Final2.jpeg as examples.
From playing about with a couple of tools such as brightness and vibrance, it seems to brighten it a lot or not bright enough, and then in some cases it goes to orangey with a tan look….. I just can't find the exact thing that is required.
I have tried googling up tutorials but not sure what the outcome I am looking for is actually called, I tried brightness etc but it brings up lots of other tutorials that do not exactly show what it is that I require.
I have tried all soughs of plugins also, just not getting there.. The facial touching up of blemishes etc is not a problem.. it's the lighting I am having an issue with.
My two shots at it are MyTry1.jpeg and MyTry2.jpeg. I had someone else try and they came really close with OtherTry.jpeg, well better then my tries, but still missing that something.
So 2 questions I have is
1. What is is that I am missing or need to do, tool needs to be used or the technique to get the orig to have the same effect as Final.jpeg
2. Also what am i doing wrong or what did the person that done OtherTry.jpeg do, as it is much better then mine
Hope the above made sense, if not do ask away and i'll do my best to explain.
Thanks.
My first post
hoping I've come to the right place and you guys can help..I need to brighten up a set of images, to be honest not sure if brighten up is the exact word as its a bit dull, I guess it is more to do with the lighting or add some form of lighting to the images. The image in question is Orig.jpeg and need it to have the effect seen on the Final.jpeg and Final2.jpeg as examples.
From playing about with a couple of tools such as brightness and vibrance, it seems to brighten it a lot or not bright enough, and then in some cases it goes to orangey with a tan look….. I just can't find the exact thing that is required.
I have tried googling up tutorials but not sure what the outcome I am looking for is actually called, I tried brightness etc but it brings up lots of other tutorials that do not exactly show what it is that I require.
I have tried all soughs of plugins also, just not getting there.. The facial touching up of blemishes etc is not a problem.. it's the lighting I am having an issue with.
My two shots at it are MyTry1.jpeg and MyTry2.jpeg. I had someone else try and they came really close with OtherTry.jpeg, well better then my tries, but still missing that something.
So 2 questions I have is
1. What is is that I am missing or need to do, tool needs to be used or the technique to get the orig to have the same effect as Final.jpeg
2. Also what am i doing wrong or what did the person that done OtherTry.jpeg do, as it is much better then mine
Hope the above made sense, if not do ask away
and i'll do my best to explain.Thanks.