What's new
Photoshop Gurus Forum

Welcome to Photoshop Gurus forum. Register a free account today to become a member! It's completely free. Once signed in, you'll enjoy an ad-free experience and be able to participate on this site by adding your own topics and posts, as well as connect with other members through your own private inbox!

Brush Glitch?


easytiger

Member
Messages
8
Likes
2
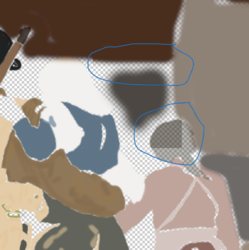
I am a b&w photo colouriser. I had to recently uninstall and reinstall photoshop. After doing this, whenever I am painting layers with the background layer (the photo) turned off, it almost appears that the brush is bleeding it’s colour into the surrounding areas.
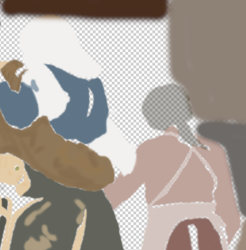
Except, if I zoom out or turn background layer on and off again it goes away. The same issue is there whether I am “painting” a layer with the brush or using its inverse to erase.
Anyone encountered anything like this? I am using a MacBook Pro - Photoshop cc2019.

Photos attached showing before and after and highlighting what happens.

Has anyone encountered anything like this?
6905DE9C-BA1C-4435-85C3-AD366ABA8764.png

61439934-1C0B-478A-A78E-04961AA31447.png
 
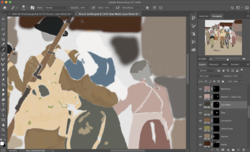
Please upload a screenshot of your entire Ps interface while the Brush Tool is selected.

The same issue is there whether I am “painting” a layer with the brush or using its inverse to erase.
What does this mean? Please explain.
 
entire Ps interface attached.

as for your other question. My terminology is terrible, sorry. I paint in masks, the effect I'm referencing occurs when I'm adding or subtracting from the mask, if that makes sense.

Screen Shot 2019-06-26 at 2.55.23 AM.png
 
To me this looks like a remnant from another layer. Have you tried the process of elimination by turning off layers to see which one might be causing the anomaly?
 
It looks like I might have solved the issue by clicking Legacy Compositing under Preferences > Performance
 
That looks kinda cool. Mind to show us the colourized photo ? You got me curious. :)
 
Thanks for sharing your results easytiger and the link to your instagram. Very nice work.

Looks like you have figured out a solution for your problem.

Just for reference, there are many such display type anomalies in Photoshop that often rear their head due to hardware/software shortcuts that are taken for speed of display. Yours is just one example of many. Some of these are caused by shortcuts for display in the graphics card yet there are similar shortcuts in PS even when the graphics card is turned off.
Some of the sources/causes of those issues are
1) Layer to layer software shortcuts treat the transparency and pixels separately looking up (or down) in the stack instead of calculating pixels and transparency combined on each layer first.
2) Display shortcuts at non-100% magnification. Similar shortcuts for pixels and transparency/layer masks is done when rendering actual pixels to display pixels

Often the solution to not see these anomalies is display at 100%, view only stamped Layers (not always practical), or turn down or off the graphics card.

As far as your particular issue, you might start to see where your problem arose with the above mentioned sources with the image below.
Left most pair of dots are a 100 pixel brush spot at 0 hardness with 100% hardness below on transparent Layer
Second from left is the same pair of dots with an underlying white Layer
Third from Left (background white turned off) is the Layer Mask created when pulling the transparency out of two dots on the transparent Layer
Right image is the pixel brush that is left once you pull out the transparency!!

So you actually are always brushing with a square/rectangular brush and it only looks soft because of the the associated embedded transparency.
So as you daub along, you get overlapping hard corner edges just as you saw in the image with the anomaly. PS and/or the graphics card with their shortcuts were just not quite calculating correctly how to combine the transparency along with your square/rectangular brush spots.
Boring technical talk now over :)

Screen Shot 2019-06-26 at 8.08.35 AM.png
 
Thank you so much for this explanation. I really appreciate it and it makes a lot of sense.
Is there an easy shortcut for the future to eliminate this issue if it pops up again?
 
Your welcome. Not sure I have an answer to all of the anomalies since I probably have not experienced all instances of them nor know the detailed software coding or graphics card implementations (which are all different).

The steps to make it go away are not different that what I already said above yet which order you apply the "fixes" depends on where you are in the creative process and your priorities.

1) Stamping to a new Layer takes care of most especially if the resulting Layer has no Transparency remaining (if it does, either turning off all the other Layers or adding a temporary background under the stamped Layer both would work). This step is usually nails it yet may not be productive for the workflow

2) Viewing at 100%, 200%, 400% etc. This does not cover all anomalies yet a high fraction of them. Viewing above 67% usually solves many problems yet artificial Moiré issues can come in to play for display rendering. Viewing at at specific magnifications is easy to set up key strokes yet it is not a cureall and it does not work if what your are viewing needs to be viewed at a smaller magnification

3) Turning down or turning off graphics acceleration. Most often an easy thing to try yet I am not sure you could do that with a shortcut key or an Action so still takes some overhead in a fast paced workflow. Always good to have the latest software/firmware for the graphics card as sometimes they improve the rendering to have less of the issues. However, the graphics card solves a certain class of issues, it does not solve problems that the basic PS rendering to display has.

So I listed from the most effective to the least yet the reverse order may be the least intrusive to ones workflow. If you find a case that is not solved by one of the three mentioned steps, I would sure like to hear about it to track down the issue.

Now just for grins, I have inserted a small PSD file to show some worst casing in display anomalies. If you open up this file and look at it 100% magnification or higher, it will look gray yet it is just a pixel level black and white checkerboard pattern.

However, reduce the magnification below ~64% and an image will appear on the left. The right did not show this problem because it is a stamped version of the Layers with a mask to show what happens with display anomalies with Layers. Enjoy
John Wheeler
 

Attachments

  • Worst Case Display Anomaly.psd
    2.8 MB · Views: 0

Back
Top