What's new
Photoshop Gurus Forum

Welcome to Photoshop Gurus forum. Register a free account today to become a member! It's completely free. Once signed in, you'll enjoy an ad-free experience and be able to participate on this site by adding your own topics and posts, as well as connect with other members through your own private inbox!

Can anyone help?


Dubai_Dave

New Member
Messages
2
Likes
2
I am doing some branding ideas and I came across this that I really like, and wondered what is the best way to achieve it?

Any help would be much appreciated, Thanks!
 

Attachments

  • 583632fc5fef8fa26b56181ce20e3526.jpg
    583632fc5fef8fa26b56181ce20e3526.jpg
    80.4 KB · Views: 7
  • b03533fa828ba61e420a3fdc4434970a314e5959.jpg
    b03533fa828ba61e420a3fdc4434970a314e5959.jpg
    273.6 KB · Views: 1
Hi and welcome to PSG

You can get a similar effect using the Halftone Pattern from the Filter Gallery

First make a selection of the subject and hit CTRL + J to copy it to a new layer

Then go to Filter, Filter Gallery and select Sketch then Halftone Pattern, select Line from the Pattern Type

Untitled.jpg

Result

Untitled1.jpg
 
I'm a little late on this one, but I really like this effect. And as usual, there are always many ways to do things in Photoshop.

I basically used the same technique as Ged but with a few extra additions.

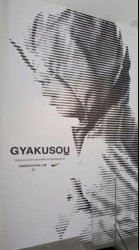
I started with this photo.
Screen Shot 2017-12-03 at 4.35.37 PM.png

The trick to halftone effects is contrast. So I used a Levels and Curves adjustment layers to highten the contrast.
Screen Shot 2017-12-03 at 4.36.29 PM.png

I then converted this result/layer into a Smart Object. Doing this allows me to make quick adjustments to any smart filters.
I added the Halftone Smart Filter.
Screen Shot 2017-12-03 at 4.36.47 PM.png

Here's the fun part.
I went into the Channels Panel and clicked on any channel other than RGB, I think I used Red. It doesn't matter since this is a B/W image.
I then Cmd/Cntrl + clicked the channels thumbnail to make a selection.
I reversed the selection by holding Shift + Cmd/Cntrl + I
Screen Shot 2017-12-03 at 4.37.49 PM.png

Click once on the RGB channel.
Go back to the Layers Panel.
Create a new layer.
Fill the selection with black.
Turn off any previous layers.
Notice that this layer is now transparent.
Screen Shot 2017-12-03 at 4.38.12 PM.png

Duplicate this new layer.
Change it's blending mode to Luminosity.
This will sufficiently darken the effect.
Screen Shot 2017-12-03 at 4.38.32 PM.png

Make a stamped visible layer or combine the two layers.

Create a new layer below merged main image layer.
Use the Gradient Tool to add any color gradient you desire.

Use whatever tool your comfortable with to make a selection around the subject.
Use that selection to create layer mask.

Should be done......
Screen Shot 2017-12-03 at 4.40.12 PM.png
 

Back
Top