What's new
Photoshop Gurus Forum

Welcome to Photoshop Gurus forum. Register a free account today to become a member! It's completely free. Once signed in, you'll enjoy an ad-free experience and be able to participate on this site by adding your own topics and posts, as well as connect with other members through your own private inbox!

Changing colors


Mission2000

New Member
Messages
4
Likes
0
This should be easy as I have changed colors of images in PS a thousand times but for some reason this one is kicking my butt.

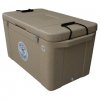
I have two images here. One is considered grey granite and the other sandstone. I want to change the grey granite image to look like sandstone. The problem isn't the color change as that changes ok, its that the dark speckles in the grey granite image still hold over once I change it to Sandstone and it doesnt really look the same. Is there an easy way to fix this?

I tried some of the filters but they don't seen to get me where I need to be.

Thanks.
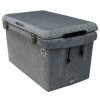
GreyGranite.jpg Sandstone.jpg
 
See my post from yesterday at 02:52 PM in a thread where a similar question was asked:
http://www.photoshopgurus.com/forum/photoshop-newbies/44453-re-coloring-methods-help.html

The problem is that some coloring methods can't introduce color into pixels that have near-zero saturation (eg, your black flecks). You have to be sure to use methods like Hue/sat (colorize mode=ON) that can do this.

FWIW, the "replace color" tool doesn't work when the original has no color (ie, areas with saturation near zero). Lots of shoes are black, so the OP may be dealing with this limitation more than one might expect.

This is why, like RTC, I prefer using the Hue/Sat tool in colorize mode. Obviously, one needs to have a layer mask that only includes the shoe, otherwise the entire image will pick up that color.

For a slightly different effect, put a solid color adjustment layer on top of the image and set the blending mode to "color".

It's almost impossible to nail the correct color on the first shot -- it always needs tweaking -- so, don't even bother trying to use a brush set on "color" mode, or the actual "color replacement brush". It's much better to use a method that you can easily tweak simply by moving a couple of sliders.

That being said, these two brushes (on low opacity) are great for introducing small variation in the saturation or hue once you get close to the correct values using the other tools. This is tremendously useful for adding realism when re-coloring old B&W photos. For example, shadow, midtones, and bright areas of a specific material in an image, almost always have very different saturation values, and unless you make some attempt to simulate that variation, your re-coloring is always doomed to look somewhat fake.

HTH,

Tom M
 
That certainly worked better than anything I had tried. I never knew the purpose of the colorize option but now it makes sense.

Thanks Tom.
 

Back
Top