What's new
Photoshop Gurus Forum

Welcome to Photoshop Gurus forum. Register a free account today to become a member! It's completely free. Once signed in, you'll enjoy an ad-free experience and be able to participate on this site by adding your own topics and posts, as well as connect with other members through your own private inbox!
how to restore a painting in Photoshop


avwebmaster

New Member
Messages
1
Likes
0
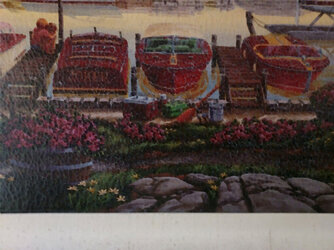
Here is a painting someone did and a friend asked if I could restore it. I am a painter so I said yes. I think the first step is to smooth all the obvious breaks and I was hoping PS could help.

Can I do that and HOW would I do it?

Thanks in advance!

Paul, Avwebmaster

Paul;'s Pic.jpg
 
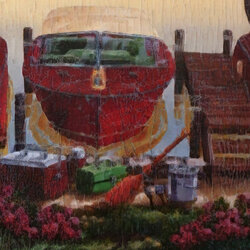
When you say "smooth all the obvious breaks", I assume you mean to get rid of all the white web-like mesh that covers the painting. I played around with different attempts and landed on something that is not great, but may be a better starting point. The trick, to me, is to somehow select all the white mesh and replace it with a nearby color of the actual painted objects. I tried Content-Aware Fill, which was terrible, but I have an old version of Photoshop and this (or other filters) might work better in newer versions.

Here's the approach I landed on:
  • Copy the image to a new layer. Change the blend mode of this new layer to Darken.
  • Using the Move tool and the keyboard arrows, move the image three clicks to the right. (Trial and error. You can experiment by varying the clicks and direction.) This causes much of the white to be replaced by anything that is darker: hopefully the correct nearby colors. But unfortunately it also has the effect of introducing blurriness and loss of detail to the overall image.
  • Copy your result to a new layer using Stamp Visible (Shft+Ctrl+Alt+E).
  • Create a copy of your new Stamp Visible layer, change its blend mode to Darken, and repeat the process again, using the Move tool to get rid of even more of the white.

Here's what I've got. Hopefully, others will jump in with better suggestions.

Pic2.jpg
 
Hi @avwebmaster

Here are som esuggestions.
1) A better starting image. I don't now how large the painting is yet it should either be done on a copy stand with uniform lighting or with tripod and uniform to the side lighting. The image provided did not have uniform lighting and best to capture it right instead of trying to compensate in post processing
2) It should be at much higher resolution and save in a lossless compression format (or not compressed) such as PNG or TIFF (not JPEG). The lack of resolution and lossy format used does not allow good recovery

From there the best approach will need different parameters or approaches that what I am provided below.

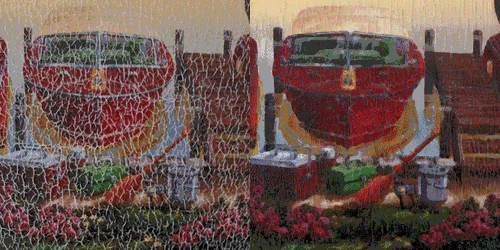
I just provided a sample of the image both as a still image and a before after GIF format. Not the best yet better starring image would likely allow much better results.

The steps I took were to Use the minimum filter (1 pixel for this images resolution), put it through Topaz Photo AI (trial and error settings for better result), and then a dust and scratches filter afterwards all done in a Smart Object so parameters could be changed and have a non destructive workflow.

Hope this gives you an another approach to consider.
John Wheeler

Still image:

Restore-Painting.jpg

GIF before after animation:

Restore-Painting.gif
 
1) A better starting image. I don't now how large the painting is yet it should either be done on a copy stand with uniform lighting or with tripod and uniform to the side lighting. The image provided did not have uniform lighting and best to capture it right instead of trying to compensate in post processing
2) It should be at much higher resolution and save in a lossless compression format (or not compressed) such as PNG or TIFF (not JPEG). The lack of resolution and lossy format used does not allow good recovery

the above cannot be reiterated enough... crap in, crap out ;-(

the cracking looks like craquelure, the ageing of the paint on canvas. perhaps a better approach might be to tackle the painting itself (if it's really worth the effort).


good luck either way...
 
The steps I took were to Use the minimum filter (1 pixel for this images resolution)

@thebestcpu
John, I had no idea that the Minimum filter could be applicable here. I didn't even know what it did, but I did some research and it seems that the usual situation is to apply a Minimum filter to a layer mask to get rid of halos. In the case of this painting, there is no selection and no mask, so applying the filter directly to the image itself seems very non-intuitive. I tried it myself and it works great, but I'm not sure what the filter is actually doing in this situation. Is it somehow identifying anything it sees as white (i.e., the craquelure) and replacing it with something else?

Rich

Hi Rich, my understanding of the minimum filter and it associated slider is that for the slider value e.g. 1 pixel, it will take every pixel of the original image, look around that pixel by 1 pixel, and take the minimum R, G, B of all those pixels on a channel by channel basis and assign it to the position of the same pixel location in the new image. All pixels will be done in the same fashion. So whites would yield to the surrounding colors. The maximum filter does the same yet looks for the maximum pixel value on a channel by channel basis and use that value to replace the original pixel value. So the maximum of R, G, B is taken.

So blacks would be changed to the lighter R, G, B channels surrounding it.

Does that help your understanding/
John Wheeler
 
Yes, that does help. So, the result of the Minimum filter is that any given pixel will either get darker (if its neighbors are darker) or remain unchanged (if its neighbors are the same or lighter). The Maximum filter does the opposite. Very cool. I successfully ignored the Min/Max filters for 15 years, but now I see that they can be very useful.
 
Hi @Rich54
In practice it almost always works that way you describe. By understanding the details, it would also explain anomalies that can occur.
Since the min and max filters work on a channel by channel basis, you can get a little different behavior in unusual cases.
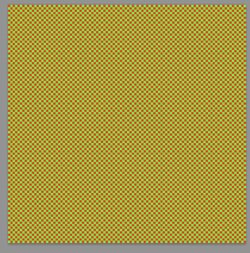
EG If you had had a checkerboard patter on pure green and pure red pixels, when you use the Min filter you get you get pure black. That is because the min of the each individual color channel is zero. Alternately, when you use the Max function you would get yellow.

Here is an example using a checkerboard pattern of pure red and pure green

Screen Shot 2023-07-24 at 8.24.07 PM.jpg

When using the Min function on this red/ green pixel pattern one gets pure black:

Screen Shot 2023-07-24 at 8.24.18 PM.jpg

And when I use the Max filter one gets pure yellow:

Screen Shot 2023-07-24 at 8.24.29 PM.jpg

This is because the min function is used on each R, G, and B channel independently as opposed to a value of brightness or luminosity.

Good to know about this differences that in some images a color anomaly could crop up.

FYI

John Wheeler


Write your reply...

Back
Top