Photoshop Gurus Forum
Welcome to Photoshop Gurus forum. Register a free account today to become a member! It's completely free. Once signed in, you'll enjoy an ad-free experience and be able to participate on this site by adding your own topics and posts, as well as connect with other members through your own private inbox!
Merge layers/content aware fill based on another layer
- Thread starter mr.kenken
- Start date
thebestcpu
Guru
- Messages
- 3,241
- Likes
- 2,988
Here is my approach that I used which included gernative fille.
First, since the original without the red circle was not provided. I first selected around the red selection and did a generative fill.

I had to do a little healing on the right side of the drum to make it look as it should:

I then made a selection in line with the left side edge of the paneling and selected all the areas that needed fixing and used generative fill:

It was pretty good yet did not get the edge wall edge exactly right so also did some healing/cloning within the selection for this result:

I hope that helps
John Wheeler
First, since the original without the red circle was not provided. I first selected around the red selection and did a generative fill.

I had to do a little healing on the right side of the drum to make it look as it should:

I then made a selection in line with the left side edge of the paneling and selected all the areas that needed fixing and used generative fill:

It was pretty good yet did not get the edge wall edge exactly right so also did some healing/cloning within the selection for this result:

I hope that helps
John Wheeler
JeffK
Guru
- Messages
- 2,631
- Likes
- 3,028
I don't know what the rest of your image looks like, but first I cropped into the image so that the mismatched area was cropped out. Then I recropped the area, pulling out with the generative expand option selected.. Using the selection and clone tool. I matched the bottom trim of the wall to the left side.
Cropped back:

Cropped/expanded with Generative Expand option:

Cropped back:

Cropped/expanded with Generative Expand option:

Wow, thank you for the detailed explanation! I've been using the crop + generative expand approach, similar to to JeffK above, but haven't used the generative fill based on selections very much. I managed to recreate what you did here, but as you mentioned, the wall edge isn't exactly right. I've been using the healing tools before, but always struggle when I need to base the healing on another part of the image. Is there any chance that you can explain how you did" healing/cloning within the selection"?Here is my approach that I used which included gernative fille.
First, since the original without the red circle was not provided. I first selected around the red selection and did a generative fill.
View attachment 151318
I had to do a little healing on the right side of the drum to make it look as it should:
View attachment 151319
I then made a selection in line with the left side edge of the paneling and selected all the areas that needed fixing and used generative fill:
View attachment 151320
It was pretty good yet did not get the edge wall edge exactly right so also did some healing/cloning within the selection for this result:
View attachment 151321
I hope that helps
John Wheeler
thebestcpu
Guru
- Messages
- 3,241
- Likes
- 2,988
Hi @mr.kenken
Sure, I can show about the same steps. I typically delete the files after posting to save disk space yet I will start with the image I already posted part way through.
Do note that Generative Fill gives highly variable results and sometimes you have to give it multiple gos to get it right.
So I recreated the selection and the guide to match the flooring on the left:

I used generative fill until I got a reasonable result though the edege at the floor as you have also seen was not too great:

I used the Select > Reselect command to reselect the previous selection, which I had previously used for healing or cloning. For this example, I only use the stamp tool for cloning:

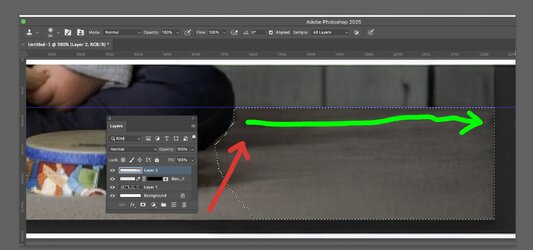
I am providing a larger screen shot the includes the stamp tool and brush settings that were used (relatively soft brush and with the alignment option checked) as well as where I set the sample point from at red arrow and then the starting point and brush direction that I used for the cloning with the green arrow. Note that it may not look perfect when you are doing it, yet this area is not the center of attraction, so it does not have to be perfect.

After cloning, I removed the selection edge and moved the guide out of the way. Since the selection was used, you get a pretty clean edge.

I hope the extra step-by-step clarifies the details. Sometimes you have to go back a step to retry cloning until you are satisfied with the result, and that all comes with a bit of practice/experience.
John Wheeler
Sure, I can show about the same steps. I typically delete the files after posting to save disk space yet I will start with the image I already posted part way through.
Do note that Generative Fill gives highly variable results and sometimes you have to give it multiple gos to get it right.
So I recreated the selection and the guide to match the flooring on the left:

I used generative fill until I got a reasonable result though the edege at the floor as you have also seen was not too great:

I used the Select > Reselect command to reselect the previous selection, which I had previously used for healing or cloning. For this example, I only use the stamp tool for cloning:

I am providing a larger screen shot the includes the stamp tool and brush settings that were used (relatively soft brush and with the alignment option checked) as well as where I set the sample point from at red arrow and then the starting point and brush direction that I used for the cloning with the green arrow. Note that it may not look perfect when you are doing it, yet this area is not the center of attraction, so it does not have to be perfect.

After cloning, I removed the selection edge and moved the guide out of the way. Since the selection was used, you get a pretty clean edge.

I hope the extra step-by-step clarifies the details. Sometimes you have to go back a step to retry cloning until you are satisfied with the result, and that all comes with a bit of practice/experience.
John Wheeler
Thank you very much! I've never used the stamp tool before. I'm happy with the result - It's not perfect, but as you mentioned, it doesn't have to be so in the corner.Hi @mr.kenken
Sure, I can show about the same steps. I typically delete the files after posting to save disk space yet I will start with the image I already posted part way through.
Do note that Generative Fill gives highly variable results and sometimes you have to give it multiple gos to get it right.
So I recreated the selection and the guide to match the flooring on the left: [deleted to minimize reply]

thebestcpu
Guru
- Messages
- 3,241
- Likes
- 2,988


