I have a bunch of photos from a black tie event where a bowtie is hanging at an angle and I need to remove the bowtie and replace it with one that is properly worn. I'm looking for the best method to accomplish this. I tried a bit of the generative fill from Photoshop 2024 but it isn't quite getting it right.
Photoshop Gurus Forum
Welcome to Photoshop Gurus forum. Register a free account today to become a member! It's completely free. Once signed in, you'll enjoy an ad-free experience and be able to participate on this site by adding your own topics and posts, as well as connect with other members through your own private inbox!
Remove and Replace Bowtie
- Thread starter dmwesq
- Start date
- Messages
- 23,929
- Likes
- 13,676
There are multiple ways to move a bow tie. I'm beyond certain that I'm not the only one who knows how!! LOL!!(probably sam;-))
I do need to run for awhile until later this afternoon. If no one jumps in, I will offer up my suggestions later when I return. But it's only a matter of selecting the bow tie, moving it to it's own layer. Using free transform to rotate it into the position you desire. Then filling in the shirt with primarily the Clone Stamp tool and possibly the Brush Tool. You can also "borrow" by making selections of the opposite collar, flipping it, an positioning it. Don't forget about shading!
This one is somewhat difficult. Once you remove the existing bow tie, you need to rebuild what's behind it. There are three separate sections to rebuild: the jacket lapel, the shirt collar and the shirt placket. You'll need to use the Pen Tool to create precise paths for masking and fitting all these pieces together.
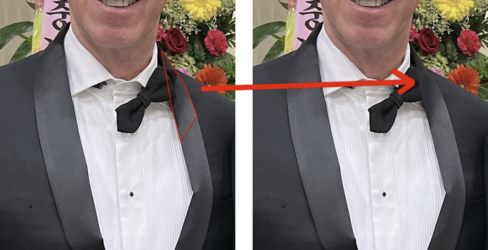
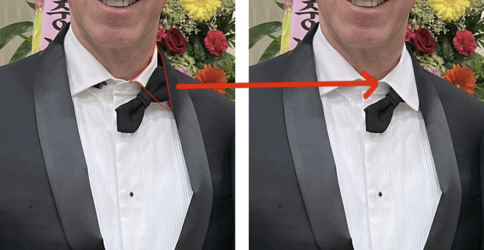
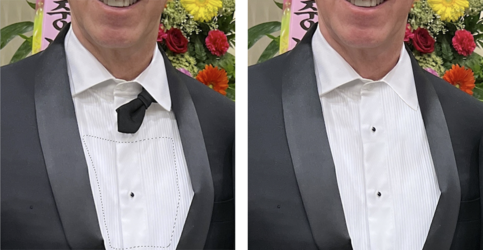

- Start with the lapel.
- Create and save a Pen path like below (on the left, outlined in red for visibility).
- Make a selection from that path and then use the clone stamp to copy the color gradations and texture of the left lapel onto the right lapel to cover-up the crooked bow tie.
- The corrected lapel needs to be darker than the one on the left, so add a Levels adjustment to darken your repair and blend it with the existing shadows.

- Next, replace the collar.
- Create another Pen path as shown below (outlined in red).
- Copy the good collar on the left onto a new layer and flip it horizontally.
- Position it into place as best you can and then use Edit>Transform>Warp to bend it into the correct angle and perspective.
- Use the two Pen paths you've already created to cleanly erase or mask away any excess collar, leaving something like this:

- Next, replace the shirt placket.
- Make a rough selection of the shirt, like below (left).
- Copy it to a new layer and position it as best you can to cover up the bow tie while keeping the shirt patterns as aligned as possible.
- Mask away any excess that you don't need. Use the existing Pen paths you've made as an aid to precise masking.
- Like this:

- Now fix the bow tie.
- Use the Pen tool to create a clean, sharp path around the existing (crooked) bow tie.
- Make a selection from that path and copy the bow tie to a new layer.
- Rotate the tie to straighten it and then move it into position.
- Add a drop shadow below the tie to mimic the shadows that you see in the original image.
- Here's the final repair. Hopefully, you can use some of these corrections to copy & paste into the several other images you have. If the angle and perspective are similar enough to this one, you may not need to start from the beginning for all the subsequent images.

- Messages
- 23,929
- Likes
- 13,676
Just a comparison between techniques.
Original collar.
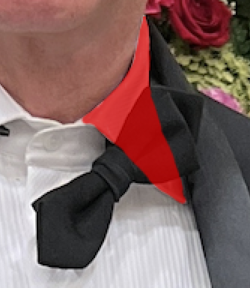
Rich's technique. Exactly as I would have proposed!
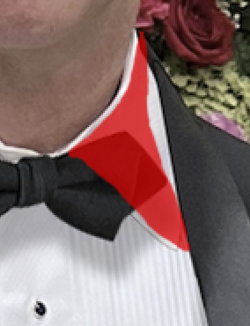
Babine's Generative fill. The collar is not natural and consistent with the original. I AM NOT criticizing Babine's technique! The repair is acceptable if the OP has trouble working with Rich's tecnique! I'm just making an observation of the differences between the techniques!
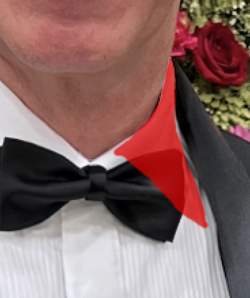
Original collar.

Rich's technique. Exactly as I would have proposed!

Babine's Generative fill. The collar is not natural and consistent with the original. I AM NOT criticizing Babine's technique! The repair is acceptable if the OP has trouble working with Rich's tecnique! I'm just making an observation of the differences between the techniques!

Just a comparison between techniques.
Original collar.
View attachment 143896
Rich's technique. Exactly as I would have proposed!
View attachment 143897
Babine's Generative fill. The collar is not natural and consistent with the original. I AM NOT criticizing Babine's technique! The repair is acceptable if the OP has trouble working with Rich's tecnique! I'm just making an observation of the differences between the techniques!
View attachment 143898
Good point Sam. If I would have taken a bit more time, I would have copied the lapel on his right side, flipped it horizontally and warped it into position.


