Photoshop Gurus Forum
Welcome to Photoshop Gurus forum. Register a free account today to become a member! It's completely free. Once signed in, you'll enjoy an ad-free experience and be able to participate on this site by adding your own topics and posts, as well as connect with other members through your own private inbox!
Rotating gradient with CS6
- Thread starter Kayeselle
- Start date
- Messages
- 23,924
- Likes
- 13,676
Hello and welcome to the forum.
You can do something like this using Free Transform and warp then arc.
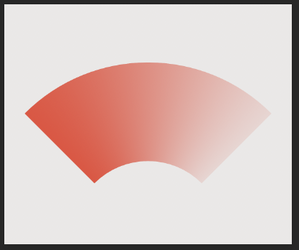
And a variation of the gradient above by making selections and cropping.
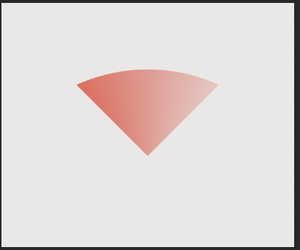
Is this what you had in mind? If so, let me Know and I will walk you through the simple process.
Edit: Or maybe something like this using a Polar Coordinates filter?

You can do something like this using Free Transform and warp then arc.

And a variation of the gradient above by making selections and cropping.

Is this what you had in mind? If so, let me Know and I will walk you through the simple process.
Edit: Or maybe something like this using a Polar Coordinates filter?

- Messages
- 23,924
- Likes
- 13,676
Sure.so if you could walk me through that it would be good.
Open a Ps document to the size you desire. I used a 1200px x 1000px document.
Make your first layer a background layer. I used a Solid Color Fill Adjustment layer. You can set the color to what ever you like, I used a light grey color.
On a new layer, create a selection slightly wider than high. I used the Rectangular Marquis Tool for this.
Choose your Gradient Tool, select your Foreground to Transparent preset, set your foreground color to your color of choice.
Create the gradient from left to right while holding down the shift key. You can do this over and over until you get it the way you want it. Just back step using Cmd/Cntrl + Z.
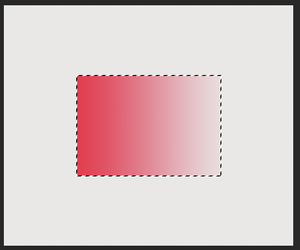
When you have the gradient where you like it, hit Cmd/Cntrl + D to deselect.
Next hit Cmd/Cntrl + T to enter Free Transform. Right click and choose "Warp"....
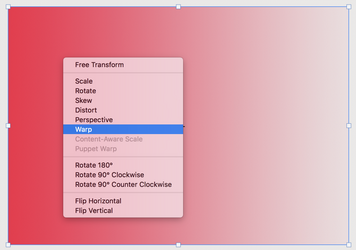
At the top left hand side of the Tools Options bar, choose "Arc".
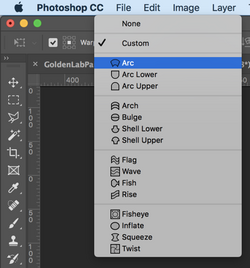
Hit enter to accept the state change.
Should now look like this....
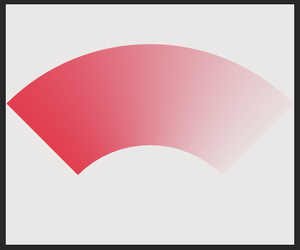
At this point you can use free transform to size it down if you wish.
Go to "View" > New Guide > enter 600px or half the distance of your documents width.
This placec a guide in the middle of your document thereby dividing your arched gradient in two.
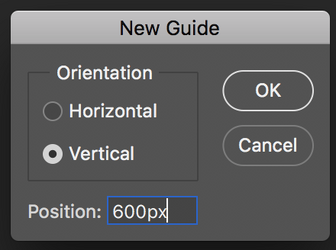
Then pull a guide to the top center of the gradient, and another to the bottom center.
Like this.....
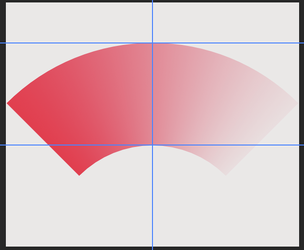
More to come!
- Messages
- 23,924
- Likes
- 13,676
OK, I really searched for an easy way to do this, but this technique seems to be the simplest. There are a few steps involved.
Choose your Rectangle Tool (Not the Rectangular Marquee Tool!)
On a new layer, create a rectangle by clicking once and holding on the upper center guidelines, start dragging, then add in and hold down the shift key and the Opt/Alt key at the same time. Drag until the rectangle is even with the lower horizontal guideline.
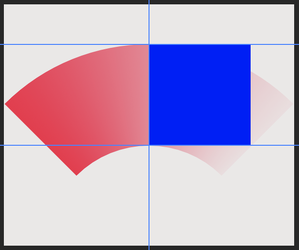
On a new layer, you can repeat the same process on the left or you can duplicate the first rectangle using Cmd/Cntrl + J , and then use the Move Tool to position it to the left.
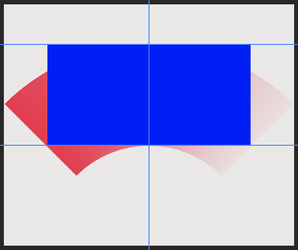
Next, you need to select the Direct Selection Tool.

Select the right side rectangle layer.
ON the canvas, click once on the right side rectangle. This will add a path with anchor points. Place the cursor on the lower right anchor point, right click and choose "Delete Anchor Point".
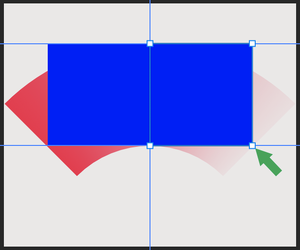
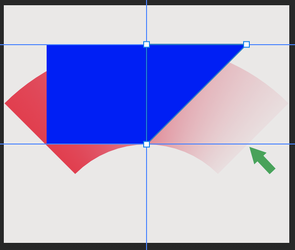
Repeat for the left side rectangle.
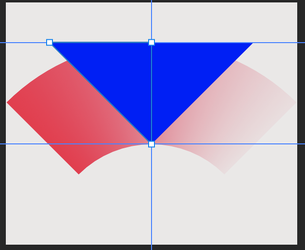
Almost there! LOL!
Turn off the two new triangle layers.
Select/Highlight the Gradient Arc layer.
Hold down the Cmd/Cntrl key, place your mouse cursor over the the right triangle layers thumbnail and click once.
This will make a selection of the right triangle........
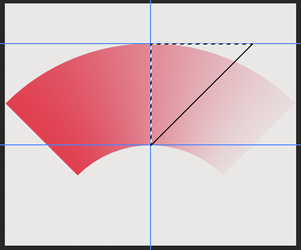
Now hold down the shift key and the Cmd/Cntrl key, place your mouse cursor over the the left triangle layers thumbnail and click once.
This will add the left side triangles selection to the rights.
Note: Only the new larger triangle is selected!
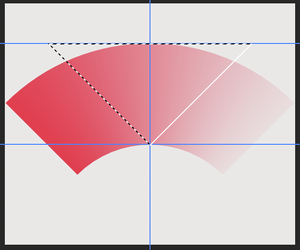
Now hold down the shift key and the Cmd/Cntrl key, then hit I (Inverse)
Note: Now the selection is around the larger triangle and the outside of the document.....
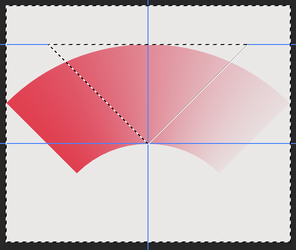
Now hit the delete key! Then Cmd/Cntrl + D to deselect. DONE!
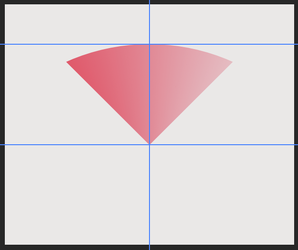
You can clear the guides by going to View > Clear Guides
Choose your Rectangle Tool (Not the Rectangular Marquee Tool!)
On a new layer, create a rectangle by clicking once and holding on the upper center guidelines, start dragging, then add in and hold down the shift key and the Opt/Alt key at the same time. Drag until the rectangle is even with the lower horizontal guideline.

On a new layer, you can repeat the same process on the left or you can duplicate the first rectangle using Cmd/Cntrl + J , and then use the Move Tool to position it to the left.

Next, you need to select the Direct Selection Tool.

Select the right side rectangle layer.
ON the canvas, click once on the right side rectangle. This will add a path with anchor points. Place the cursor on the lower right anchor point, right click and choose "Delete Anchor Point".


Repeat for the left side rectangle.

Almost there! LOL!
Turn off the two new triangle layers.
Select/Highlight the Gradient Arc layer.
Hold down the Cmd/Cntrl key, place your mouse cursor over the the right triangle layers thumbnail and click once.
This will make a selection of the right triangle........

Now hold down the shift key and the Cmd/Cntrl key, place your mouse cursor over the the left triangle layers thumbnail and click once.
This will add the left side triangles selection to the rights.
Note: Only the new larger triangle is selected!

Now hold down the shift key and the Cmd/Cntrl key, then hit I (Inverse)
Note: Now the selection is around the larger triangle and the outside of the document.....

Now hit the delete key! Then Cmd/Cntrl + D to deselect. DONE!

You can clear the guides by going to View > Clear Guides
thebestcpu
Guru
- Messages
- 3,255
- Likes
- 2,998
Here is another approach yet also a bit fiddly and its using a Gradient Overlay Layer Style
Start with your object in which you want a gradient surrounded by transparent pixels.
Add a pure white layer above it and make it a clipping mask:
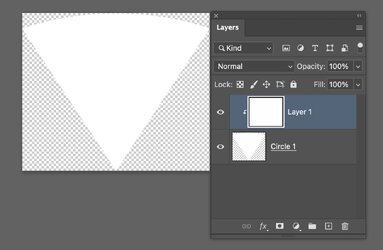
Turn on Layer Styles, chose Gradient Overlay and set the type of gradient to Angle. When you start it may not have the right gradient colors or position yet that is pretty easy to fix. In this example note that the gradient starts in the wrong center point.
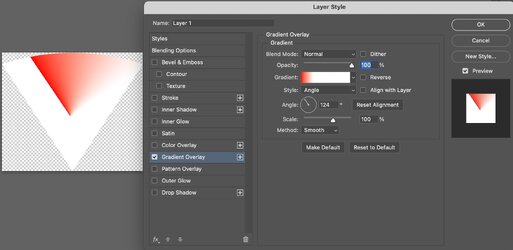
To move it, you just click in the image window (anywhere) and then click and drag the gradient until the center point is where you want it (at the tip at the bottom):
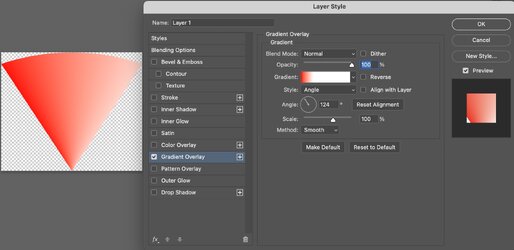
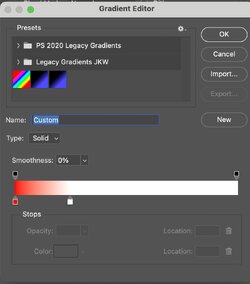
To get the colors you want you click on the gradient and it opens the gradient editor where you choose the colors and position of the colors. For short sweeps you want it crunched to the left side (or right side if you reverse the gradient):
To adjust the starting point of the gradient you change the "Angle" number to line the start point with the edge on the left of this object.
Then iterate with the gradient editor to fine tune in the gradient beginning color and ending color you desire.
The one thing that I think is a bug is once in a while I cannot drag the center of the gradient to where I want. If I close the Layer Styles panel and reopen, then it allows me to move the position of the center of the gradient.
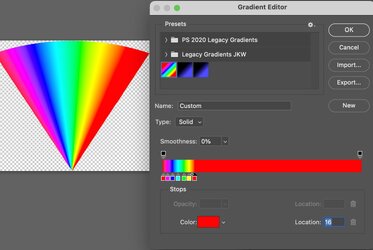
What's nice about this is if you have the same shape and want a different gradient, you can copy the two Layers and just change the Layer style. Here is where I made it a rainbow gradient using the settings in the gradient editor as such:
One other nice feature of this. If you are using the Layer Style panel for anything else, when you reopen it, it starts right where you left off which is nice if you want to use that as a starting point for your next gradient.
This approach does take getting used to so it's not necessarily easier at first, yet pretty powerful
Just another approach to consider
John Wheeler
Start with your object in which you want a gradient surrounded by transparent pixels.
Add a pure white layer above it and make it a clipping mask:

Turn on Layer Styles, chose Gradient Overlay and set the type of gradient to Angle. When you start it may not have the right gradient colors or position yet that is pretty easy to fix. In this example note that the gradient starts in the wrong center point.

To move it, you just click in the image window (anywhere) and then click and drag the gradient until the center point is where you want it (at the tip at the bottom):

To get the colors you want you click on the gradient and it opens the gradient editor where you choose the colors and position of the colors. For short sweeps you want it crunched to the left side (or right side if you reverse the gradient):

To adjust the starting point of the gradient you change the "Angle" number to line the start point with the edge on the left of this object.
Then iterate with the gradient editor to fine tune in the gradient beginning color and ending color you desire.
The one thing that I think is a bug is once in a while I cannot drag the center of the gradient to where I want. If I close the Layer Styles panel and reopen, then it allows me to move the position of the center of the gradient.
What's nice about this is if you have the same shape and want a different gradient, you can copy the two Layers and just change the Layer style. Here is where I made it a rainbow gradient using the settings in the gradient editor as such:

One other nice feature of this. If you are using the Layer Style panel for anything else, when you reopen it, it starts right where you left off which is nice if you want to use that as a starting point for your next gradient.
This approach does take getting used to so it's not necessarily easier at first, yet pretty powerful
Just another approach to consider
John Wheeler
Thanks for your patient effort with this limited user.
As I began to work through your careful instructions I noticed one drawback in the out come which was relatively minor and my design might have absorbed : the colour along the straight edges varies slightly from the top to the bottom as the section that is cut out is at a different angle to the change in colour gradient.
However, a more critical problem for me is that I need to dictate exactly the start colour and exactly the finish colour which I couldn't figure how to do with your process.
The good news is that your description of the process gave me an idea I thought might solve both those problems and so far almost has done.
I produced a rectangular gradient so I could choose exact start and finish colours. I selected the whole rectangle and under transform and distort I pulled the two ends together to make a right-angle which I had drawn on another layer. That gave me the consistent and defined colour that I need on the straight edges and turned the gradient into the quadrant sweep I was looking for.
A slight quirk is that it has produced a black line over the green and sporadic black pixels down the other two edges which I will either crop off or paint over.
Thanks again for your time and inspiration.
Two direct messages sent to you.Thanks for your patient effort with this limited user.
Ooooh!Here is another approach yet also a bit fiddly and its using a Gradient Overlay Layer Style
Start with your object in which you want a gradient surrounded by transparent pixels.
Add a pure white layer above it and make it a clipping mask:
View attachment 151590
Turn on Layer Styles, chose Gradient Overlay and set the type of gradient to Angle. When you start it may not have the right gradient colors or position yet that is pretty easy to fix. In this example note that the gradient starts in the wrong center point.
View attachment 151591
To move it, you just click in the image window (anywhere) and then click and drag the gradient until the center point is where you want it (at the tip at the bottom):
View attachment 151592
To get the colors you want you click on the gradient and it opens the gradient editor where you choose the colors and position of the colors. For short sweeps you want it crunched to the left side (or right side if you reverse the gradient):
View attachment 151593
To adjust the starting point of the gradient you change the "Angle" number to line the start point with the edge on the left of this object.
Then iterate with the gradient editor to fine tune in the gradient beginning color and ending color you desire.
The one thing that I think is a bug is once in a while I cannot drag the center of the gradient to where I want. If I close the Layer Styles panel and reopen, then it allows me to move the position of the center of the gradient.
What's nice about this is if you have the same shape and want a different gradient, you can copy the two Layers and just change the Layer style. Here is where I made it a rainbow gradient using the settings in the gradient editor as such:
View attachment 151594
One other nice feature of this. If you are using the Layer Style panel for anything else, when you reopen it, it starts right where you left off which is nice if you want to use that as a starting point for your next gradient.
This approach does take getting used to so it's not necessarily easier at first, yet pretty powerful
Just another approach to consider
John Wheeler
Your post came in while I was replying to the previous.
I'll take a look through that too thanks John.
Between you I'll get a bit more educated.
Thanks for your patient effort with this limited user.OK, I really searched for an easy way to do this, but this technique seems to be the simplest. There are a few steps involved.
Choose your Rectangle Tool (Not the Rectangular Marquee Tool!)
On a new layer, create a rectangle by clicking once and holding on the upper center guidelines, start dragging, then add in and hold down the shift key and the Opt/Alt key at the same time. Drag until the rectangle is even with the lower horizontal guideline.
View attachment 151496
On a new layer, you can repeat the same process on the left or you can duplicate the first rectangle using Cmd/Cntrl + J , and then use the Move Tool to position it to the left.
View attachment 151497
Next, you need to select the Direct Selection Tool.
View attachment 151498
Select the right side rectangle layer.
ON the canvas, click once on the right side rectangle. This will add a path with anchor points. Place the cursor on the lower right anchor point, right click and choose "Delete Anchor Point".
View attachment 151499
View attachment 151500
Repeat for the left side rectangle.
View attachment 151501
Almost there! LOL!
Turn off the two new triangle layers.
Select/Highlight the Gradient Arc layer.
Hold down the Cmd/Cntrl key, place your mouse cursor over the the right triangle layers thumbnail and click once.
This will make a selection of the right triangle........
View attachment 151502
Now hold down the shift key and the Cmd/Cntrl key, place your mouse cursor over the the left triangle layers thumbnail and click once.
This will add the left side triangles selection to the rights.
Note: Only the new larger triangle is selected!
View attachment 151503
Now hold down the shift key and the Cmd/Cntrl key, then hit I (Inverse)
Note: Now the selection is around the larger triangle and the outside of the document.....
View attachment 151504
Now hit the delete key! Then Cmd/Cntrl + D to deselect. DONE!
View attachment 151505
You can clear the guides by going to View > Clear Guides
As I began to work through your careful instructions I noticed one drawback in the out come which was relatively minor and my design might have absorbed : the colour along the straight edges varies slightly from the top to the bottom as the section that is cut out is at a different angle to the change in colour gradient.
However, a more critical problem for me is that I need to dictate exactly the start colour and exactly the finish colour which I couldn't figure how to do with your process.
The good news is that your description of the process gave me an idea I thought might solve both those problems and so far almost has done.
I produced a rectangular gradient so I could choose exact start and finish colours. I selected the whole rectangle and under transform and distort I pulled the two ends together to make a right-angle which I had drawn on another layer. That gave me the consistent and defined colour that I need on the straight edges and turned the gradient into the quadrant sweep I was looking for.
A slight quirk is that it has produced a black line over the green and sporadic black pixels down the other two edges which I will either crop off or paint over.
Thanks again for your time and inspiration.
Thanks for your patient effort with this limited user.
As I began to work through your careful instructions I noticed one drawback in the out come which was relatively minor and my design might have absorbed : the colour along the straight edges varies slightly from the top to the bottom as the section that is cut out is at a different angle to the change in colour gradient.
However, a more critical problem for me is that I need to dictate exactly the start colour and exactly the finish colour which I couldn't figure how to do with your process.
The good news is that your description of the process gave me an idea I thought might solve both those problems and so far almost has done.
I produced a rectangular gradient so I could choose exact start and finish colours. I selected the whole rectangle and under transform and distort I pulled the two ends together to make a right-angle which I had drawn on another layer. That gave me the consistent and defined colour that I need on the straight edges and turned the gradient into the quadrant sweep I was looking for.
A slight quirk is that it has produced a black line over the green and sporadic black pixels down the other two edges which I will either crop off or paint over.
Thanks again for your time and inspiration.

OK . Thanks all. Apols to IAMSAM and others that I can't even reply to posts in the right place. I think SAMs idea inspired me towards the method I'll use for now {as above) and the others will give me learning info to discover functions I've never used before. So thanks all again.
