What's new
Photoshop Gurus Forum

Welcome to Photoshop Gurus forum. Register a free account today to become a member! It's completely free. Once signed in, you'll enjoy an ad-free experience and be able to participate on this site by adding your own topics and posts, as well as connect with other members through your own private inbox!

Very old image (around 1920) unable to improve


TheDentist40

Member
Messages
6
Likes
0
Hi all,

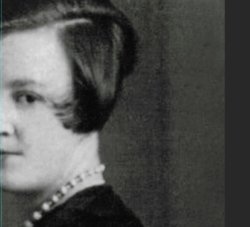
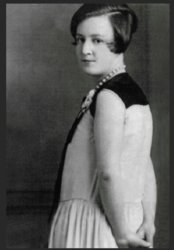
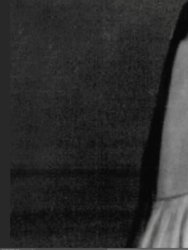
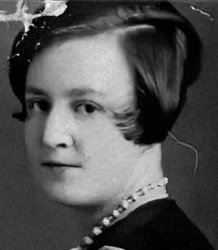
I was hoping someone might me able to help me here! I have a scan (1200 dpi) of an old photo from around the 1920s era. I've been able to get out rips and creases and such but I'm trying to 'sharpen' the image up a little and try and make the awful background a bit less "harsh". There's an awful lot of speckling and noise in the background of the picture and there isn't much definition to the subject's face. I've tried to adjust this with a Dust & Scratches filter but all this seems to do is make the whole image go blurry and out of focus. I have seen examples of images like this that other people have done and they have made them look almost like they were taken yesterday. I just wondered if anybody might be able to give me a few tips on how I could improve the overall quality of this image and others like it (I have a boxful!)?

I have included the main image but resized it and lowered the resolution. I've also included some snips of the areas that I mean.

Many thanks in advance guys, I do appreciate it.
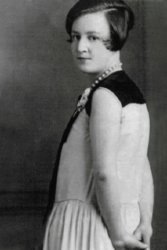
mm.jpg

ps1.JPG

ps2.JPG

ps3.JPG
 
Hi TheDentist40

The images you provided give some idea of what you are asking yet they are highly compressed JPEG images with significant associated JPEG anomalies. As an example, your main image is 1200x1800 which for an 8 bit depth RGB image would be ~6.5 MB yet the file is only 151 KB in size or a ~43x compression.

It would be best to post a portion of the original image without resizing and/or the full image in scanned resolution through a file sharing site (e.g. DropBox or many others)

So one question I have in advance of you posting better images is: When you made the high resolution scan, did you save in a file format that has no compression or lossless compression?

If you saved the high resolution image in JPEG, it would be best to rescan and save in a format such as TIFF or PNG-24. Ideally the scan should be in 16 bti mode instead of 8 bit mode yet that is less critical when scanning prints.

Just a suggestion
John Wheeler
 
Hi John,

Thank you for your reply, I really appreciate you taking the time to help!

I uploaded the main image onto here at a reduced size, really just being mindful of bandwidth. I scanned the original image as a "Save as JPEG" at a resolution of 1200 dpi with image settings of 24 bit RGB Color (default settings on my HP software - the scanner is a HP Envy 5540). The dimensions of the finished image are 4830x7473 with a file size of 9.83Mb. I have included a link to the untouched, unedited file here:


I simply opened that file with PS, reoriented and cropped it, duplicated the background layer and began editing the rips/creases out using the spot healing brush and clone stamp.

I have been using the standard HP driver/scanning software but it doesn't seem to have all that many options. I've included a couple of screen snips of it below in case you're not familiar with HP software. As you can see, the "everyday scan" option allows TIF to be selected as the output image format from the menu...Is this what I should be scanning to, then editing the TIF directly in PS as normal?

Many thanks for all your help!

Tom

hp1.JPG

hp2.JPG
 
Hi Tom
First let me say that the restoration work you did with the initial image is very good. That's not easy getting rid of rips, tears, and missing pieces.

In general, the first step is to get the best possible scan to begin with. After than, there are options for sharpening or fooling the eye into thinking that it is sharper such as contrast and localized contrast (the clarity slider in the Camera Raw Filter in PS).

Also, backgrounds can be masked and replaced or blurred so that is not a big problem.

For non background areas there are a multitude of approaches that people use and maybe forum members will jump in and provide additional thoughts. One of the keys is to sharpen the areas that are of most important and leave alone (or even soften) the areas that are not. On the face the eyes, eyebrows, nose and mouth are most important followed by ears and higher contrast areas of the image (boundaries). By selectively sharpening those the human eye will get the impression all of the image is sharp.

What I will focus on is the issue with JPEG. The scanner software you are using does not support TIFF and I believe only saves in JPEG. JPEG is not a bad format in general if it is not overly compressed. The smaller file size comes from removing data from the image in a way that least bothers the eye relative to the compression. Typically the color is compresses the most (eyes color resolution is acutally pretty low) and compress the luminosity the least. Also, JPEG does more compression in the very right areas and very dark areas which the eye will notice less. If you have large areas that are of similar color or luminosity the data is stripped out of those as well.

The issue ends up being if you post process a JPEG in the ways I mention. the artifacts in JPEG can rasie their ugly head and make improvements much more difficult. It is much better to start and edit a format the has no compression or lossless compression.

I don't know for sure if you printer/scanner is compatible with the approaches I will mention below yet it is worth a try because these other approaches do support TIFF

For Mac systems you can use the built in application Image Capture.

Hints from your supplied images suggest you are on a Windows System. If you are in Windows 10, there are a couple free pieces of software that are available.

Fax and Scan is a quick and dirty utility under accessories that allow you to scan and most printers.
However, I suggest downloading the application from the Microsoft Store the app "Microsoft Scan" A better user interface and should get the job done.

There are also other applications out there that are more capable for a price yet not sure that is needed for you project. You can google the info and instructions on how to use those apps yet my understanding is that they both support TIFF (maybe PNG too) which do not have the lossy issues.

Now for some details to motivate moving away form JPEG format for images with which you will be doing post processing.

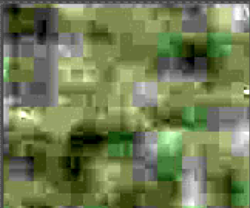
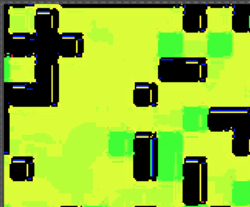
Just to show you how JPEG hides the data loss, I took your original image and really turned up the contrast in the background area and did a screen shot with the PS rulers in place.
As you can see, the information is very boxy and with detailed pixel information actually far and few between. Note that the boxes are 8s8 pixel blocks. So for some of this area you 1600 dpi scan is more like 200 dpi scan:

Some of the block areas are even larger than 8x8 pixels

Screen Shot 2020-02-25 at 4.32.54 PM.png

Less critical is how the color information is stored (even more compressed). Scanning in color is good especially if you are doing any color repairs. However, JPEG format blocks up colors even more since the eye cannot see color resolution well. Here is a Hue map of the exact same area that I should before:

Screen Shot 2020-02-25 at 4.35.49 PM.png

Given all the work you have already done with this image, I would not suggest going back and starting over, yet use TIFF or PNG format for future scans.
Hope this extra info is helpful (maybe even enlightening).
John Wheeler
 
Hi John,

Thank you for the words of encouragement! I really appreciate your patient explanations of how these things work! It's something of an eye opener but fascinating to see how these things work at an individual pixel level.

I have just bought a program that allows me to scan into TIF format - I figured that it was worth the small investment because I do have quite a few of these old family pics to repair and I want to do the best job possible on them, and I am actually finding it quite therapeutic to work on them! I have re-scanned the image at 1200dpi and saved it to TIF with compression turned off, and the image size is now 458mb! I'm guessing that this should remove some of the "blocky" compression and data loss caused by saving to JPEG?

I've included a link to the new TIF file here, just in case you wanted to see it (although like I say, it's pretty big!):


I notice that you mentioned about masking / blurring the background - could you possibly explain a little further about this? I'm guessing that would be using the quick selection tool to select only the background areas, then applying something like a Gaussian blur just to soften it to get rid of the 'textured' appearance? With sharpening the face, would that just be selecting the facial area and applying something under the Filter>Sharpen menu?

Many thanks John!

Tom
 
Last edited:
Hi Tom
I also have a big stack of pictures (and negatives from early 1900s) that I scan and restore. I too find it quite therapeutic and goes hand in hand with some genealogy work I do.

I don't have as much time until this evening and others may jump in on your additional questions. I will add some thoughts this evening as well.

As far as file size, here are some considerations that I have used in scanning old images

1) I usually want to scan just once since it is a PITA amount of time. So for negatives (which have more tonal depth) I scan in 16 bit and as default I do the same for pictures (though 8 bit is often enough for pictures as they don't have as much tonal depth)

2) As far as what resolution to scan at, I think it terms of the smallest area of an image (i.e. an image may be cropped when restoring) and what is the largest image I will ever print. An 8 x 10 image only needs 300 ppi or 2400 x 3000 pixels and when viewing at 12 inches you really don't need more (they eye cannot resolve more then that). Your resolution if not cropped would allow for a print that is 15 x 24 inches. So you could possible save on file size with considerations #1 and #2

3) Another sometimes huge factor is how the image is saved. TIFF save options in PS offers several lossless (non-destructive) options for saving. The best would be to use the ZIP option for the whole file and for Layers. If all you have is one Layer, you can save without Layers and it is even less. Your 480 MB 16 bit depth file when saved without Layers and using the ZIP options is only 24MB in size. Saving with Layers (even though there is only 1 Layer is around 66 MB in size. Still a huge savings (and this is still with 16 bit depth)

So just a few ideas on how to manage TIFF files

One more consideration. When postings on this site has many posts and one main person answering such as myself. Other forum members may not jump in or your original questions could lost. If you are not getting multiple people answering your post, it may be worthwhile to start a new post with specific questions such as how to handle the background or just the sharpening of the image. You might get more responses that way if other forum members don't jump in at this point.

Hope this helps
John Wheeler
 
Hi Tom
Yes, the ideas you had for masking the background and softening is a good direction. I would suggest doing it in a way that is non-destructive to the original pixels such as duplicating the image, soften the whole image on the bottom Layer and then using a Layer Mask on the upper image to have the blurred background show through.

A whole different direction to explore which I use a lot is converting the original Layer into a Smart Object and using the Camera Raw Filter (Under Filters). This provides a whole new interface with many options and sliders to make adjustments. You can also use selective tools such as the spot removal brush for repairs and the adjustment brush to select areas to apply the wide range of settings.

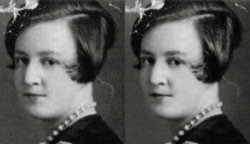
I did a quick example below where the left image is the original and I used the Camera Raw Filter to:
A) Some tonal adjustments over the entire image
B) Sharpening and clarity over the eyes, eyebrows, nostirls and mouth with the adjustment brush
C) A separate use of the adjustment brush to soften the face (reduce texture)
D) Another separate use of the adjustment brush to soften the background area.

The changes are subtle yet I believe makes a real difference in the feeling for the image. Note that perfection in the pixels is never the goal, in my opinion it is the feeling you impart to the viewer. Given these are images are ancestors and part of the family, just having any picture is already a great starting point and the most important part is to remove distractors and maybe some enhancements. If the image looked to perfect or razor sharp, note that the focus for the viewer could shift from thoughts about the ancestor to thoughts on how you made an old image look like it was taken with modern equipment. That may not be where you want the viewer to go.

Again, to get more feedback from forum members, I suggest posting targeted questions for ideas on approaches you could explore taking for different areas that you wish help. The more specific the better in my mind.

Hope this helps and best of wishes to the grand project ahead of you
John Wheeler

EC-(TIF)-adj.jpg

The advantage of using soft filters and these tools such as the brushes is that at any time you can go back and change the sliders and/or the areas selected for the adjustments. The pixels are never changed with this filter, The Camera Raw Filter is basically the same engine used in Adobe Lightroom.

Hope this gets you some
 
Hi John,

Many thanks for taking the time to do this and for all your help! I haven't used the camera RAW software before but it is definitely something that I will use now! There is a definite improvement between the two images there! Is the Adjustment brush only in RAW/Lightroom? It just seems to me to be an infinitely better way to more selectively "target" specific areas of an image?

You have been a great help John and have given me a lot of tips for me to further read up on :)

Many thanks again,

Tom
 
Hi Tom
Doing non destructive edits in PS can be done without Smart Objects and filters applied to that Smart Object just as when you build a house, it can be done without power tools.

However, Smart Objects with most any filter or filters in the Filter dropdown is a pretty powerful tool to consider.

To get you going, I suggest you watch this video which is a brief introduction. From there, you could seek more detailed tutorials about specific filters or features within any of the Filters. Its a whole new world to explore when you take this path and I use it often. Enjoy the ride: https://helpx.adobe.com/photoshop/how-to/camera-raw-filter.html

John Wheeler
 

Back
Top