What's new
Photoshop Gurus Forum

Welcome to Photoshop Gurus forum. Register a free account today to become a member! It's completely free. Once signed in, you'll enjoy an ad-free experience and be able to participate on this site by adding your own topics and posts, as well as connect with other members through your own private inbox!

Colour replacement tool


NDG2911

Member
Messages
11
Likes
0
Is there a way to replace colour and luminosity at the same time with the colour replacement brush?

I'm replacing black with an orange. At the moment I'm using the colour replacement tool to change the luminosity first, then going over again with the colour.

Thanks
 
Hi @NDG2911

I may not understand your workflow enough to give a good answer, yet based on my interpretation of what you are trying to do, there may be another approach, as the color replacement tool has its limitations.

First, if you are trying to change both the color (hue and saturation) and the luminosity, then that is a total replacement with an alternate total color from the color picker.
If my interpretation of what you desire to do is correct, here is another approach.
1) Create a selection of the desired total color you want to change selectively.
2) Use the regular brush or pen tool to paint over areas limited by the selection.

If this is not what you desire, maybe you could provide a more detailed explanation, preferably with a sample before-and-after image.
Just a suggestion
John W/heeler
 
So I'm using it to clean stray pixels

for example, I just want to replace the colour of the black pixels with the nearest colour. so I just take my colour replacement brush and select which colour I want to replace. however because it is black I need to change the luminosity first then the colour.

I know I could select colour range then fill. but I don't want to replace all the black in the image. and using the fill bucket will not fill solid it has a soft edge.
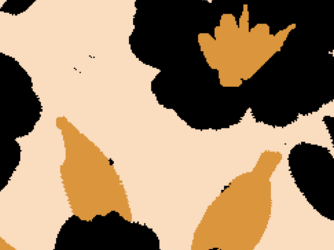
1710516030129.png
 
Hi @NDG2911
I may have a productive alternate approach for you.
Using the pencil tool (with all appropriate settings to make it a hard edge per your needs), hold down the Option key (Alt Key on Windows machines), and it temporarily converts to the eyedropper tool.
With the eye dropper tool set to point sample, you click on the Option key and hold, sample the color you want in the image, and then release the option key and use the Pencil tool to paint over the undesired pixels.
I hope that works for you.
John Wheeler
 
Thanks John

I have been trying that, buts its a very long process. as you can imagine cleaning a file which is 60x60cm down to the pixel is a lot.

I was using a photoshop plugin called NEDgraphics. it had the colour replacement tool , but it would only replace the colour selected and not touch anything larger than a certain group of pixels. so I could brush over the image easily without affecting the main part of my design.

I was wondering if there was a way to achieve this in photoshop. but I'm guessing not. If I could combine the colour and luminosity into one brush that would make things a lot easier, but still not perfect.
 
Hi @NDG2911

First, I don't know how you can duplicate all the functions of the color replacement tool and have it fully replace the luminosity and color (basically painting with a nearby color). Also, the color replacement tool is known to not work well with blacks or darks.

Since that functionality is not in Photoshop, Can you more explicitly define what a "straggler" for your projects is and what is not a "straggler?" There may be ways to do this mostly automatically yet it would have to be clear what needs to be done manually (e.g. brushing) vs just having photoshop automate.

I am sure what you are doing is very clear in your mind; that is just hard to translate by word. If all you wanted to do were remove the few black pixels in that one common background color, that would be pretty straightforward, but I bet it is more complicated than that.

I think a more complete understanding of what you need will keep forum members from providing partial answers (which I have already done from not understanding the whole picture)

John Wheeler
 
I think a more complete understanding of what you need will keep forum members from providing partial answers (which I have already done from not understanding the whole picture)

John Wheeler
Agreed yet again.
 
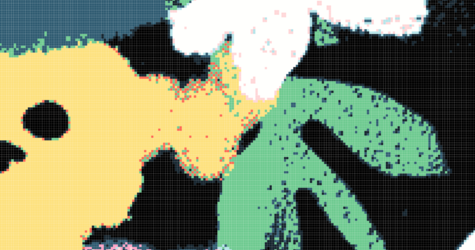
Sorry. I'll try to explain better. So sometime when I'm indexing an image down to 12 or less colours it can create these stray pixels that appear in parts of the design which they aren't intended to be. I would like to be able to brush over these pixels and replace them. So on the yellow part of the image the red and green pixels shouldn't be there. Previously I would use a program called NEDgraphics. It has a tool which I pick the colour I want to replace and then pick the colour I want to replace it with. I would then brush over the portion of the image effected and it would replace the colour without effecting the design as a whole. this way I didn't have to be too precise I could do it very quickly without concentrating on individual pixels. There was also setting that so that it wouldn't effect any group of pixels larger than a certain size. it was just efficient in that way. I was just wondering if there was a similar work around. The colour replacement tool works well. but as I said it the colour is black and I'm replacing it with a lighter colour. i have to use the brush with luminosity first ten again with colour.

1710852498760.png
 
HI @NDG2911
Thanks for the additional explanation.

I am not sure if I can help. The approaches I considered were based on the straggling pixels being actual pixels. In both your initial image and the image in your last post, the square straggling colors are blocks of a multi-pixel size. Your first image had 4x4 or 4x5 pixels; in your previous image, the "square blocks" were 9x10 pixels.

Is that what you are doing for your workflow, or are the images you are providing not the exact file on which you are working but rather a blown-up version? If the latter is the case, can you give the file you are using so that alternatives can be tested?

I am just confused. In your most recent image, not only are the blocks 9x10 pixels in size, but they also include a grid. This would complicate or at least limit the options for a solution.

Following is an expanded version of your image (with no Photoshop grid)
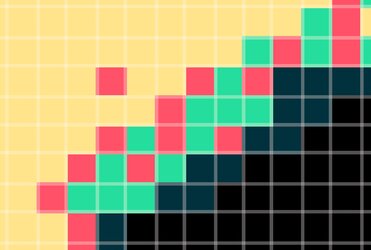
Screenshot 2024-03-19 at 12.38.24 PM.jpg

And here is one with the Photoshop pixel grid turned on.
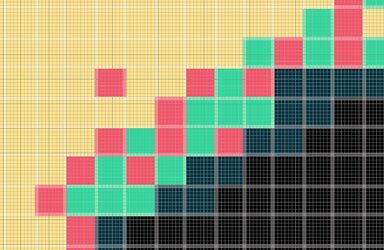
Screenshot 2024-03-19 at 1.00.19 PM.jpg

If your workflow involves a single pixel for each square block, would you please provide that file? That is what would be needed to test out alternative solutions.
This is just a suggestion. I am not trying to make this more complicated; I am just trying to find a solution for your workflow.
John Wheeler
 
Hi

Yes sorry I was zoomed in to the individual pixels.

Mod edit: Link not working. Please post image if possible, thanks.
 
Hi @NDG2911
I have one additional request. For the example starting image on which you use the color replacement tool, could you complete a color replacement using that tool and post the end result as well?
It would also be helpful to know your settings for the Color Replacement Took in the Options Tools Bar (e.g., how sampled, the tolerance, etc.
You have found this tool to be productive for you, yet I have not. For example, when the tolerance is set high, it replaces a wide range of colors yet is also prone to changing colors near boundaries with colors one wants to keep. So, I could spend a lot of time on boundaries when sometimes pixels are selected that I did not want to be selected for replacement. With too low a tolerance setting, it won't pick up pixels that I do want to have picked up.
Most tutorials I have seen on this tool often mention better approaches.
I thought having a completed image, and the tool settings you are using could shed some light on my difficulties with the tool.
Thanks
John Wheeler
 

Back
Top