What's new
Photoshop Gurus Forum

Welcome to Photoshop Gurus forum. Register a free account today to become a member! It's completely free. Once signed in, you'll enjoy an ad-free experience and be able to participate on this site by adding your own topics and posts, as well as connect with other members through your own private inbox!

Enhancing the 3 dimensionality of a product shot (eg, jeans)


JayJSully

New Member
Messages
1
Likes
0
Hi Forum,


I am quite new to the photoshop scene. I have just purchased Adobe Photoshop CS6, and have been experimenting for about 2 months.


I am quite keen to get some experience and help.


I would really like to develop my photoshop skills in taking photographs of clothing items and making them look professional and eye-catching with photoshop.


My friend actually owns a small clothing boutique and is thinking of going online in the future so I would like to help out. I doubt he will use my pictures just more of a hobby for myself.


I have uploaded a photograph which I took Photo A.

PHOTO A.jpeg

As you can see it looks quite flat and there is much not character, depth and texture to the photo.


I would like it to look like this photograph I found from the Internet Photo B.
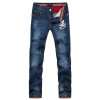

PHOTO B.jpg

As you can see, this picture of the jean clothing has texture, creases folds and depth really something eye-catching about it.


With the power of photoshop I would like to make Photo A look like Photo B.


For instance is there anyway to transfer the colour of the jean in photo A and paste it on the texture of photo B.


I hope you can help any input would be greatly appreciated,


Kind regards,

Jay
 
Hi Jay -

Welcome to PSG.

A couple of thoughts:

1. A "challenge" thread usually means that the OP (original poster) wants other people to try their hand at something and see who is "the winner". On the other hand, it seems very clear that you own a copy of PS and want to learn how to make such improvements yourself. In other words, you are looking for advice, not a contest. Accordingly, I made the title of this thread more descriptive. This will help people in the future who may come along looking for information like this.

2. The simplest, fastest, most economical, and highest visual quality solution to the problem of bringing out the texture and three dimensionality of a product shot like this is to take the picture correctly in the first place, NOT trying to fix an inferior quality image after the fact in software. Yes, you can sorta-kinda do what you are asking in PS, but in my experience, unless you are *very* experienced with PS and lighting, AND have a lot of time to spend on the project, faking it in PS will never be as good as simply getting a good starting photo.

The primary cause of the flatness in your photo is the lighting. It looks like you just laid the product on the floor and took whatever lighting was present instead of taking an active role by modifying the lighting to get the effect you want. Specifically, your lighting was too omnidirectional and hence there are essentially no shadows.

Using either artificial lights, or modifying the existing lighting through the use of "flags" (pieces of dark fabric) to block existing light from hitting the product from certain directions, you could easily improve the 3 dimensionality of this product without even moving it. While using your own lights would be the preferred method, if you don't have lights yet, for example, you could put a large piece of black cloth on a frame about 2-3 feet above the jeans, and centered on them. You would shoot through a hole or gap in this cloth. This simple change would mean that the jeans would be illuminated only by light just grazing the surface of the jeans, with very little hitting it from straight on. By optimizing the size and height of this flag, this would increase the three dimensionality tremendously.

The other big advantage of working this way is that once the lighting is set up, you can rapidly take photo after photo using the same setup instead of wasting your time trying to tweak each one individually in PS. This is the way commercial product photographers work.

3. OTOH, if you had some rare / valuable subject that could not possibly be re-shot, and really need to improve it in PP (post production), I'm sure people will come along and describe some of the methods that can be used.

Cheers,

Tom M
 
Last edited:
Yes lighting is very important for any picture but if you play around with the colors
and contrast in PS you may not find what exactly you're looking for but you will be able
to make any image look better than it is. And a big part dulling this image is the wood floor
behind it. If you put it on a solid background the pants will look much better already. I messed
around with you're image for a few minutes I couldn't bring out the detail like you asked but
I did bring out the pants a bit. If you need any help editing you're pics in PS dont hesitate to
ask as I am learning PS myself right now & would love to work on images for people as practice.

Pants.jpg
 
Tom said:
The simplest, fastest, most economical, and highest visual quality solution to the problem of bringing out the texture and three dimensionality of a product shot like this is to take the picture correctly in the first place, NOT trying to fix an inferior quality image after the fact in software. Yes, you can sorta-kinda do what you are asking in PS, but in my experience, unless you are *very* experienced with PS and lighting, AND have a lot of time to spend on the project, faking it in PS will never be as good as simply getting a good starting photo.
Very, very true.

If your really serious about a dimensional effect, you need to check into 'ghost mannequin effect'.

Take a look at this video:

Then take a look at some of these tutorials: https://www.youtube.com/results?search_query=Photoshop+invisible+man+
 
Last edited:
All i did with the flat and uninspiring image was ran the dodge and burn tools across the dark and light tones within the jeans creases then did a quick HDR pass just to boost colours and give it a bit more of an edge, the original image really needs more creases in it to start with - ironed jeans and the look you are after don't really go.

dbhdr.jpg
 
90% of this tweaked version was nothing more than ACR adjustments, with the final 10% coming from an application of Topaz Adjust.

That being said, good lighting would produce a much better effect and would also be much better suited to producing relatively large numbers of images at the least cost and expenditure of time.

Tom M
PHOTO_A-tjm01-acr-ps02a_sRGB_16bpc-698px_hi-01.jpg
 
Last edited:

Back
Top