What's new
Photoshop Gurus Forum

Welcome to Photoshop Gurus forum. Register a free account today to become a member! It's completely free. Once signed in, you'll enjoy an ad-free experience and be able to participate on this site by adding your own topics and posts, as well as connect with other members through your own private inbox!

Retouch Skin retouching


Getrude

Banned
Messages
2
Likes
0
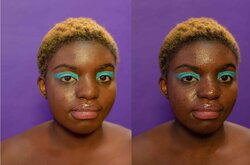
Hello guys am a new member to the forum, started photoshop a couple of weeks ago and still learning some skills. I got a photo from Monstera and tried to retouch it and add some contrast.. Any feedback and criticism will be greatly appreciated. Right is original photo.

BEFOREAFTER.jpg
 
Hi, welcome to the forum.

Just to be clear, I believe you're saying that the "Before" image is the darker one on the right. Your contrast adjustment ("After") is the lighter image on the left. Correct?

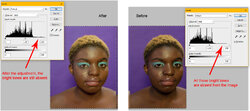
To some degree, brightness and contrast adjustments are a matter of personal taste. Since you are new to Photoshop, I wonder if you're familiar with how to read the histogram graph for the image. For example, when you open a Levels adjustment, it provides a histogram. I opened a Levels adjustment separately for each half of the Before & After (screen shot below). For either one, if you look where the red arrow is pointing it shows that the image lacks a substantial portion of the tonal scale for bright colors (approaching pure white). The histogram is suggesting that this image can still be brightened substantially—providing even more contrast—before the whites start to "blow out".

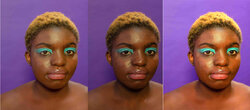
In my version down below (see the third image on the far right), I adjusted the white slider of the Levels adjustment to bring the brightest areas of the image much closer to pure white. The image now has the full range of luminosity from black to white. To me, this image now "pops" and is more pleasing. As I said, these things are a matter of personal taste. But I want to make sure that you're aware of what the histogram shows and what your options are.

Untitled-1.jpg


Skin Retouch New.jpg
 
I understand you're at the beginning of your learning curve and you've come to a good place to learn and see what can be done with the program. Fair warning - I'm no maven on color but there are a couple of things that stood out to me.

Problem is I'm not sure which is the BEFORE and which is the AFTER. But I focused on the darker version since Before and After is read left to right.

One comment I would make is the image is fairly dark and should be brightened. You can do that with curves. Here's a video from a series that can provide you some insights:


Once brightened, I would start repairing some of the blemishes on the skin and follow that up with some softening of the skin without destroying the texture. Here's a tutorial to give you some insight:


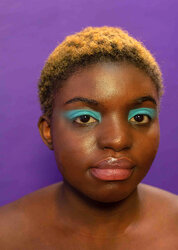
This is some of the above that I applied to the image on the right:

AFTER edited.jpg

The tutorial I mentioned above on curves is also part of a 30 Days of Photoshop by Aaron Nace of PHlearn. Great instructor - you view the series here:


Some incredible creatives and artists on this site. Stay in touch, show your work, and maybe try some edits on the posts. Good luck and best wishes on the journey!

- Jeff
 

Back
Top