What's new
Photoshop Gurus Forum

Welcome to Photoshop Gurus forum. Register a free account today to become a member! It's completely free. Once signed in, you'll enjoy an ad-free experience and be able to participate on this site by adding your own topics and posts, as well as connect with other members through your own private inbox!

How to Create Load Selection Layers


knowoneuno

Well-Known Member
Messages
111
Likes
11
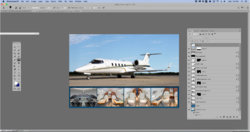
For a lack of a better term, I have a "template" that a retouching service made for me and I understand how to use it. It has about eight layers, and each layer has a gray and a black background, and when I want to load a specific photo in each layer, I can go to that layer, such as one that is titled, "Far Left Image" and then I go to the selection part of Photoshop and then go down to "load selection" and then I get the marching ants around that specific layer. I then go to the photo I want to "drop" into that layer, copy it, and then go back and "paste into" that specific layer.

My retouching service made me a new one, BUT, it doesn't have those gray and black layers. Can someone please teach me how to do that? I googled it, but I truly don't know if I am "googling" the correct term for what I am trying to create.

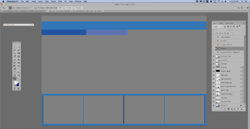
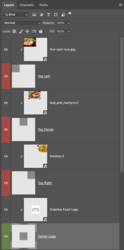
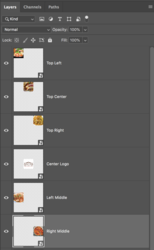
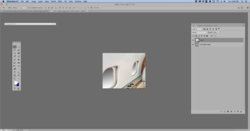
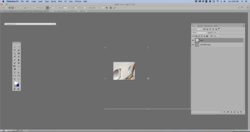
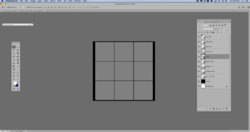
Enclosed is a screen shot of the template, along with the layers of my template that I use all the time (Screen shot 2), along with the new template, that is missing the gray and black parts.....(Screen shot 1)

I hope you can understand my question.

Thanks in advance!
Screen shot 1.jpg

Screen shot 2.jpg
 

IamSam

Administrator
Staff member
Administrator
Messages
22,744
Likes
13,267
For a lack of a better term, I have a "template" that a retouching service made for me and I understand how to use it. It has about eight layers, and each layer has a gray and a black background, and when I want to load a specific photo in each layer, I can go to that layer, such as one that is titled, "Far Left Image" and then I go to the selection part of Photoshop and then go down to "load selection" and then I get the marching ants around that specific layer. I then go to the photo I want to "drop" into that layer, copy it, and then go back and "paste into" that specific layer.
If you are referring to the top example screenshot, there are 11 layers not 8. There are 9 grey square layers on a black background layer. The white background layer is on but not visible because the black background layer is on. What you describe is one way of adding images to the template grid but it's not even close to being the best way. In doing it this way, none of the images within the "grey square" boundaries are editable. This is not good!

Two better ways of doing this would be to use clipping masks or smart objects. Either of these ways are COMPLETELY editable.

Clipping mask method.
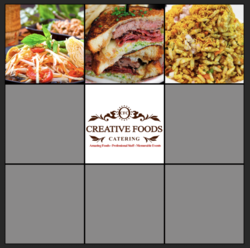
Grid......
Screen Shot 2019-05-24 at 10.04.42 PM.png

Layers panel (half) showing grid squares and clipping masked images (which are SO's).
Every image is quickly editable!!!!
Screen Shot 2019-05-24 at 10.04.53 PM.png


Smart Object method.
With smart objects, you just double click the layer thumbnail and open the PSB. Drag and drop the image, edit/adjust, save the PSB and the image is added or subsequently edited (if needed) to the main grid template PSD file. You can add text, effects, filters, blur, etc. or whatever else you desire.
It's completely editable.
Screen Shot 2019-05-24 at 10.20.40 PM.png

Screen Shot 2019-05-24 at 10.20.54 PM.png

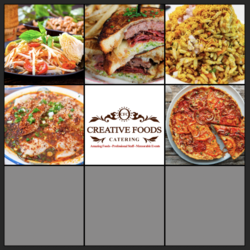
You can even add two images to one square if you like! Only takes a few seconds. If you don't like it........double click and edit!
Screen Shot 2019-05-24 at 10.56.50 PM.png
 

IamSam

Administrator
Staff member
Administrator
Messages
22,744
Likes
13,267
I'm not at all sure what your wanting for the bottom image example. Perhaps it would be best if you contacted the retouching service who created it and have them adjust it to your liking.
 

knowoneuno

Well-Known Member
Messages
111
Likes
11
If you are referring to the top example screenshot, there are 11 layers not 8. There are 9 grey square layers on a black background layer. The white background layer is on but not visible because the black background layer is on. What you describe is one way of adding images to the template grid but it's not even close to being the best way. In doing it this way, none of the images within the "grey square" boundaries are editable. This is not good!

Two better ways of doing this would be to use clipping masks or smart objects. Either of these ways are COMPLETELY editable.

Clipping mask method.
Grid......
View attachment 98882

Layers panel (half) showing grid squares and clipping masked images (which are SO's).
Every image is quickly editable!!!!
View attachment 98883


Smart Object method.
With smart objects, you just double click the layer thumbnail and open the PSB. Drag and drop the image, edit/adjust, save the PSB and the image is added or subsequently edited (if needed) to the main grid template PSD file. You can add text, effects, filters, blur, etc. or whatever else you desire.
It's completely editable.
View attachment 98885

View attachment 98886

You can even add two images to one square if you like! Only takes a few seconds. If you don't like it........double click and edit!
View attachment 98887
Thanks for your help with this.

I said the first example has "about" 8 layers, but I should have written, it has 9 boxes (layers?) in terms of where I can add/delete images for the template. The retouching service sent me the new one, and it doesn't have the options that the bottom template does. That is the one I am very familiar with using and was trying to "replicate" the multiple layers (the gray/black portions) with the new template my retouching service sent me.

With that being said, I greatly appreciate your help with these two new options and am trying to learn more about the two new options.

Can you please explain why it is a good idea for each method you've shown me to be editable? I don't understand that. In my old way of doing it, if I didn't like the photo I actually dropped into each specific cell (layer), I'd just go back to the layers palette and deleted that layer and start over again with a new image in that layer.

Also you mention PSB, I have no idea what PSB is, so can you please explain that?

Finally, with the two new options you offer that are a better way of doing what I am trying to accomplish, how do you even begin to start making a new template like this?

I always appreciate your help with my questions and thank you for taking the time to assist me.
 

IamSam

Administrator
Staff member
Administrator
Messages
22,744
Likes
13,267
Can you please explain why it is a good idea for each method you've shown me to be editable? I don't understand that.
What is editable? Well..........you can replace the image, you can resize (free transform) the image, you can re-position the image within the square/cell, you can add effects to the image, you can add adjustment layers to the image to darken or lighten, add color overlay, etc,. Basically anything you can do to an image is what we would call "editable" and can be done quickly and easily without having to go back to the original image because the images are contained within the PSD file.

Whereas using your way, if you want to (edit) add an effect to one of your images in a cell, you have to delete the non editable image from your PSD, go to another file source to to get the original, open the original, edit the image, then add it back to the PSD.

Also you mention PSB, I have no idea what PSB is, so can you please explain that?
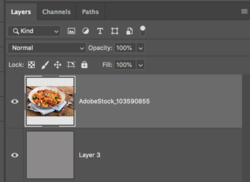
A PSB is a file extension of a smart object layer. The extension will open when you double click a smart object. We are using this for our grey squares/cells.

When we double click a cell a PSB is opened.
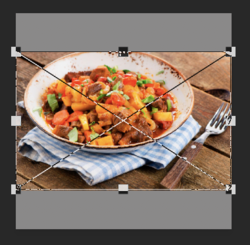
When you add (drag and drop) an image into the PSB, you can adjust it to fit and make any edits you desire.
Screen Shot 2019-05-25 at 8.19.08 AM.png

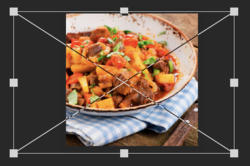
Fit to the cell.
Screen Shot 2019-05-25 at 8.18.47 AM.png
Screen Shot 2019-05-25 at 8.23.59 AM.png

Save the PSB.
The PSD is updated......
Screen Shot 2019-05-25 at 8.20.22 AM.png

OOOPs..........let's say I don't like the position and I want the image to be lighter!
Double click the SO.........the PSB opens..........edit...........save state changes.....done!
Took less than 30 seconds!
Screen Shot 2019-05-25 at 8.37.47 AM.png


how do you even begin to start making a new template like this?
This is very easy and Ps 101. I'm not going to make a tutorial for this in this thread.
Plan your layout. Create a background. Decide the dimensions of the cell grid. Divide the grid with guidelines. Create one cell. Duplicate and move cells into position. Convert all cells into smart objects. Add images or graphics.
 

knowoneuno

Well-Known Member
Messages
111
Likes
11
What is editable? Well..........you can replace the image, you can resize (free transform) the image, you can re-position the image within the square/cell, you can add effects to the image, you can add adjustment layers to the image to darken or lighten, add color overlay, etc,. Basically anything you can do to an image is what we would call "editable" and can be done quickly and easily without having to go back to the original image because the images are contained within the PSD file.

Whereas using your way, if you want to (edit) add an effect to one of your images in a cell, you have to delete the non editable image from your PSD, go to another file source to to get the original, open the original, edit the image, then add it back to the PSD.


A PSB is a file extension of a smart object layer. The extension will open when you double click a smart object. We are using this for our grey squares/cells.

When we double click a cell a PSB is opened.
When you add (drag and drop) an image into the PSB, you can adjust it to fit and make any edits you desire.
View attachment 98906

Fit to the cell.
View attachment 98907
View attachment 98909

Save the PSB.
The PSD is updated......
View attachment 98910

OOOPs..........let's say I don't like the position and I want the image to be lighter!
Double click the SO.........the PSB opens..........edit...........save state changes.....done!
Took less than 30 seconds!
View attachment 98911


This is very easy and Ps 101. I'm not going to make a tutorial for this in this thread.
Plan your layout. Create a background. Decide the dimensions of the cell grid. Divide the grid with guidelines. Create one cell. Duplicate and move cells into position. Convert all cells into smart objects. Add images or graphics.
Thanks for explaining why I'd want to edit a cell the way you explained.

I will disagree with you about this being very easy and PS 101. I'm not near the PS level expert you are, but I'll take your steps you wrote out at the end and try it.

Thank you!
 

IamSam

Administrator
Staff member
Administrator
Messages
22,744
Likes
13,267
Thanks for explaining why I'd want to edit a cell the way you explained.
Sure.......your welcome.

I will disagree with you about this being very easy and PS 101.
OK

You never did explain (in better detail) what it was that you were wanting for your second (bottom) example. If all you want is to add a black BG,
just go to IMAGE > CANVAS SIZE > increase the canvas to the desired dimensions. Then create a new layer on the bottom of the layer stack, fill with black.
 

knowoneuno

Well-Known Member
Messages
111
Likes
11
Sure.......your welcome.


OK

You never did explain (in better detail) what it was that you were wanting for your second (bottom) example. If all you want is to add a black BG,
just go to IMAGE > CANVAS SIZE > increase the canvas to the desired dimensions. Then create a new layer on the bottom of the layer stack, fill with black.

I'm sorry!

What I was trying to say was this. I'd like the first example, the one that you showed me how to manage better, to match the second example, in terms of the gray layer, the black layer, etc...
I am VERY happy with the second example, the template works fine for me.....I was just trying to see if there was any way possible, to add those "additional" layers to the first example, that are already in the second example.

Does that make sense now? I didn't want to change anything in the second example. I wanted the first example to have all the different layers the second one did......

But from what you are telling me, the new way you showed me, is a better option.

You've never led me wrong.

:)
 

IamSam

Administrator
Staff member
Administrator
Messages
22,744
Likes
13,267
OK...........in the top example image, there is already a black layer and grey cells. Where would a grey layer go?

The bottom example image has a black layer, which is turned on, but it's obscured by the grey layer on top of it except for one tiny strip at the bottom between the grey and the blue. The grey cells have strokes added around them.

So again, I'm not at all sure what you're asking for.
 

IamSam

Administrator
Staff member
Administrator
Messages
22,744
Likes
13,267
The top example image is in a completely different configuration and I'm not sure how you want to apply the layers from the bottom example image to the top.

Your best bet would be to exactly describe how you want the top example image to look when completed.
 

knowoneuno

Well-Known Member
Messages
111
Likes
11
The top example image is in a completely different configuration and I'm not sure how you want to apply the layers from the bottom example image to the top.

Your best bet would be to exactly describe how you want the top example image to look when completed.

I would like the top example to look exactly like the bottom example, where it has, for example, "right image" in a gray box, and then "right image black" below it, in a black box.

I'll be honest with you, that was how my retouching folks set it up for me, and that is all I know how to do, in terms of using this template. I simply click on the "right image" gray box, and then go to Select and then hit "load selection", then I go copy the image I want, then go back to the second template and hit "paste into" and then I have that specific box (layer?) filled in with a photo.

I was just trying to see if there was any way to add the "black layer" below each of the "gray layers" in the first template example that I had posted, so it will "match" the second template" and then I could understand how to use it.
 

IamSam

Administrator
Staff member
Administrator
Messages
22,744
Likes
13,267
in terms of using this template. I simply click on the "right image" gray box, and then go to Select and then hit "load selection", then I go copy the image I want, then go back to the second template and hit "paste into" and then I have that specific box (layer?) filled in with a photo.
And this does not work for your first image example when you choose a cell to add an image?

When you say, "click on the right image grey box", do you mean a layer or layers thumbnail in the layers panel or on the canvas itself?

Please provide an example screenshot of the bottom template in use (with images).............leave out the text.
 

IamSam

Administrator
Staff member
Administrator
Messages
22,744
Likes
13,267
Can you answer these?
And this does not work for your first image example when you choose a cell to add an image?

When you say, "click on the right image grey box", do you mean a layer or layers thumbnail in the layers panel or on the canvas itself?
 

IamSam

Administrator
Staff member
Administrator
Messages
22,744
Likes
13,267
I don't understand the left image black............left middle image black..........top black BG....what are the black layers for?????

OK. Let's try this.

I know that this is not exactly the same but I want you to try it out. This is so simple and completely editable.

Open the PSD
In the layers panel, choose the left image layer.
Double click on it's thumbnail............this will open a PSB extension file.
Drag and drop.........don't copy and paste...........just drag and drop one of your aircraft interior images onto the grey square.
The transform box will already be present, resize to fit if needed and then hit the check mark or click return/enter.
Close the PSB extension file and save.

Now repeat for all other image cells. Remember, if you don't like the position, double click and adjust, save.
You can also edit the color of blue area by double clicking layer thumbnail.
 

Attachments

  • AdvertisingTemplate_01.psd
    5.9 MB · Views: 3

knowoneuno

Well-Known Member
Messages
111
Likes
11
I believe I did all you told me to do, yet when I went into each PSB extension, I had to "free transform" them, as I didn't see the transform box once I went and dragged the image.
Here are shots.

Also, I don't know what the black layers are for. A long time ago, a friend of mine set that template up for me, for another project, and then I asked my retouching folks to replicate it. I just know that each layer has a black layer and a gray layer, and that is how I've done my templates for quite some time.

Sceen-4PM.jpg

Screen-2.jpg

AdvertisingTemplate_Completed.jpg
 

IamSam

Administrator
Staff member
Administrator
Messages
22,744
Likes
13,267
Much easier RIGHT?

Also, I don't know what the black layers are for. A long time ago, a friend of mine set that template up for me, for another project, and then I asked my retouching folks to replicate it. I just know that each layer has a black layer and a gray layer, and that is how I've done my templates for quite some time.
There's no need for doing things the hard way with redundant black layers that are not doing anything or adding the images the way you have been doing it. You can easily convert your old templates or make your own template mockups using the modern and up to date editable smart objects.

You can upload them and I will bring them into the modern era for you! LOL!!
 

knowoneuno

Well-Known Member
Messages
111
Likes
11
Much easier RIGHT?


There's no need for doing things the hard way with redundant black layers that are not doing anything or adding the images the way you have been doing it. You can easily convert your old templates or make your own template mockups using the modern and up to date editable smart objects.

You can upload them and I will bring them into the modern era for you! LOL!!

So how would I convert an old template into the new and improved, modern era one?

Thank you!
 

IamSam

Administrator
Staff member
Administrator
Messages
22,744
Likes
13,267
So how would I convert an old template into the new and improved, modern era one?
By removing all non-relevant layers and converting the grey image layer/cells into smart objects. Just like we have been talking about and just like the example PSD file I posted in #15. After you convert, use "save as" so you preserve the original just in case.
 

Top